Local Render Mode

Access: Open this function from one of the following locations:
-
Select View > Render Mode > Local Render Mode Dialog from the menu bar.
-
Select one of the following Local Render Mode dropdown buttons from the Visibility Floating Toolbar
 :
:


 .
The last used render mode button is displayed.
.
The last used render mode button is displayed.
|
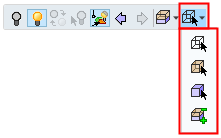
To select a preset Local Render mode, select one of the following highlighted buttons: |
To define varying degrees of visibility using the Transparency slider, select the Local Render Mode Dialog button (highlighted below): |
|
|
|
Open the Local Render Mode Dialog and set the transparency for selected objects and faces.
The following local render modes may be applied.
|
|
Local Wireframe |
|
|
Local Transparent (50%) |
|
|
Local Shade |
|
|
Local Render Mode Dialog |
If you invokedinvoked this function from the menu, the Render Mode & Transparency dialog is immediately displayed. This dialog enables you to define the level of transparency for faces and objects.
If you accessed this function from the toolbar , the dialog is displayed if you select the Local Render Mode Dialog button ![]() in the dropdown listdropdown list.
in the dropdown listdropdown list.
|
|
|
Notes:
-
Transparency settings for faces and objects can be saved as part of the file. When the file is re-loaded, the faces and objects are displayed with the previously set transparency settings.
-
When a Local Render Mode has been defined, the Global Render Mode status is changed to Mixed.
-
You can change the visible and hidden edges in Wireframe mode, enabling you to identify the colors more easily when the specific colors are unclear.
Interaction
To select a default render mode for specific faces or objects
To define varying degrees of visibility using the Transparency slider
|
Demo: Press the button below to view a short movie demonstrating the function: |
|
|

To select a default render mode for specific faces or objects:
-
Pick the faces or objects whose render modes are to be changed.
-
Select the appropriate Local RenderLocal Render mode
 .
.One of the following Local Render mode icons will appear on the top row of the toolbar:
. If you cannot see these icons, press the Toolbar Options button  on the top row of the toolbar to display the Local Render mode button, together with other buttons.
Either press the Local Render mode button to apply the currently displayed render state to the selected entities:
Or press the Dropdown Options button to display additional Local Render options and then select the appropriate render state button:
|
|
|
Notes:
-
The currently displayed state of the local render mode button is applied to the selected entities
-
If a face or object was not preselected prior to running this function, the toggling (or selecting) will have no effect.
-
A default render mode can also be selected from the Render Mode & Transparency dialog.
To define varying degrees of visibility using the Transparency slider:
-
Pick the faces or objects whose render modes are to be changed.
-
Either select the following menu command: Edit > Render & Transparency.
Or select the appropriate buttonappropriate button from the toolbar. To display the appropriate button in the toolbar:
One of the following Local Render mode icons will appear on the top row of the toolbar: ![]()
![]()
![]() . If you cannot see these icons, press the Toolbar Options button on the top row of the toolbar to display the Local Render mode button, together with other buttons.
. If you cannot see these icons, press the Toolbar Options button on the top row of the toolbar to display the Local Render mode button, together with other buttons.
-
-
Press the Dropdown Options
button next to the Local Render mode button to display additional Local Render options. -
Select the Local Render Mode Dialog button
:
-
The Render Mode & Transparency dialog is displayed. This dialog enables you to define the level of transparency for faces and objects.
![]()
-
Either select one of the predefined buttons to change the level of transparency (this also changes the local render mode button displayed in the toolbar when you exit the dialog):
|
|
Wireframe |
|
|
Transparent Control |
|
|
Shade |
Or manually define the transparency level by using the slider.
Moving the slider to the left (towards the Wireframe button), increases the percentage of transparency. Moving the slider to the right (towards the Shade button), decreases the percentage of transparency (more opaque).
-
Press the Exit button
 to leave the function. The level of transparency defined for the faces/objects, remains after you have exited this function.
Examples of Local Render Mode and Transparency settings
-
Pick the required faces (or objects).
![]()
-
Either select the render mode . . .
|
Render Mode |
Button |
Examples |
|
Wireframe |
|
|
|
Transparent 50% |
|
|
|
Shade |
|
|
Or use the slider to select intermediate transparency levels.
![]()
![]()