Table of Holes (TOH) 
Access: Open this function from one of the following locations:
-
Click the
 button in the toolbar.
 -
Select Symbols > Tables > Table of Holes from the menu bar.
Create a Table of Holes (TOH).
A Table of Holes displays a list and description of each hole in a specific view of a part. These holes can either be entities that are defined as holes, or points and circles created in the Sketcher.
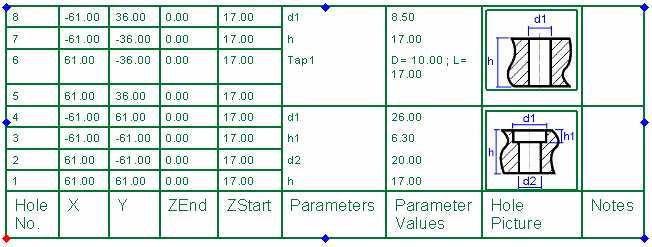
A Table of Holes is a useful means of defining the size and location of a hole or group of holes. Holes are represented as rows in the table, and dimensions and other properties of the holes (such as the Manufacturing Attributes), are represented as columns in the table.
Specifically, for each hole, the columns represent the hole number, the X and Y coordinates, the Z start and Z end coordinates, any parameters that may be attached to a hole (such as height and depth), values for these parameters, a picture representing the type of hole - for example a through hole (if the hole is defined), notes or comments, and a user type or user-defined name for a hole. For example:

Creating a Table of Holes entails:
-
Selecting the required view.
-
Picking the origin point.
-
Picking the table location.
The system then runs the hole analyzer on the selected model and creates the table of holes displaying the information mentioned above. During this process, the system automatically groups identical holes together (holes containing the same geometry, hole attributes and threads).
The Table of Holes function enables you to:
-
Produce a TOH which includes all of the holes and their dimensions, tolerance and type (screw threading).
-
Add the TOH to a drawing.
This provides you with:
-
Quick access to the TOH.
-
Better communication with other departments in your organization.
You can relocate the TOH by picking a point on the screen to define its new position (the table will jump to the picked point).
Note: When the 8 dragging points of the picture are displayed, one of them is colored red. This is the "anchor point". By default, the left-bottom corner point is the anchor point. If you pick one of the other points (or drag the symbol by one of the points), that point will be the new red anchor point.
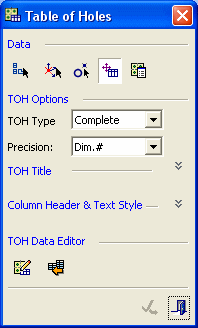
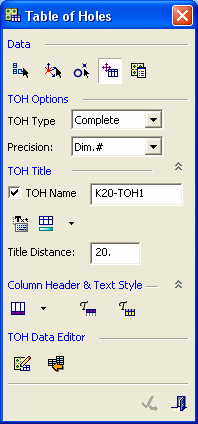
When the TOH function is invokedinvoked, the Table of Holes dialog is displayed to guide you through the table creation and editing stages. The example dialog below is displayed in collapsed (default) and expanded modes (also, all the options and buttons are displayed here as available at the same time - this is for clarity; the TOH Type dropdown option is unavailable when editing a table of holes.
|
Dialog collapsed: |
Dialog expanded: |
Sections of the dialog For more, see:
|
|
|
|


