Using Contour Labels
![]()
![]()
Access: Open this function from the following location:
Boundary/Contour selection mode:
Either press the button in the Work
Mode Dialog (if you are in Wizard
Mode), or display the Geometry
parameters in the parameter
tables.
button in the Work
Mode Dialog (if you are in Wizard
Mode), or display the Geometry
parameters in the parameter
tables.
The Geometry Table is displayed:
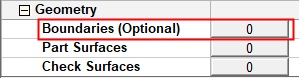

Depending on the current operation, the Boundaries or Contours option is displayed. Press the adjacent button to display the Contour Manager; you are ready to start selecting contours.
See Selecting / Unselecting Geometry.
See the cursor symbols in Cimatron when picking geometry.
The following examples show the use of NC contour labels under various scenarios:
Changing contour parameter values in the Contour Manager dialog (and the effect on the labels of previously created contours)
Changing the parameter values of previously created contours
Multiple contours, each with different parameter values
Selecting multiple contours, each with different parameter values (and the effect on the NC Parameters section of the Contour Manager dialog)
Changing the parameter values of multiple contours simultaneously
Changing the contour order number
Changing contour parameter values in the Contour Manager dialog
To create an NC contour and subsequently change the parameter values in the dialog:
-
Create an NC contour (see Picking Curves).
In this example, an NC contour is created with the contour parameters as shown.
|
|
The label
|
 indicates that:
-
Press the OK button
 (or <exit><exit>) to accept the changes and to close the Contour Manager dialog.
 -
Re-openRe-open the Contour Manager dialog and change one or more of the NC Parameters. The following occurs:
|
|
As this contour was previously created using the parameters shown above, if any of the parameters in the NC Parameters section of the Contour Manager dialog are subsequently changed (in this case the Cutter Location has been changed from On to In), the label |
 indicates that the parameter values of the specific NC contour and those currently displayed in the
 Changing the parameter values of previously created contours
To change the original parameters of the specific contour so that they are the same as those in the NC Parameters section of the Contour Manager dialog:
-
Select the required contour either by clicking the green check mark
 of the appropriate contour's label or picking the actual contour.
This displays the original parameters of the specific contour (highlighted in yellow ).
|
|
Notice that:
|
-
Edit the parameter values as required (see NC Contour Parameters):
|
|
In this case, the Cutter Location has been changed from On to In. Notice that the arrow on the contour indicates the currently selected direction. |
-
Press the OK button
(or <exit><exit>) to accept the changes and to close the Contour Manager dialog.
Multiple contours, each with different parameter values
In this example, a second contour is added to one that was created previously:
-
A second contour is created using the same contour parameters as the first contour (both the labels display an = sign).
-
When one or more of the parameters of the contour currently being defined are changed, the label of the first contour displays the ≠ sign to indicate that one or more of its parameters are not the same as those displayed in the dialog.
-
Press the OK button
(or <exit><exit>) to accept the changes and to close the Contour Manager dialog.
Selecting multiple contours, each with different parameter values
In this example, there are two NC contours. The parameters of one of them are the same as those shown in the Contour Manager dialog.
-
Select one of the contours (by clicking the left side of the appropriate label or by picking the actual contour):
|
|
The parameters of the contour are displayed in the dialog and the label and the parameters in the dialog are highlighted in yellow to indicate that they can be edited. Notice that the dialog displays that only one NC contour is selected. |
-
Select the second contour (by clicking the left side of the appropriate label or by picking the actual contour):
|
|
In this case, the parameters in the Contour Manager dialog are now highlighted in orange and the value fields are empty. This indicates:
Note: The reason why one of the labels displays an =, is simply because this NC contour was selected first and, initially (until the second contour was selected), the parameters of the first selected contour were displayed in the Contour Manager dialog and hence they were the same. |
Changing the parameter values of multiple contours simultaneously
The parameters values of multiple contours can be simultaneously changed in the following ways:
Using the Contour Manager dialog
Using the Motion Parameters table
Using the Contour Manager dialog
To edit the parameter values of multiple contours simultaneously:
-
Select the required contours (by clicking the left side of the appropriate labels or by picking the actual contours).
|
|
As shown in the example above, the parameters in the Contour Manager dialog are now highlighted in orange and the value fields are empty. This indicates:
Note: The reason why one of the labels displays an =, is simply because this NC contour was selected first and, initially (until the second contour was selected), the parameters of the first selected contour were displayed in the Contour Manager dialog and hence they were the same. |
-
Edit the required parameter in the Contour Manager dialog.
-
Press the OK button
(or <exit><exit>) to accept the changes and to close the Contour Manager dialog. -
Re-openRe-open the Contour Manager dialog and select both the contours again. The following occurs:
|
|
Both the contours are marked as selected (in the dialog). The Cutter Location parameter is highlighted in orange and the value is not displayed. This indicates that the parameter can currently be edited and that this value differs in both the selected contours. The Contour Offset parameter is highlighted in yellow and the value is displayed. This indicates that the parameter can currently be edited and that this value in both the selected contours is the same. |
Using the Motion Parameters table
If the value of an NC parameter in all the NC contours and Contour Manager main dialog is the same, it can be modified from outside the Contour Manager.
|
|
Both the contours are marked as selected (in the dialog). The Cutter Location parameter is highlighted in orange and the value is not displayed. This indicates that the parameter can currently be edited and that this value differs in both the selected contours. The Contour Offset parameter is highlighted in yellow and the value is displayed. This indicates that the parameter can currently be edited and that this value in both the selected contours is the same. Note: The reason why one of the labels displays an =, is simply because this NC contour was selected first and, initially (until the second contour was selected), the parameters of the first selected contour were displayed in the Contour Manager dialog and hence they were the same. |
To edit this common parameter from outside the Contour Manager dialog:
-
Switch to the Motion Parameters section by clicking the Motion Parameters button in the Procedure Wizard.
-
Open the Boundary Settings branch of the parameter table, as shown below.
This shows (as already seen in the Contour Manager dialog) that the Cutter Location parameter value is different for each selected contour, but that the selected contours have a common Boundary Offset parameter value, in this case 1.
Note: If the Cutter Location value in the parameter table = "Various", this means that the Cutter Location value is different for each selected contour. However, if the Cutter Location value in the parameter table ≠ "Various" (i.e. it is = On, In, etc.) this means that all the selected contours have the same Cutter Location value. In this case, you can use the Cutter Location parameter in the Boundary Settings branch of the parameter table to globally change the cutter location value for all the selected contours.
-
Edit the value of this common parameter value, in this case from 1 to 3.
-
Re-openRe-open the Contour Manager dialog and select both the contours again. The following occurs:
|
|
Both the contours are marked as selected (in the dialog). The Cutter Location parameter is highlighted in orange and the value is not displayed. This indicates that the parameter can currently be edited and that this value differs in both the selected contours. The Contour Offset parameter is highlighted in yellow and the value is displayed. This indicates that the parameter can currently be edited and that this value in both the selected contours is the same. In this case, the selected contours now have an offset of 3, defined outside the Contour Manager dialog. |
Changing the contour order number
The contour order number is automatically displayed in the contour label for procedures where the contour order number is important. It is not displayed for procedures where the order number is not required.
However, you can hide or show the contour order number as required and even change the order number of the contours.
In this example, there are 5 contours, each with a label numbered accordingly.
To change a contour order number:
-
Click the contour number to be changed (on the appropriate label) and change the number as required.
In this case, contour number 4 was changed to 2. The appropriate contours are re-numbered, as shown below:
When re-numbering, the lowest number affected by the new contour order is changed and this has a knock-on effect on subsequent numbers. Numbers that are unaffected by the re-ordering, remain unchanged.
In this case, when the 4 was changed to 2, the lowest number to be re-ordered was the old 2. The old 2 became the new 3 and the old 3 became the new 4. In this example, numbers 1 and 5 were unaffected.