Zoom, Pan, and Rotate (ZPR)

Access: Open this function from one of the following locations:
-
Select the appropriate button from the Interactive UCS controls.
-
Select the View > ZPR section from the menu bar. Select the required function.
This group of functions is used to zoom, pan, and rotate the display.
The following ZPR (Zoom, Pan and Rotate) commands are used to manipulate the position and size of the display. Any of these commands can be terminated by pressing the middle mouse button.
For more detailed information, see ZPR Operations below.
|
|
Center of Rotation |
Select the center of rotation. |
|
|
Flip View |
Rotate the view by 180 degrees along the Y axis of the display. |
|
|
Next View |
Rotate to the next view orientation. |
|
|
Pan |
Pan the model. |
|
|
Previous View |
Rotate to the previous view orientation. |
|
|
Rotate |
Rotate the model. |
|
|
Rotate by Angle |
Rotate the view by a defined angle. |
|
|
Rotate Left |
Rotate the model 90° to the left. |
|
|
Rotate Right |
Rotate the model 90° to the right. |
|
|
Rotate to Plane |
Rotate the selected plane so that it is parallel to the display. |
|
|
Zoom |
Zoom in and out. |
|
|
Zoom All |
Zoom in or out so that all entities are visible and occupy the entire display area. |
|
|
Zoom by Box |
Zoom to the defined box selection size. |
|
|
Zoom In |
Zoom in. |
|
|
Zoom Out |
Zoom out. |
|
|
Zoom Selection |
Zoom in or out to automatically center the display around the selected geometry. |
|
|
ZPR Lock |
Zoom, Pan, and Rotate as if the CTRL key is pressed down. This enables ZPR operations using only the mouse. The display of this option is controlled in the Preferences. If the Show ZPR Lock button on interactive UCS toolbar checkbox is ON, the ZPR Lock option is available. |
Notes:
-
Mouse shortcuts can also be used for some ZPR functions. The mouse is fully customizable. This means that these mouse shortcuts can be changed and other shortcuts (that only use the mouse buttons, for example) can be added.
-
Some of these operations can also be performed by the Interactive UCS and its adjacent toolbar.
-
To increase performance (speed) and/or the clarity of individual components during ZPR operations, use Auto Hide Entities During ZPR.
-
Also see the various view display options.
ZPR Operations
|
To do the following: |
Click the button |
Or go to |
Mouse Shortcuts |
Examples |
|
Zoom All: Zoom in or out so that all entities are visible and occupy the entire display area. |
|
View > ZPR > Zoom All |
|
|
|
Zoom Window: Zoom to the defined box selection size. To exit this option, press <exit><exit>. |
|
View > ZPR > Zoom by Box |
|
|
|
Zoom to Selection: Zoom in or out to automatically center the display around the selected geometry. |
|
View > ZPR > Zoom Selection |
|
|
|
Zoom In |
|
View > ZPR > Zoom In |
|
|
|
Zoom Out |
|
View > ZPR > Zoom Out |
|
|
|
Dynamic Zoom to screen center: |
|
View > ZPR > Zoom |
Ctrl + Move the mouse up to zoom in and down to zoom out. |
|
|
Dynamic Zoom to cursor position: |
|
|
Ctrl + Move the wheel forward to zoom in and backwards to zoom out. |
|
|
Dynamic Pan: |
|
View > ZPR > Pan |
Ctrl + |
|
|
Dynamic Rotate around the center of geometry: |
|
View > ZPR > Rotate |
Ctrl + |
|
|
Dynamic Rotate around a manually selected point: |
|
View > Settings > Center of Rotation |
|
|
|
Rotate by Arrow keyboard keys: |
|
Press the up or down arrow key to rotate the model around the Y axis in the direction of the arrow. Press the left or right arrow key to rotate the model around the X axis in the direction of the arrow. The rotation increment is 90 degrees. For a 15 degree increment, press the CTRL key while pressing the arrow key. The center of rotation is the last center of rotation used (either a manually defined center of rotation, or the one used in the last ZPR operation, not including zoom in/out by scrolling). |
|
|
|
Rotate to Plane: Rotate the selected plane so that it is parallel to the display. After selecting this function, you can also define a plane by using 3 points. The view will rotate to the defined plane. |
|
View > ZPR > Rotate to Plane |
|
|
|
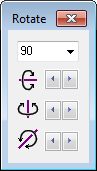
Rotate by Angle:
|
|
View > ZPR > Rotate by Angle |
|
|
|
Next View: Rotate to the next view orientation. This button is only available if you are not at the end of your view "list" (only available if you went back a view using Previous View). |
|
View > ZPR > Next View |
|
|
|
Previous View: Rotate to the previous view orientation. This button is only available if you are not at the beginning of your view "list" (only available if you change the view orientation or went forward a view using Next View). |
|
View > ZPR > Previous View |
|
Related Topics