Automatic Label of Holes (LoH)
(LoH)


Access: Open this function from one of the following locations:
-
Click the
button in the toolbar. -
Select Symbols > Automatic Symbols > Automatic Label of Holes from the menu bar.
Automatically label holes, creating labels on the view beside each hole.
Once the labels have been created, they can be edited later. Single or multiple labels can be edited and overwritten.
To automatically Label Holes:
-
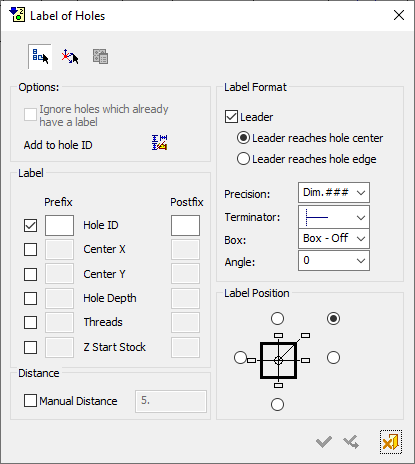
InvokeInvoke the Automatic Label of Holes function. The Label of Holes dialog is displayed, as follows:
Note: If a Table of Holes (ToH) was created previously from this view, the Origin Point will be selected automatically, according to the same UCS (since the LoH and ToH are associated).
- Click the
 Select view button and select the reference view.
 -
The system proceeds to the next step in the procedure enabling you to define the origin point. The Select the origin point button
 is selected in the Label of Holes dialog and the Select Origin Point dialog is displayed, as follows:
The Select Origin Point dialog is displayed in the Automatic Label of Holes (LoH) and Table of Holes (ToH) functions.
In the Table of Holes and Label of Holes functions, the origin point can either be defined by selecting a UCS, or the XY origin point can be picked on the view.
The Z origin can either be defined by a delta value from the Origin UCS or by selecting a reference point on a view perpendicular to the view on which the ToH or LoH are created, which is often more convenient than defining a delta.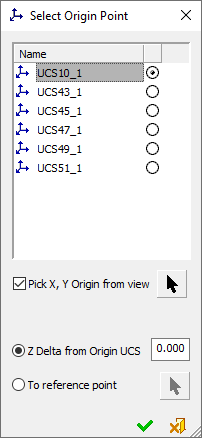
Pre-Defined UCS Origin Point:
From the Select Origin Point dialog, select the predefined UCS that represents the origin point of the LOH/TOH.
The X and Y axis orientation are defined according to X/ Y direction of the drawing sheet and the Z direction is defined by the analysis direction and view projection.User-Defined Origin Point:
In addition to selecting a predefined UCS, you can also set a user-defined origin point in the view, using the options below.
Pick X, Y Origin from view
When this checkbox is ON
 , the Pick X, Y Origin from view enables the selection of a user-defined origin point for the LoH/ToH.
click the
 button to pick the X,Y origin point on the view. The default is the selected UCS X,Y point relative to the view projection.
The Z origin can be defined (using the radio buttons below) either as a delta value or by picking a reference point.
Default = OFF
Z Delta from Origin UCS
Set the Z origin of the reference point as a delta value from the Origin UCS.
This is the default option.
Default = 0.To Reference Point
Set the Z origin of the reference point by picking a reference point on a view perpendicular to the view on which the ToH or LoH are created.
Click the
button to pick the Z origin reference point.Notes:
-
Irrespective of which method is used to select the origin point of the LoH/ToH, the selected Origin UCS is always displayed.
-
If a new point is picked after a point was selected, only the new point is displayed.
-
The user-defined point is associative and the LoH/ToH data is updated accordingly.
-
If the selected point is deleted then the LoH/ToH works with the last known value of the selected point.
From the Select Origin Point dialog, the required origin point of the Label of Holes and click
 .
. -
-
In the Options area of the Label of Holes dialog, the following options are available:
Ignore holes which already have a label
Select this checkbox to add labels only to new holes.
When this option is selected, existing labels (as well as removed labels) will not be affected. This option is grayed-out if labels have not been created for any holes (for example, the first time you access the Label of Holes dialog). This option only becomes enabled once you have already created the labels for the holes.
Add to hole ID
Press the
 button in the Options area to display the Column Chooser dialog which shows any user-defined data that can be included in the label of holes. This user-defined data consists of the contents of any user-defined column previously added to the Table of Holes (for example, User Type, Notes, etc.).
ExampleExample:
The Column Chooser dialog is displayed empty if no user-defined columns were added to the table of holes.
To be displayed in the Column Chooser dialog, the user-defined columns must be visible in the created table of holes.
Select the appropriate checkbox to add the user-defined data to the label of holes. The data can be added as a prefix and/or postfix to the label of holes.
See the button explanations below.

Select all the checkboxes (in the Prefix and Postfix columns). This will added all the available user-defined data as prefixes and postfixes in the label of holes.

Unselect all the selected checkboxes in the dialog. No user-defined data will be added to the label of holes.

Toggle the current state of the checkboxes to the opposite state; selected checkboxes are toggle to unselected, and vice versa.
Move Up /
Move DownMove a selected user-defined entry either up or down the list.
ExampleExample:
OK - Accept and execute all changes, and close the dialog.

Cancel - Reject the changes and close the dialog.
If a Table of Holes is defined with the following User Types,...
...and the Column Chooser dialog is set as follows:
...the Label of Holes may look as follows:
- From the Label area of the Label of Holes dialog, select the checkbox besides the required label information that you want to include. If required, you can add a prefix and suffix for each label parameter, by entering the information in the relevant fields, as shown below.
Note: The prefix/suffix added here will not be added to the ToH. However, local changes performed from the ToH will be presented in the ToH.
- From the Label Position area of the Label of Holes dialog, select the required position of the label, relative to the hole, as shown below:
-
From the Label Format area of the Label of Holes dialog, define the format of the label created:
Leader checkbox selected:
Leader checkbox unselected:
-
Enter the required label information, as follows:
Leader
Select the
 Leader checkbox to include a leader in the label. If the checkbox is selected, the following radio options are available:
Leader reaches hole center
The leader reaches the center of the hole.
Example:Example:
Leader reaches hole edge
The leader reaches the edge of the largest circle in the hole.
Example:Example:
Precision
From the Precision dropdown list, select the required number of digits to include after the decimal point, when displaying the label information.
Terminator
From the Terminator dropdown list select the required line, or arrow format leading to the label. The default terminator is configured in Preferences Editor>Drafting>General>Terminator>Arrow Types:
Note: This option is dimmed if the Leader checkbox is unselected.
Box
From the Box dropdown list, select the required option, as follows:

Select the required option, as follows:
Box - Off
Select this option if you do not want a box to be displayed for the label (Default).
Box - On
Select this option to displayed a box for the label.
Underline
Select this option to display to underline the label.
Angle
From the Angle dropdown list, select the required angle to display, as follows:

-
From the Distance area of the Label of Holes dialog, select the Manual Distance checkbox and define the distance of the label, manually (in mm/inch, depending on the predefined units).
Note: To maintain the default distance, unselect this checkbox.
-
Click
OK to save the label format and complete the function.In the example below, Hole IDs are displayed as per the selected options in the dialog: