Contour Manager (NC) > NC Parameters
![]()
![]()
Access: Open this function from the following location:
Boundary/Contour selection mode:
Either press the button in the Work
Mode Dialog (if you are in Wizard
Mode), or display the Geometry
parameters in the parameter
tables.
button in the Work
Mode Dialog (if you are in Wizard
Mode), or display the Geometry
parameters in the parameter
tables.
The Geometry Table is displayed:
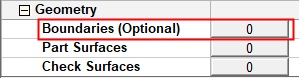

Depending on the current operation, the Boundaries or Contours option is displayed. Press the adjacent button to display the Contour Manager; you are ready to start selecting contours.
See Selecting / Unselecting Geometry.
See the cursor symbols in Cimatron when picking geometry.
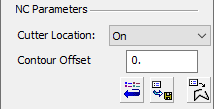
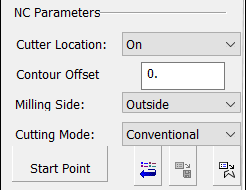
The NC Parameters section is the middle part of the Contour Manager dialog.
When picking curves to create the NC contours, this section enables you to define certain machining parameters specific to the picked boundary or contour. The parameters that are displayed here may vary and are specific to the picked boundary or contour.
|
Boundaries: |
Contours - 2.5X: |
Contours - 2.5X: |
Contours - 2.5X: |
Contours - Surface Milling: Profile Closed Contour: |
|
|
|
|
|
|
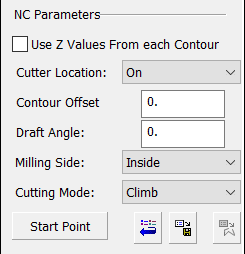
The following parameters may be displayed:
|
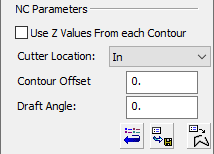
Use Z Values from each Contour |
Define the Z limits of machining motions. The Use Z Values from each Contour parameter is equivalent to the Z Values Source parameter in the Tool Trajectory parameter grid. Changing it in one place influences the other. When this checkbox is ON When this checkbox is OFF |


- Cutter Location
- Contour Offset
- Draft Angle
- Milling Side
- Cutting Mode
- Direction
- Open Section
- Section Buttons
Milling Side
This option enables you to define which side of the contour milling will be performed. This option is displayed in a number of 2.5 Axes procedures.
If the contour is open, the options Left and Right are available.
If the contour is closed, the options Inside and Outside are available.
The options that are available from the dropdown list depend on the current procedure:
|
Left |
Mill on the left side of the selected open contour. |
|
Right |
Mill on the right side of the selected open contour. |
|
Inside |
Mill inside the selected closed contour. |
|
Outside |
Mill outside the selected closed contour. |
|
As Pocket |
The milling side is set automatically for "Pocket" procedures. Once the NC contours are defined, the system automatically recognizes the enclosed region as a pocket and mills within that area. Note: The following rules only apply to closed contour procedures with the As Pocket setting. (These rules do not apply to the open contour procedures, Profile Open Contour or Safe Open Profile, which can have open sections.)
|
See Open Section below.
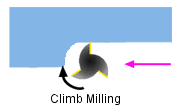
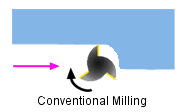
Cutting Mode
This option enables you to define the direction of the cutter movement. The following options are available from the dropdown list:
|
Climb |
The cutter will be on the left side of the cut contour when facing the direction of the cutter movement.
|
|
Conventional |
The cutter will be on the right side of the cut contour when facing the direction of the cutter movement.
|
Direction
This option enables you to define the milling direction. The following options are available from the dropdown list:
|
Chaining Order |
The milling direction is the same direction as the chaining order of the curves selected to create the NC contour. |
|
Opposite to Chaining Order |
The milling direction is the opposite direction of the chaining order of the curves selected to create the NC contour. |
Open Section
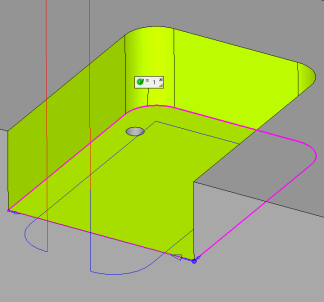
This option enables you to define open sections on closed contours. Cimatron prevents air milling motions for open segments, so the toolpath is created only on the part's walls, avoiding the open segment.
|
In the image below, the contour was selected by clicking the floor and indicating the open segment. The result is automatic profiling of the walls only. See additional examples below. |
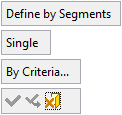
The following parameters are displayed: |
Right-click to display the popup menu with additional options: |
|
|
|
|
This option is displayed in the following 2.5X procedures (see the notes below):
VoluMill Pocket
Profile Open Contour.
The following parameters are displayed:
|
Define by Segments |
Pick the segments of the closed contour that are to remain as open sections. |
|
Single |
This is a toggle option Single / Chain, that enables you to either pick single segments or a chain of segments. |
|
By Criteria |
Pick the segments using criteria. See Creating Sets By Criteria for additional information on the By Criteria method. |
Popup Menu
Right-click during the Open Section operation to display the following popup menu:
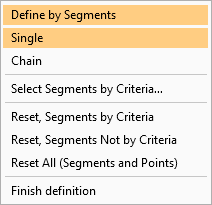
Options:
|
Define by Segments |
The active selection modes are highlighted. |
|
Select Segments by Criteria |
Pick geometry by criteria. This enables you to pick segments based on colors, sets, etc. |
|
Reset Segments by Criteria |
Reset (clear the selection of) all segments selected by criteria. |
|
Reset Segments Not by Criteria |
Reset (clear the selection of) all segments not selected by criteria. |
|
Reset All (Segments and Points) |
Reset (clear the selection of) all segments and points. |
|
Finish Definition |
Ends the selection mode, closes the popup menu and screen parameters, and redisplays the Contour Manager dialog. |
Examples:
|
Closed contour: |
Selection of open segment: |
Resulting contour: |
|
|
|
|
Notes:
-
The participating NC contours are from the current Contour Manager session.
-
Open Sections can be defined on existing closed and open NC contours.
-
When NC contours of the VoluMill Pocket procedure are transferred to the 2.5X Profile Open Contour procedure, they maintain the correct milling side and their "Open Sections" (if they are defined).
-
The open sections are displayed as dotted lines.
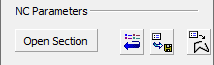
NC Parameter Section Buttons
The following buttons are displayed in this section:
|
|
Reset the NC Parameter values to their defaults (for example, cutter location, offset). This also includes the Z-Top, Z-Bottom and Reference Z values that the system automatically identifies when defining the automated machining of vertical walls. |
|
|
Save the currently defined NC Parameter values for later use. When values are changed and no contour has been selected, the only way to exit the Contour Manager is by clicking Cancel. This way the changed values are not saved. By clicking the Save icon, the values are saved for this procedure only, and only appear when you re-enter the Contour Manager. |
|
|
Apply the currently defined NC Parameter values to NC contours that you subsequently pick. This applies to newly picked contours or to re-picked contours (contours that have previously been selected and are re-picked to apply the new parameters to them). When this button is pressed, it remains in "pressed mode" until you re-press it to disable it. |


