New Project (Setup Tools) 


Access: Select the appropriate Wizard option:
-
Parting: Click the Parting Setup Wizard
button
from the initial
toolbar or press File >
Setup Wizards > Parting Setup
Wizard from the menu bar.
-
Mold Project: Click the Mold Setup Wizard
button from the initial
toolbar or press File >
Setup Wizards > Mold Setup
Wizard from the menu bar. -
Electrode: Click the Electrode Setup Wizard
button
from the initial
toolbar or press File >
Setup Wizards > Electrode Setup
Wizard from the menu bar.
-
Die Tool Design: Click the Transfer Die Setup Wizard
button
from the initial
toolbar or press File >
Setup Wizards > Transfer
Die Setup Wizard from the menu
bar. -
Die Layout: Click the Progressive Die Setup Wizard
button from the initial
toolbar or press File
> Setup Wizards > Progressive
Die Setup Wizard from
the menu
bar.
This group of functions is used to invoke the following Setup processes: Electrode Setup, Mold Setup, Parting Setup, Progressive Die Setup and Transfer Die Setup.
These processes assist you in setting up new "assembly projects" by prompting you to define the appropriate parameters. Setup processes appear in the following applications (listed alphabetically):
|
|
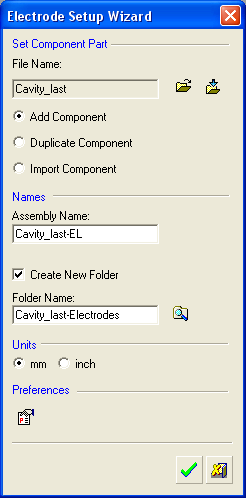
Setup a new Electrode Project. |
|
|
|
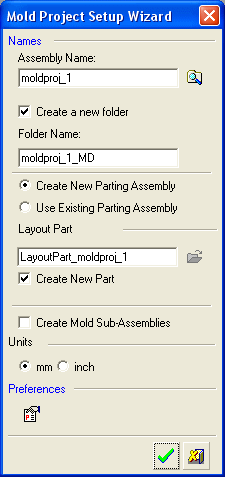
Setup a new Mold Project. |
|
|
|
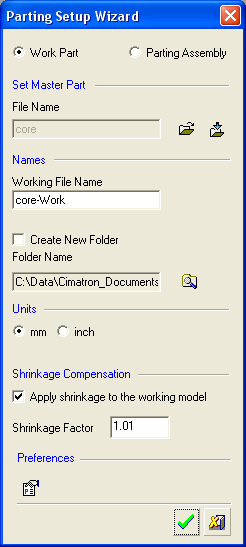
Setup a new Parting Project (including a work part and parting surfaces). |
|
|
|
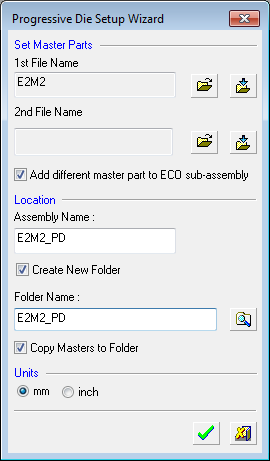
Setup a new Progressive Die assembly. |
|
|
|
Setup a new Transfer Die assembly. |
Examples of the various Wizard dialogs are shown below:
|
|
|
|
| When creating a new mold or die project, the last used default sheet (setup template) that is in the format and units as defined in the wizard, is automatically loaded. You can change the sheet either in the wizard or later on in the Setup dialog. | ||
|
|
|
|