|
|
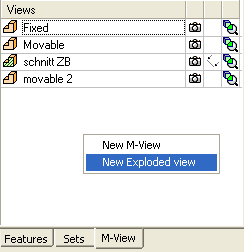
New Exploded View
-
Unpack the Explode_view_ex.ctf file.
-
Open the Explode_view_ex.elt assembly. Hide all components and show only the fixed side.
-
Press the M-View tab, right-click and select New Exploded View.
-
Rename the view to tutorial 1.
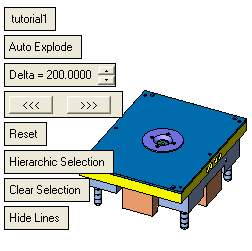
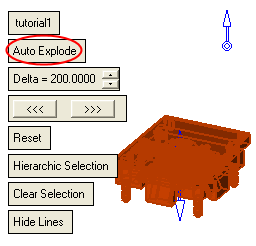
Auto explode: Press this button to perform Automatic Explode view. The distance between the components is determined by the Auto Delta value.
Auto Delta: The distance between each component when performing an automatic explode.
Reset Selection: Return the selected component to its original position.
Hierarchic Selection / Simple Selection: When only the parent is selected, the system automatically selects (hierarchic selection) the children as well. (It does not automatically select the children if Simple Selection is chosen.)
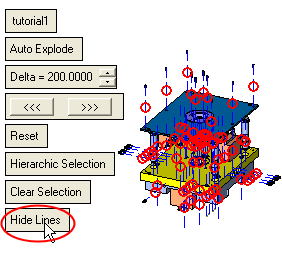
Hide/Show Lines: Hide/Show the explode lines that connect between parts.
-
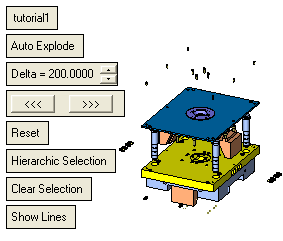
Set the parameters as indicated above, select all components, and press Auto Explode.
To move individual or groups of components manually, drag the components.
-
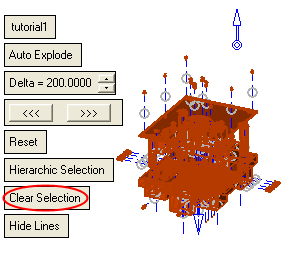
Press Clear Selection to see the results.
-
Press Hide LinesHide Lines to hide the exploding lines.
Notes:
Auto Explode provides initial results according to constraints between the components. In most cases, additional work is necessary to optimize the results.
The system automatically analyzes the explode order and direction by the following indications:
Parents and children are components that are connected to each other (UCS to UCS, UCS to face, and so on). The parent is usually the component which was brought first to the assembly.
-
Explode order - Child elements are exploded after their parents.
-
Explode direction - Determined by the connection type. For example, in a UCS to face connection, the suggested explode direction is normal to the face.
![]()
![]()
![]()