|
|
Measurement  : Displaying Measuring Reports

Access: Open this function from one of the following locations:
-
Click the
Measuring
button in the toolbar. -
Select Analyze > Main Tools > Measurement from the menu bar. From the displayed Measurement dialog click the Export to File
 button.
Cimatron enables you to create a report containing the measurement calculations of the objects, faces, curves and so on.
When creating reports for points, faces, curvatures, arcs and points, the data is exported *.txt file, enabling you to save the data to a local directory for backup purposes.
When creating a report for object data the system displays the Report Preview dialog, enabling you to select the fields to include in the report as well as the output format and more.
These two report options, are described, below.
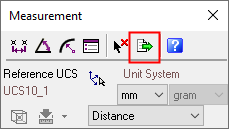
The Measurement dialog is displayed. First perform a measurement operation and then click the Export to File ![]() button to invoke a report of the results.
button to invoke a report of the results.
|
|
When switching between measurement types, the system automatically displays the last measurement type in the current measuring session. For example, if you use the |

Some examples for measuring reports, described in this Help are displayed, as follows:
Exporting Measurement Data
This option enables saving distance measurements, angle measurements, curvature measurements, face data, point data and curve data, to an external file, as described in the following procedure. This example shows how face data can be exported to a *.txt file and saved for backup purposes.
To export measurement data:
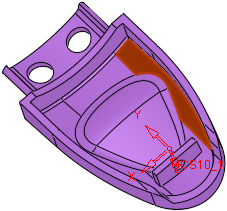
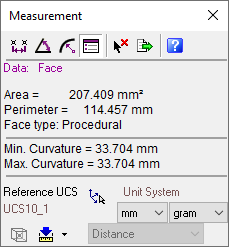
Select the Data ![]() button. Select the required face. Click the
button. Select the required face. Click the ![]() Automatic Calculation button to enable the system to perform the calculations automatically. The Measurement dialog is displayed, as follows:
Automatic Calculation button to enable the system to perform the calculations automatically. The Measurement dialog is displayed, as follows:
|
|
|
Click the Export to File ![]() button on the Measurement dialog toolbar. The measurement.text file is displayed in Notepad, as shown in the following example:
button on the Measurement dialog toolbar. The measurement.text file is displayed in Notepad, as shown in the following example:
From the Notepad menu bar Select File > Save As. In the displayed Save As dialog, click Save to save the file to a local directory for backup purposes.
Exporting Object Data Using the Report Preview Tool
The Report Preview dialog enables you to save object data to an external file. In addition, you can select the required fields to include as well as the output file format, as described in the following procedure. This example shows how object data can be exported to the requested file format and saved for backup purposes.
To export data using the report preview tool:
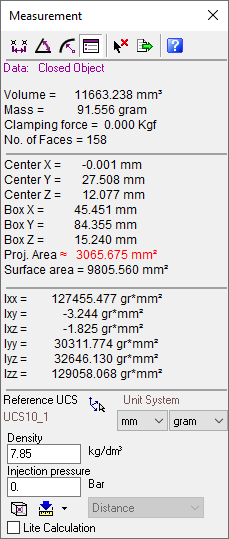
Select the Data ![]() button. Select the required object and enter the density and injection pressure values in the relevant fields. Click the
button. Select the required object and enter the density and injection pressure values in the relevant fields. Click the ![]() Automatic Calculation button to enable the system to perform the calculations automatically. The Measurement dialog is displayed, as follows:
Automatic Calculation button to enable the system to perform the calculations automatically. The Measurement dialog is displayed, as follows:
|
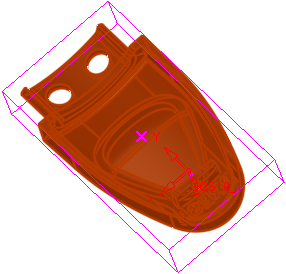
Selected Object: |
Data Measurements: |
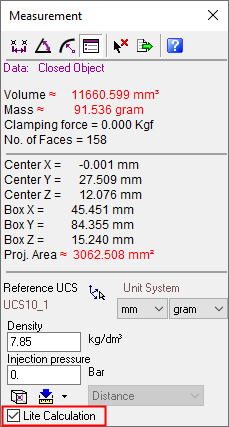
Data Measurements - Lite: |
|
|
|
|
Click the Export to File ![]() button on the Measurement dialog toolbar. The Report Preview dialog is displayed.
button on the Measurement dialog toolbar. The Report Preview dialog is displayed.
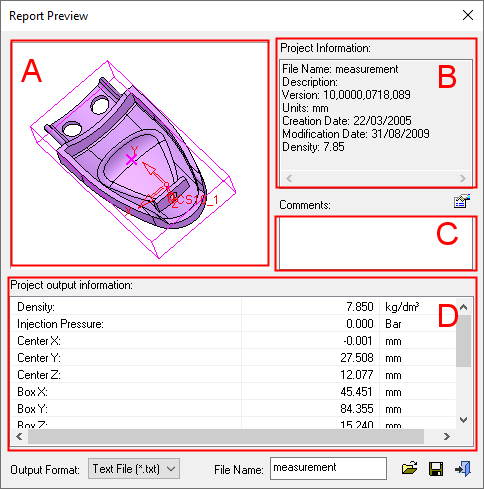
The Report Preview dialog contains the following information:
|
A |
Object Display Area |
Displays selected object. |
||
|
B |
Project Information Area |
Displays the project information that you want to show in the report. These include, version, units, creation date and more. You can change these fields by selecting the Select projects information fields Click the Select
projects information fields
|
||
|
C |
Comments Area |
In the Comments area, enter an optional comment for information purposes; for example:
|
||
|
D |
Project Output Information |
Displays the object data measurements that were performed. |
 individually, or use the appropriate buttons to select
or clear all the checkboxes.
individually, or use the appropriate buttons to select
or clear all the checkboxes. to close the
From the Select output format dropdown list, select the required output format. Depending on the chosen file format, the generated report will be opened in the appropriate viewer (see the notes below). The following report file formats are available:
3D PDF File (*.pdf)
Text File (*.txt)
Excel 97-2003 File (*.xls)
Excel File with Macro (*.xlsm)
Excel File (*.xlsx)
File Format Information for ReportsFile Format Information for Reports
Definitions of the available report file format templates are listed below. The last used save type is retained for the next save.
-
3D PDF File (*.pdf) – Adobe Portable Document Format (PDF). 3D PDF files include parts and assemblies from Cimatron. These interactive 3D PDF files look exactly like the original 3D design and enables users to view, package, and share 3D design data. Operations such as zoom, pan, and rotate, plus additional extended tool operations can be performed on the models in the 3D PDF files. The free Adobe Reader is required to view PDF files. Download the latest version of Adobe Reader from Adobe's website (https://www.adobe.com).
-
CSV File (*.csv) – Comma-Separated Values (CSV). CSV files are used to store tabular data (numbers and text) in plain text. Files in the CSV format can be imported to and exported from programs that store data in tables. Each line of the file is a data record. Each record consists of one or more fields separated by commas.
-
Excel 97-2003 File (*.xls) – Microsoft Excel 97- Excel 2003 Workbook. This format can be viewed using a free viewer from Microsoft and does not require an Office installation on the client machine to create a report. However, to edit data, save a workbook, or create a new workbook, this format requires that Microsoft Office be installed on the client computer.
-
Excel File (*.xlsx) – Microsoft Excel Workbook. This format can be viewed using a free viewer from Microsoft and does not require an Office installation on the client machine to create a report.
-
Excel File with Macro (*.xlsm) – Microsoft Excel Macro-Enabled Workbook. This format can be viewed using a free viewer from Microsoft and does not require an Office installation on the client machine to create a report.
-
Multi Format (*.repx) – Report Preview. This format allows you to preview the report before creating a report in one of the other supported formats. This is the default format for report types that have not previously been saved.
-
PDF File (*.pdf) – Abode Portable Document Format (PDF). The free Adobe Reader is required to view PDF files. Download the latest version of Adobe Reader from Adobe's website (https://www.adobe.com).
-
Single File Web Page (*.mht) – Microsoft embedded HTML format file. This web page archive format is similar to an HTML file where all images and linked files are saved, along with the HTML code, into a single file. This format can be viewed with Microsoft Internet Explorer or Microsoft Office (as well as other software).
-
Text File (*.txt) – Creates a text in Microsoft Notepad.
-
XML File (*.xml) – Extensible Markup Language (XML). This format stores data that can be read by other programs. XML is similar but distinct from HTML. XML is for carrying data while HTML is for displaying it.
Notes:
-
-
For the (*.xlsm) output, you need to add a template named Measuring_Data.xlsm.
-
When any file format other than ASCII is selected, the Capture Image button
 is displayed. Click this button to capture the required image for the Excel file. If no image is captured, then no image is displayed in the Excel file.
The default templates for the Excel formats are saved in the folder: \Cimatron\Data\templates\Measuring\. You can edit the templates as required.
-
The File Name field displays the file name of the report, when it is created. This file name applies to all the output formats. By default, the file name of the report is the same as the .elt file name, however, you can change this as required.
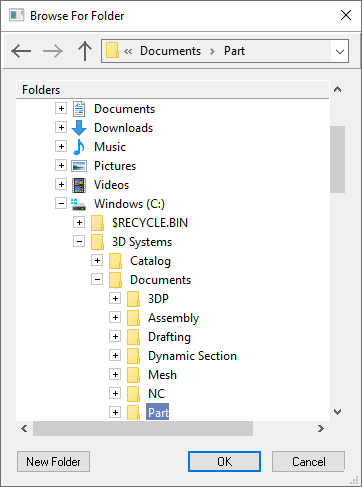
Click the Browse for Output Folder button ![]() next to the File Name field to open the dialog below showing the folder location where the report will be saved. By default, this is the same folder where the currently open .elt file is saved. Browse to the folder where you wish to save the report and press OK to select it, or press Cancel to accept the default folder, or press New Folder to create a new folder under the currently selected folder (in the latter case, rename the new folder, select it and press OK).
next to the File Name field to open the dialog below showing the folder location where the report will be saved. By default, this is the same folder where the currently open .elt file is saved. Browse to the folder where you wish to save the report and press OK to select it, or press Cancel to accept the default folder, or press New Folder to create a new folder under the currently selected folder (in the latter case, rename the new folder, select it and press OK).
Click Create report ![]() . The report is generated, as shown in the following example. (In this case the ASCII option was selected):
. The report is generated, as shown in the following example. (In this case the ASCII option was selected):
|