|
|
Creating a Derived View 


Access: A view is created under the currently active sheetactive sheet(either double-click the sheet name ![]() in the Drawing Tree or right-click the sheet name
in the Drawing Tree or right-click the sheet name ![]() and select Activate Sheet). The View Creation dialog can be accessed using one of the following methods:
and select Activate Sheet). The View Creation dialog can be accessed using one of the following methods:
-
Click
in the toolbar. -
Right-click the currently active Sheet item
 in the Drawing Tree and select View Creation.
 -
Right-click the graphics area and select View Creation.
-
Select Views > View Creation > View Creation from the Drafting menu bar.
A view derived from an existing view can be easily created by selecting an existing view and picking a location on the sheet to position the derived view.
-
InvokeInvoke the View Creation function.
-
Move the cursor over an existing view (it becomes highlighted).
-
Select the entire view and pick a location to position the derived view (according to the position of the base view and the Drawing Standard). The Derived View button
is displayed in the View Creation dialog.
To select a derived view from an edge, activate the curve filter ![]() and select only the desired edge (as it is highlighted) and pick a location to create the edge-based derived view (according to the position of the base view and the sheet standard).
and select only the desired edge (as it is highlighted) and pick a location to create the edge-based derived view (according to the position of the base view and the sheet standard).
-
Change the view scale and rotation angle.
-
Press <exit><exit> to apply the view or Close to apply the view and close the View Creation dialog. (The new derived view keeps the same View Creation parameters as the original view).
-
Create a new view or click Close to exit the operation.
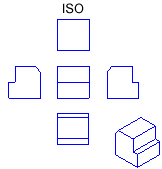
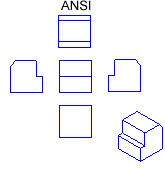
Note: Changing the view position during creation will automatically change the view type according to the active standard.
|