EDM Setup  : Report

Access: Open this function from one of the following locations:
-
Select Electrode > Tools > EDM Setup from the menu bar.
-
Select EDM Setup from the Electrode Guide Toolbar.
-
Right-click a Component
 , UCS
, UCS
 , Folder
 , Electrode
 or Location
 in the Electrode
Tree to display the popup
menu and then select EDM
Setup.
in the Electrode
Tree to display the popup
menu and then select EDM
Setup.
Create an EDM Setup Report file. The report file provides information based on the selected profile and the parameter settings in the EDM Setup dialog. A number of output formats are available and, depending on the chosen file format, the generated report will be opened in the appropriate viewer. This permits the output of different reports to fit the specific requirements of machines and/or customers. It is also possible to integrate pictures into the report. The report can be customized by your Provider to include any parameter that is available in your EDM Setup interface.
Once you have set the appropriate parameters in the EDM Setup dialog, click the EDM Setup Report button ![]() to display the EDM Report dialog.
to display the EDM Report dialog.
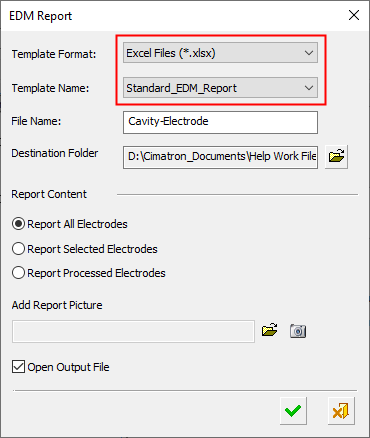
Excel format parameters |
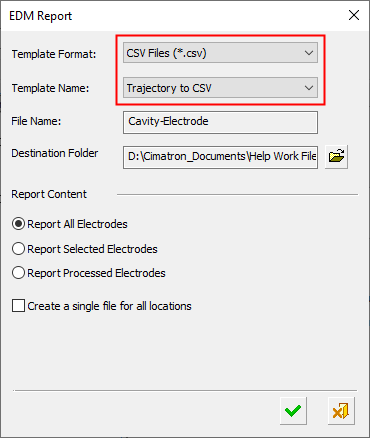
CSV file parameters |
|
|
|
The EDM Report dialog contains the following:
|
Template Format |
Select the template format for the report from the dropdown list of options. The default format is an Excel document that is based on a default Excel template. This allows you to easily customize the template to produce reports that fit your exact needs. When making an edit to the report template, pay attention to the start and end statements at the far right side of the rows. These set the ranges that allow the setup variables to work and fill in the correct values in the report. Try a few simple edits first, and always keep a safe copy of the default report on hand in case you need to revert to it. The EDM Report templates are located in the following folder:
...\ProgramData\Cimatron\Cimatron\2026.0\Data\templates\EDM_Report Depending on the chosen file format, the generated report will be opened in the appropriate viewer. The following report file formats are available: Excel File (*.xlsx) Single File Web Page (*.mht) PDF File (*.pdf) CSV File (*.csv) File Format Information for ReportsFile Format Information for Reports Definitions of the available report file format templates are listed below. The last used save type is retained for the next save.
If the CSV format is selected, the Template Name is automatically set to Trajectory to CSV, see below. |
||||||
|
Template Name |
Select the required template for the report from the dropdown list of options. The available templates are those that have the format selected above. The following template names are available; Standard EDM Report and Trajectory to CSV. If Trajectory to CSV is selected, the Template Format is automatically set to CSV, see above. |
||||||
|
File Name |
Set the report file name. The default file name is <component-name> with no extension. |
||||||
|
Destination Folder |
Set the destination folder for the output file. A browse button is available. |
||||||
|
Report Content |
The Report Content has the following options:
|
||||||
|
Add Report Picture |
If required, add a picture for the report header. If no image is added, then no picture is displayed in the report file. To add an image, either browse to find the required image or click the
Capture Image button
 to capture
the required image. to capture
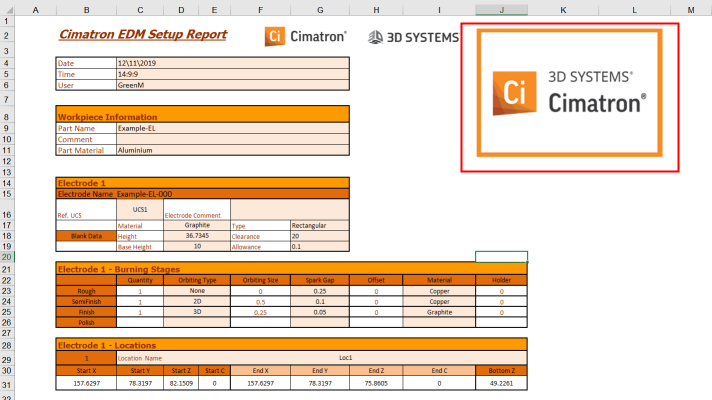
the required image.Example of a header picture in an Excel report:Example of a header picture in an Excel report: The header picture is highlighted in the top right corner of the image below.
|
||||||
|
Open Output File |
Display the output file. If this checkbox is ON, the report file is opened in the relevant application associated with this file type. This file can then be edited if required. |
||||||
|
Create a single file for all locations |
This checkbox is displayed if the Template Format is set to CSV or the Template Name is set to Trajectory to CSV. If this checkbox is ON: The File Name field is open for editing; rename the file as required. A single CSV file is created in the Destination folder for all locations. If this checkbox is OFF: The File Name field is disabled. A separate CSV file is created in the Destination folder for each location. The CSV file name is: Checkbox OFF example: An electrode assembly includes two electrodes (EL1 and EL2). EL1 has two locations, each with a trajectory defined. EL2 has a trajectory defined only on the second location. In this case, if the checkbox is OFF, the following files would be created: EL1_Loc1.csv EL1_Loc2.csv EL2_Loc2.csv |
The relevant approval buttons are also displayed:
|
OK: Save all data and exit the dialog. |
|
Cancel: Exit the dialog without saving. |