|
|
Creating a Drafting Group 

Access: Open this function from one of the following locations:
-
Click the
button in the toolbar. -
Select Groups > Groups > Create Group from the menu bar.
-
Select Groups > Create Group on the popup menu (right-click the graphics area).
Create a group of drafting entities.
In the following example, the screw will be defined as a group.
-
Activate the view which contains the entities you wish to pick.
-
InvokeInvoke the Create Group function. The Create Group Feature Guide is displayed:
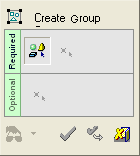
Required Step 1 
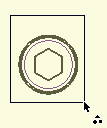
Pick the screw edges using the box selection and <exit><exit>:

Required Step 2 
Enter a name for the group and pick reference points. By default the first point picked (dark red) serves as the origin reference point:

Optional Step 3
Pick any of the newly-defined reference points to define a new origin point and <exit><exit>:
When you are finished, press OK ![]() or Apply
or Apply ![]() in the Feature Guide to complete the function. A master group is created. To apply an instance of this master group see Place Group.
in the Feature Guide to complete the function. A master group is created. To apply an instance of this master group see Place Group.
|