Export > To Drafting 

Access: Open this function from the following location:
Export geometry to a drawing file based on a selected template.
This creates a Drafting file from the model.
Note: Additional Import/Export operations are available, either between Cimatron files or between Cimatron and external file formats (file formats of a different vendor). For the latter operation, the Data Interface environment provides numerous options to perform this task.
General Interaction
Export a Part and Assembly file to the Drafting environment
-
InvokeInvoke the Export to Drafting function.
-
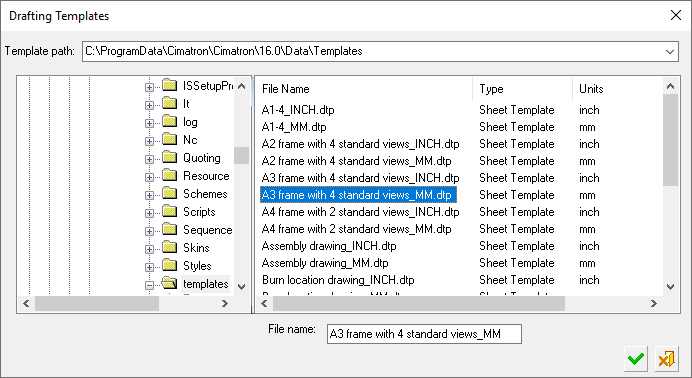
From the Drafting Templates dialog, select the template according to which the part will be displayed in the sheet as follows:
Notes:
-
Default Product and Manufacturing Information (PMI) templates are supplied; however, you can save any PMI in a view as a template.
-
From the Drafting Template dialog, when creating a sheet from a template, only sheet templates can be selected; hence, the Drafting Templates dialog shows only the "Sheet Templates" (under the Type column).
When Exporting to Drafting, the Drafting Templates dialog also shows "Drawing Templates".-
Sheet Template: A template that contains a single sheet.
-
Drawing Template: A template that contains multiple sheets. See Save as Drawing Template.
-
-
Select a sheet template with the same units as that of the drawing file. If the drawing file is in MM and an INCH sheet template is selected, a message is displayed prompting you to select a template in the appropriate units.
-
-
Click OK
 to apply the selected drafting template. The Apply Drafting Templates dialog is displayed:
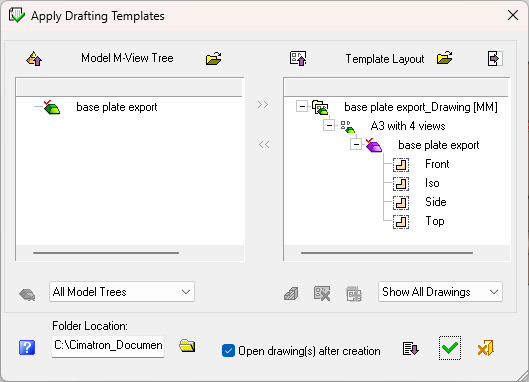
For an operations relating to this dialog, see Apply Drafting Templates Dialog - Operations.
-
Assign the required Model M-View Tree view to the appropriate template view in the Template Layout pane. See Apply Drafting Templates Dialog - Operations for details of assigning/unassigning views.
-
Click the Expand
 button to set any appropriate options (see Apply Drafting Templates Dialog).
 -
Click OK
. The Drafting file is created and the file name appears in the Cimatron ExplorerCimatron Explorer . If the appropriate options were selected (see Apply Drafting Templates Dialog), the Drafting file that was created is automatically displayed, as shown in the following example:
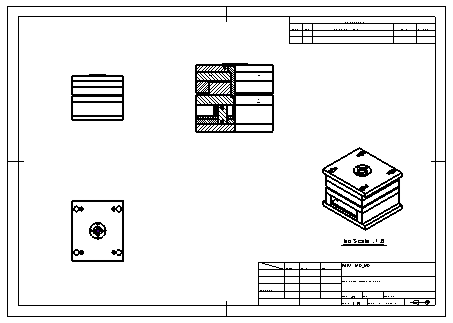
Note: The view will be scaled according to the template default. See the parameter descriptions for As view's scaleAs view's scale and Best fitBest fit, as described when expanding (
) the Apply Drafting Templates Dialog.