|
|
Insert Picture (Sketcher) 


Access: Invoke the Sketcher, define the sketch plane and then invoke this function from the following location:
-
Click the Sketcher Tools
>
Insert Image button
in the Sketcher toolbar.
Insert and embed external graphic files into existing sketches.
After inserting the file, you can then move and resize the picture within the sketch, as required. It is recommended to avoid placing heavy pictures, since this may slow down system performance. This option is used for adding system logos or for displaying part pictures and so on.
When you exit the Sketcher, the picture is not visible; when you edit the Sketcher feature in which the picture was inserted, the picture is displayed.
The following options are available:
Note: Since the pictures are embedded, there is no association between the original picture and embedded picture. This means that changes to the original picture will not affect the inserted picture.
Embed graphic files
InvokeInvoke the Insert Picture function. The Insert Picture browser dialog is displayed.
From the browser dialog, select the image type required (JPG or PNG) and navigate to select the image file.
The picture is then inserted into the sketch, such that the center of the picture is at the 0,0 point of the sketch, as shown below.
Once the picture has been inserted into the sketch and is selected, 3 control points are displayed on the picture. These points enable you to scale, move or rotate the picture (within the 2D sketch plane), by dragging the relevant point. When you first insert the picture, it is automatically marked as selected.
|
|
|
|
The picture is initially positioned at the 0,0 point of the sketch |
Select the picture to display the control points. Pick the relevant point to Scale, Move or Rotate the picture |

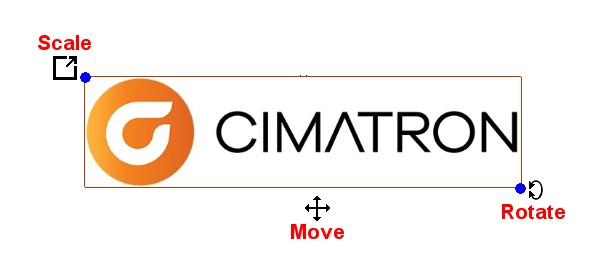
Moving/Rotating Embedded Pictures
- To move inserted pictures, click and drag the point at the center of the picture. The Move
 cursor icon is displayed at the point; drag the picture to the required location.
 - To rotate inserted pictures, click and drag the point at the bottom right corner of the picture. The Rotate
 cursor icon is displayed at the point; drag the picture to the required angle.
Resizing Embedded Pictures
To scale inserted pictures, click and drag the point at the top left corner of the picture. The Scale  cursor icon is displayed at the point; drag the picture to resize it to the required scale.
So at the top left corner we will have one other point that changes scale. The scaling should be done so that the center of the picture stays at the same position it is at and the picture scales in all directions around it. Aspect ratio is kept.
|