|
|
Capture Report Images 

Access: Open this function from the following location:
-
Select NC Process > Post & Report > Capture Report Images from the menu bar.
Capture images from the Cimatron graphics area and save them as JPG files. These images can then be used in the NC Report, in addition to the image captured when generating the report.
The captured images are saved in the following folder:
...\ProgramData\Cimatron\Cimatron\2026.0\Data\Nc\Report_Images\<elt_file_name>
The Capture Report Images dialog is displayed.
|
|
This dialog is divided into the following areas: To capture an image:
|
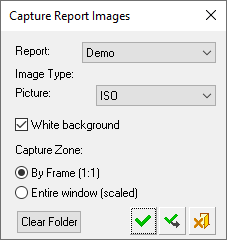
Report
The Report displays a dropdown list of all the available NC Report templates.
Select the required template.
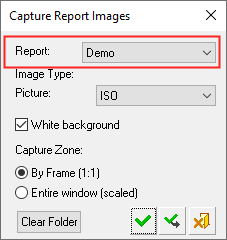
Image Type
Select the type of Picture image to be captured for the NC Report.
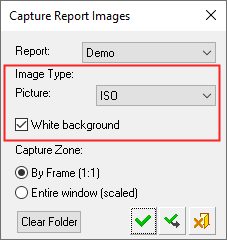
These are images that may be included in the header or footer of the NC Report. A dropdown list is displayed listing all the image types in the report template selected above. These may be ISO, standard, stock used, etc..
Select the White Background checkbox if required. This produces a white background for the captured image.
The captured images are saved in the following folder:
...\ProgramData\Cimatron\Cimatron\2026.0\Data\Nc\Report_Images\<elt_file_name>
Note: To delete all images captured from this elt file, press the Clear Folder button in the dialog.
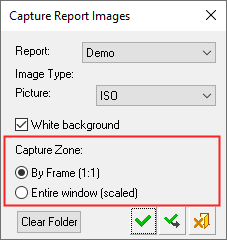
Capture Zone
The capture zone of the image can either be defined by a frame or can include the entire graphics window.
|
By Frame |
A black frame is also displayed in the graphics area. This frame defines the borders of the image that will be created. The size of the frame is defined in the template and cannot be dynamically changed, however, you can use the usual Cimatron view manipulation functions to define the contents of the frame. Depending on the template, the size of the frame may be different for each image type.
|
|
Entire Window |
The whole graphics area (including any dialogs) is included in the captured image. |
Clear Folder
All images captured from this ELT file are added to the relevant capture folder.
The captured images are saved in the following folder:
...\ProgramData\Cimatron\Cimatron\2026.0\Data\Nc\Report_Images\<elt_file_name>
To delete these saved images and clear the folder, press the Clear Folder button.
The Clear Folder button is grayed out if the folder is empty.
|