NC Setup Report 

Access: Open this function from one of the following locations:
-
Select NC Process > Post & Report > NC Report from the menu bar.
-
Click the NC Report button
in the NC Guide. -
Click the NC Report button
in the Job
Manager. -
Right-click on an item in the Process Manager, or anywhere in the graphics window when no procedure is active, and select NC Guide Commands > NC Report from the popup menu.
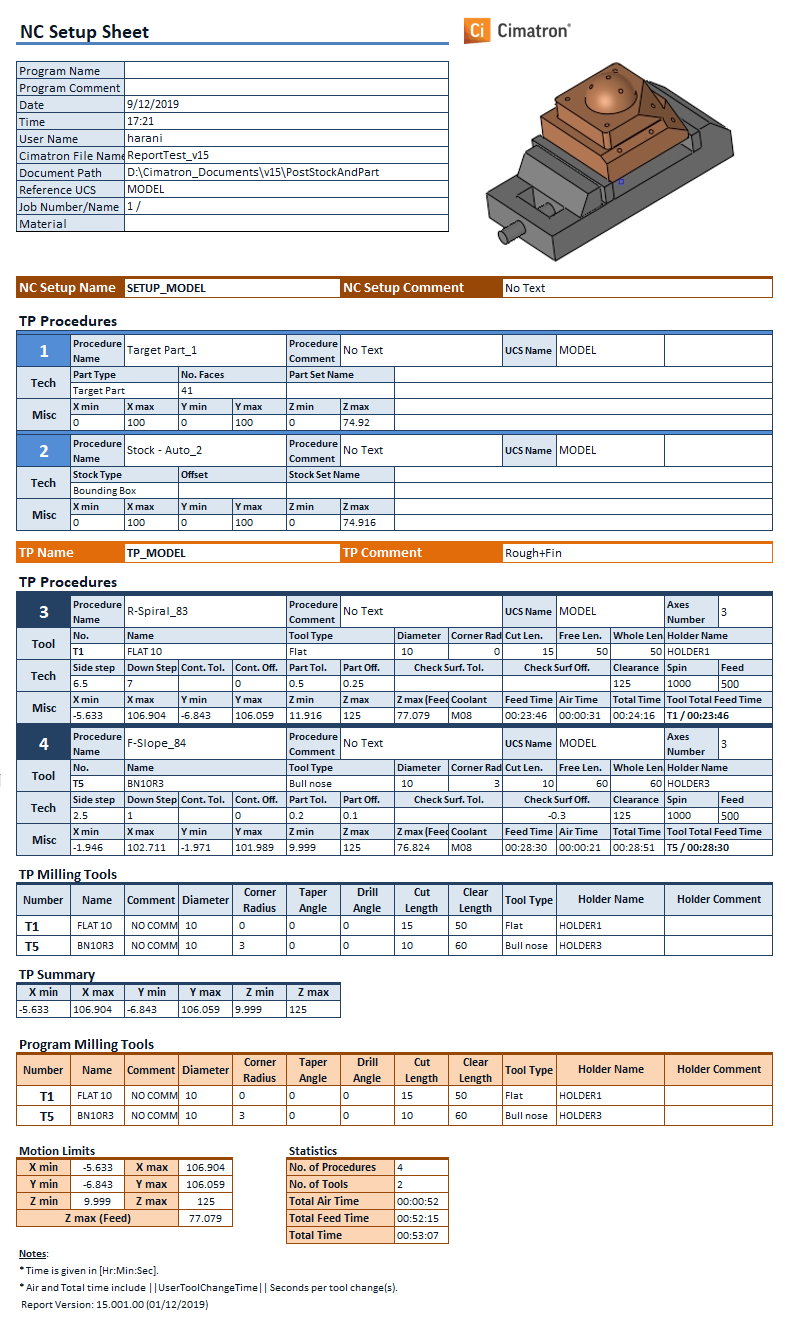
The NC Report is a file that provides various information about a set of selected procedures. This information includes details about the project and provider, as well as toolpaths, procedures (including multi-cutter information), and parameters.
See the example NC Report below.
Note: NC Reports can be initiated either from within the NC application or from within the GPP2 Post Processor. The difference between these reports is that reports initiated from GPP2 contain the kinematic data of the CNC machine and, as such, the report generation time is increased.
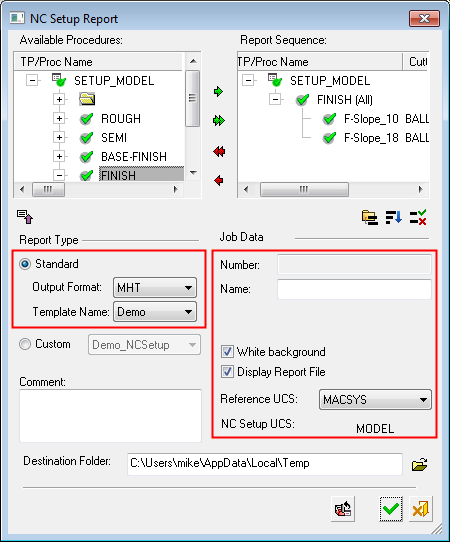
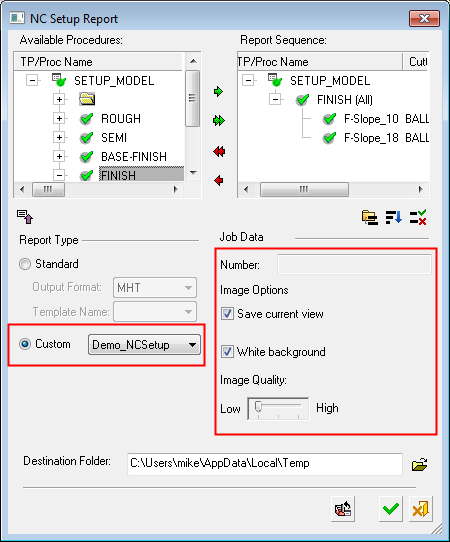
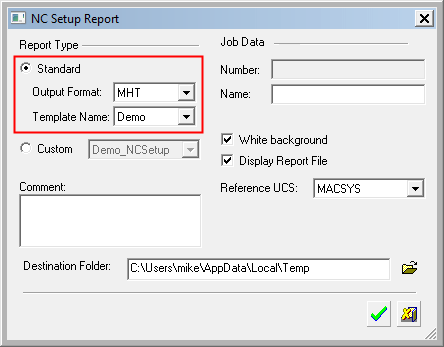
When you useuse the NC Report function, the NC Setup Report dialog is displayed with the last generated Report Type (Standard or Custom) selected. Standard is the default (see Report Type below).
|
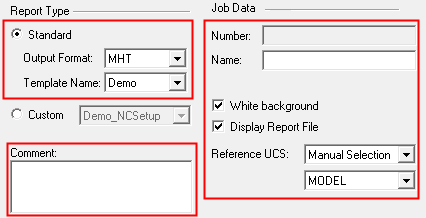
NC Setup Report: Report Type = Standard: |
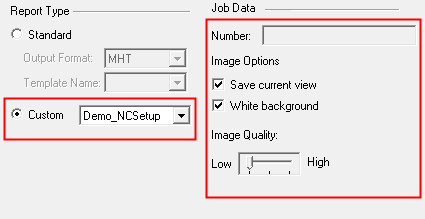
NC Setup Report: Report Type = Custom: |
|
|
|
Note: A SimpleSimple version of this dialog can be displayed by using the Preferences. Navigate to Tools > Preferences > NC > Environment > Dialogs and select NC Setup Report = Simple. In this case, the Available Procedures and Report Sequence windows are not displayed and only the procedure(s) that were selected in the NC Process Manager (prior to running the NC Setup Report) will be included in the report.
|
NC Setup Report: Standard-Simple: |
NC Setup Report: Custom-Simple: |
|
|
|

Dialog Structure
This dialog is divided into the following areas:
- Available Procedures / Sequence Panes - Select and Reorder Procedures
- Report Type
- Program Data / Image Options
- Destination Folder
- Report Dialog Buttons
- Stock and Part Information in the NC Report
- Example Report
Run a Report
To create an NC Report:
-
Define which toolpaths or procedures you want to be included in the NC Report and put them in the Report Sequence window.
-
Choose the type of report to be produced and set the required parameters.
-
Define the folder to which the NC Report will be saved.
-
Press OK
 to produce the report.
See the appropriate Report Type to view the type of NC Report produced (see Report Dialog Buttons below).
Report Type
The following report types are available:
|
The Standard report type is a fully customizable, easy to manage report. A number of output formats are available and, depending on the chosen file format, the generated report will be opened in the appropriate viewer. See the Standard Report for the list of supported output formats. The Standard report only supports procedures containing motions. Standard is the default option. If the Custom Report Type option (see below) is not available, the Standard option is marked as selected and grayed out (cannot be changed). |
|
|
The Custom report type enables you to control the type of report to be produced. This report type option is only displayed and available if your Cimatron Provider has supplied you with specific Customized Reports executable files (.exe). |
Program Data / Image Options
The parameter fields displayed here depend on the report type selected.
|
If the Standard report type is selected, the following Job Data parameters are displayed:
These parameters are displayed in the NC Report (for detailed parameter information, see Standard):
|
|
|
If the Custom report type is selected, the following Job Data parameters are displayed (for more, see Custom).
These parameters define the view of the picture for use in the NC Report:
|
Destination Folder
Set the Destination Folder to which the NC Setup Report will be saved. Click ![]() to browse to the required folder.
to browse to the required folder.
The default location for the NC Setup Report is in the following folder:
...\Users\<username>\AppData\Local\Temp
The default location for the NC Setup Report is in the following folder:
...\Users\<username>\AppData\Local\Temp
The default location for the NC Setup Report is in the following folder:
...\Users\<username>\AppData\Local\Temp
The default location for the NC Setup Report is in the following folder:
...\Users\<username>\AppData\Local\Temp
The default location for the NC Setup Report is in the following folder:
...\Users\<username>\AppData\Local\Temp
Report Dialog Buttons
The following buttons appear at the bottom of the dialog:
|
|
Reload all NC Setup Settings: Reload the settings defined in the NC Setup that are relevant to this dialog. |
|
|
OK: Accept the changes, perform the operation, and close the current dialog/task. |
|
|
Cancel: Cancel all changes and close the dialog/task without saving the settings. |

See the appropriate Report Type to view the type of NC Report produced.
Stock and Part Information in the NC Report
Stock and Part procedures may be selected while creating a report, and the information about these procedures will be available for output to the report and also for the GPP2 post processor. See the example report below.
Stock information includes the stock type (box, bounding box, by surfaces, revolve), stock size, offset, etc.
Part information includes the part type (target, fixture, other), number of faces, bounding box, etc.
If the part or the stock was created by criteria from a set, the set name is also available.
Example Report
Below is an example of a generated NC Report.