Apply Template for NC Pockets 
![]()
![]()
Access: Open this function from one of the following locations:
-
Select NC Utilities > Templates > Apply Template for NC Pockets from the menu bar.
-
Right-click and select Templates > Apply Template for NC Pockets from the popup menu.
Load and apply one or more NC templates to create toolpath(s)/procedure(s) in the NC Process Manager, to machine one or more pockets.
To save time, you can create a toolpath and/or procedure in the NC Process Manager by reading data from a template. This template contains milling strategies, parameters, and geometry. Once the toolpath and/or procedure has been created and appears in the NC Process Manager, all components can be edited.
|
Templates for Pockets is a Feature Based Machining function enabling faster, safer and simpler programming for milling multiple pockets. In many cases, pocket milling requires similar sequences of NC procedures. These sequences contain for example, roughing, wall finishing, floor finishing, cleanup, chamfering, etc. When a job requires the milling of multiple pockets, the programming may take time and this increases the possibility of human error. Define and create a Template by selecting any sequence of procedures. Once a Template is defined, you can apply it on any pocket feature. Usage of Templates enables you to apply a complete milling process to all pocket features in a single operation, saving programming time and preventing user errors. |
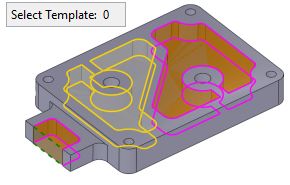
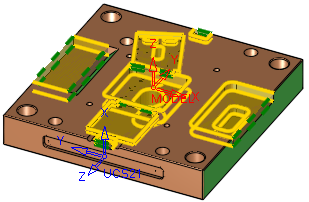
The image shows a pocket selected for milling operation. Template(s)
can be selected for applying on the pocket.
|
This function is very similar to that of Apply NC Template, with the exception that the Apply Template for NC Pockets function is used to select one or more templates used to create a procedure to machine an NC pocket.
Note: A template is created by saving to a template.
See Templates for Pockets Notes.
Note: When the system is in pocket selection mode (for example, when selecting pockets for procedures), in addition to the selection options available in the Pocket Manager, the pockets can also be selected By Box.
Creating a toolpath / procedure from a template
While in an NC file, select a toolpath or procedure from the Process Manager, invokeinvoke the Apply Template for NC Pockets function, select the desired template from the NC Template dialog, and then select from the list in the Templates Selection dialog. Different types of NC templates are available.
The detailed steps are as follows:
-
To create a toolpath(s) from a template, select a toolpath from the Process Manager that will be positioned immediately before the new toolpath(s) (in other words, the selected Toolpath Template or Multi Toolpath Template will be inserted after the toolpath that was selected in the Process Manager).
-
To create a procedure from a template, selectselect a procedure from the Process Manager that will be positioned immediately before the new procedure (in other words, the selected Procedure Template will be inserted after the procedure that was selected in the Process Manager). If the new procedure is to be the first one in the toolpath, select the toolpath.
-
InvokeInvoke the Apply Template for NC Pockets function.
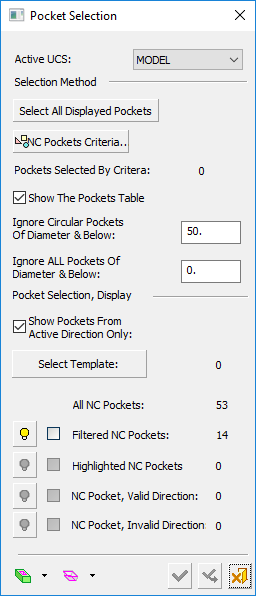
The Pocket Selection dialog is displayed. This is similar to the Pocket Manager dialog, however, it is used for selection only and not for recognizing new pockets. The geometry selected (for example, the pocket's volume, surfaces or contours) depends on the active procedure. As when the Pocket Manager is active, the pre-recognized pockets are highlighted in the graphics window.
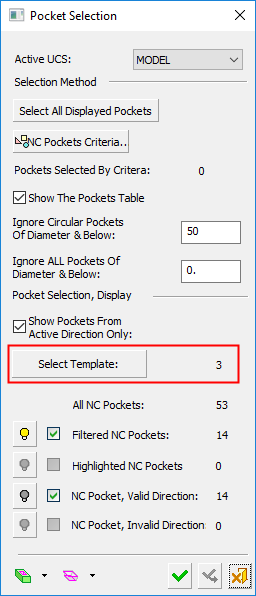
When the Pocket Selection dialog is invoked from the Apply Template for NC Pockets, the Pocket Selection dialog shows the Select Template button. Note that no templates have currently been selected; the number of selected templates is displayed adjacent to the Select Template button.
-
Pick one or more NC pockets or check the relevant selection boxes in the Pocket Table.
-
Click the Select Template button in the graphics window.
-
The NC Template dialog is displayed. Select one or more templates.
The NC Templates Explorer displays a list of the NC Templates that have been saved as well as their pictures (the template’s image is captured during the template’s save operation).

Select the following:
Template path
Select the folder where the NC template resides from the folder tree displayed on the left panel of the NC Templates Explorer.
By default, Cimatron opens the MM sub-folder that is located in the default Templates folder (see note below). You can also select the Inch sub-folder or any other folder if needed.
Note:
NC templates are stored in the MM and Inch sub-folders located in the following folder:
...\ProgramData\Cimatron\Cimatron\2025.0\Data\templates\ENCName
The selected template filename is displayed in this field. You can either enter the template filename manually or select a template directly from the template list that is displayed in the center panel of the NC Templates Explorer. Note that multiple template selections can be made from the template list using the Ctrl key.
Type
Cimatron pre-populates this field with the NC template template type.
NC templates are stored in the MM and Inch sub-folders located in the following folder:
...\ProgramData\Cimatron\Cimatron\2025.0\Data\templates\ENC -
Double-click the template file name or single-click and click Open to approve the template selection.
-
The Templates Selection dialog is then displayed; select the required template(s). When selecting multiple templates, the selection order defines the order that the templates will be used to create a procedure to machine the selected NC pocket(s).
The Templates Selection dialog displays a list of the selected templates. This dialog provides control and flexibility in the selection, order, and assignment of templates, resulting in efficient and quicker programming time.
In many cases, you need to select and apply a series of templates repeatedly. This may be a tedious process and is prone to user errors.
The Template Selection dialog supports the following operations:
-
Multiple template selection
-
Adding and removing templates
-
Setting the order of templates in the series
-
One-click selection to apply the template series.
Use the arrow buttons to set the template order and press OK
 to approve the selection.
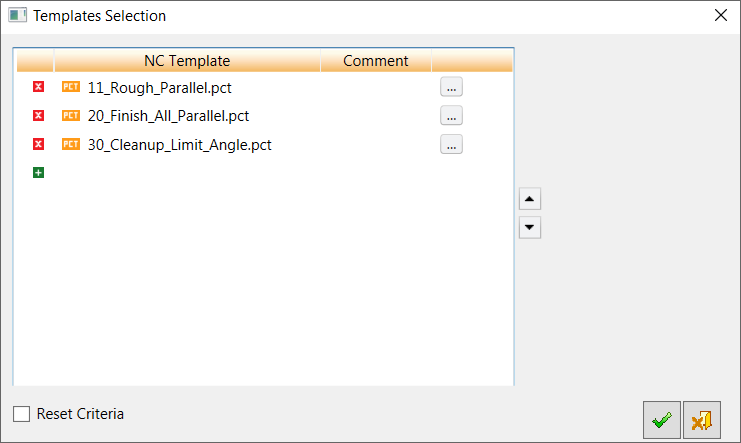
Each row in the dialog represents a single template. The image on the right displays a picture associated with the selected template. To change the order of the templates in the dialog, either drag and drop them or use the arrow buttons.

Remove a template from the dialog.

Add a template to the end of the list. The NC Template dialog (shown above) is displayed to select a template.

Replace the template in the row with another template. The NC Template dialog (shown above) is displayed to select a template.
Reset Criteria
When enabled (ON), the criteria is reset after applying the template.
Default for the Apply Template for NC Pockets function = ON.
Default for the Apply NC Template function = OFF. -
-
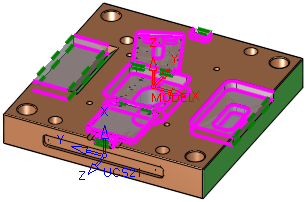
The Pocket Selection dialog is re-displayed showing that pockets have been selected; the graphics window highlights the selected pockets and the number of selected templates is displayed adjacent to the Select Template button (in the example below, 3). The template(s) will be used to create a procedure to machine the selected NC pocket(s).
Select the relevant approval option:

OK: Accept the changes, perform the operation, and close the current dialog/task.
The toolpath/procedure template is then inserted after the toolpath/procedure that was selected in the Process Manager. The name of the template used to create a procedure to machine the pocket is displayed in the Pocket Table under the Template column.

Cancel: Cancel all changes and close the dialog/task without saving the settings.
See also: