Punch/Trim 


Access: Open this function from one of the following locations:
-
Select Die Design > Strip Tools > Punch/Trim from the menu bar.
-
Select Punch or Trim from the following Die Design Guide: Die Strip Design Guide.
Pick a contour and define a punch on the strip or only trim it. The trimming is progressed to the next stations.
This function enables you to punch and/or trim the strip part at a single station or several stations in one operation and create a punch/trim with specific attributes for automatic use in the die setup.
In addition, you can define whether to trim only the 2D faces or both 2D and 3D faces on the strip. You can define whether or not to add a punch as well as trim the face or just trim the face without adding a punch, as shown in the Usage Example below.
This function is enabled only when the strip environment is activated.
Usage Example
|
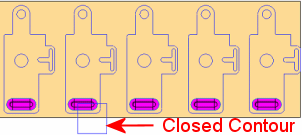
The following result is displayed when the Trim 2D option is selected: |
|
|
|
|
|
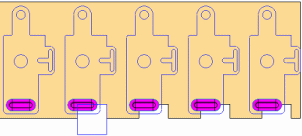
The following result is displayed when the Trim 2D + 3D option is selected (the 3D dimples are also trimmed): |
|
|
|

General Interaction
The following is the Feature Guide for Punch/Trim.
|
|
|
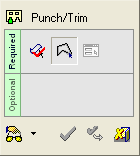
Required Step 1 ![]() : Replace blank face.
: Replace blank face.
Required Step 2 ![]() : Pick the contour.
: Pick the contour.
Required Step 3 ![]() : Define the parameters.
: Define the parameters.
Detailed Interaction
See Options and Results.