Setup – General Tab: Assembly/Part 

Access: Open this function from one of the following locations:
-
Select Tools > Main Tools > Setup from the menu bar.
-
Select Die Design > Tools > Setup from the menu bar.
-
Select Mold Design > Tools > Setup from the menu bar.
-
Select Setup from the Mold Design Guide Toolbar, Parting Guide Toolbar, or one of the various Die Design Guide Toolbars.
|
Setup parameters are those that are significant for various aspects of a project design. They represent geometrical features of the model being designed as well as parameters that influence that design. Each parameter can be assigned a value, and the dimension related to this parameter is updated accordingly. These parameters are displayed in a Setup dialog. The Setup dialog table displays the entire set of data used in the setup of a Part or Assembly project; these parameters are used in the Part and Assembly environments (assembly includes all assembly projects – plain Assembly, Mold, and Die projects). See Tabs usage for which tabs in the Setup dialog are relevant for each type of project. The table of user-defined parameters is available in the General tab of the Setup dialog. Use this table to predefine various parameters used for creating relations. Tabs in the Setup dialog
|
On This Page |
See Setup dialog description for more on the common elements in all the tabs.
General Tab
Transfer Dies
For Transfer Dies, a Die Set dropdown list is displayed at the top of the dialog. This lists all the Die Sets created and is used to define different setups for each sub-assembly of the tool design (see the images below). This list is also displayed in the Strip Layout Tab of the dialog.
![]()
![]()
![]()
Table Structure
The table contains the following columns:
The name of the item/group
The value of the item
The units of the item
The table is initially empty. There is always an empty group at the bottom of the table tree. The last item inside each group is always empty.
To add a new item or group, click the empty cell and enter the name.
- The name of a group or an item must be unique.
- The name of a group must be unique within the table.
- The name of an item must be unique within its group.
Setup Parameter Types
Different types of setup parameter are available. Each group or item type is represented by a specific icon, which includes one to identify a new item in each group.
- Items can be locked to prevent any changes to its definition; a locked item displays a lock symbol on the icon. Items may be locked or unlocked at any time.
- Groups cannot be locked (they can only lock their child items).
Each type of parameter in the Setup tab is shown here. For more on the Setup parameters, see Data parameter area.
|
|
Value |
Default dimension type |
|
|
From To |
Define a range of values and an increment. |
|
|
From List |
Select a value from a closed list of values. The list of values can be edited and is automatically sorted in the Value field. |
|
|
Formula |
Create a formula using other values from the table. |
|
|
From Catalog |
Select from a list taken from a catalog. |
|
|
Formula From Catalog |
Create a formula that is rounded to values taken from a catalog. |
|
Icons used in the table |
Locked items in a group |
|
|
|
Groups and items can be rearranged using dragging. Items can be dragged within or between groups. If the target group has an item with the same name as one of the dragged items, a warning message is displayed and that item is not moved; the other dragged items will be moved. Dragging is available for multiple selection, as long as you select only groups or only items.
An item description is displayed in a tooltip when the cursor hovers over the item name.
Data Usage
In the table, the unique identifier of a parameter is the name of the group + the name of the item.
Units
- Each item has its own units (mm, inch, or none). This means that the parameter is not unit dependent, which is useful for angles or general numbers for formulas.
- By default, new or added parameters adopt the units of the main file. An exception to this rule is explained in Load Setup button.
- In a formula, all the values of all used parameters are translated to the units of the parameter of the formula.
Adding components to an assembly
When an existing parameter is updated by a similar parameter, its entire definition is updated (parameter type, list of values when relevant, picture, units, etc.).
Items are always merged or added into the table of the highest level assembly currently opened.
The values of the assembly are more important than those of the added component and will override them.
If a group name in the component also exists in the assembly, it will be considered the same group and will be merged.
If an item name in that group exists in the assembly, it will be considered the same item and will be merged.
If a group or item name does not exist in the assembly, added components will be created as new groups or items.
Independent groups
An independent group does not merge into an existing group with the same name. A new group is created instead with an independent group icon.
Independent groups include parameters that can be controlled from the table but change (different values, units, etc.) for each part in the assembly.
Table Popup Menus
Popup menus are available on groups, items, multiple groups and multiple items—right-click the item to show the menu.
|
Popup - Single Group |
Popup - Multi Group |
Popup - Single Item |
Popup - Multi Item |
|
|
|
|
|
|


Popup Parameters
|
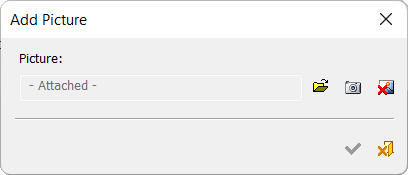
Add Picture |
Select a picture to be added to the group/item. This is similar to the Add Picture tool, except that only one picture is added.
The picture is added to the area at the bottom right of the dialog. This area can be expanded or collapsed (see Buttons).
|
||||
|
Capture Screen Image |
Capture the existing screen image and use it as a picture of the group/item. The image is added in the same area as used by the Add Picture option above. |
||||
|
Collapse All Groups |
Collapse all the groups in the tree. |
||||
|
Copy Item(s) |
Copy all the information of the selected item(s). |
||||
|
Copy Picture |
Copy the picture of the selected item or group. This option is only available if the selected item or group has a picture. |
||||
|
Delete Group |
Delete the selected group(s). A warning is displayed. |
||||
|
Delete Item |
Delete the selected item(s). A warning is displayed. |
||||
|
Duplicate Group(s) |
Copy the selected group(s) and create new ones with the same parameters. |
||||
|
Independent Group |
Identify a group as an independent group. An ON checkmark denotes an independent group. See Independent Groups under Data Usage above. |
||||
|
Lock/Unlock Group Items |
Lock or unlock all the items in a group(s). Only the items are affected—the group has no state. When locked, the specific item is marked as locked (see the icons in Table Structure above). The parameter name that is displayed depends the locked/unlocked state of the majority of the items in the group. For example, if most of the items are locked, then Unlock Group Items is displayed. In the other cases (majority are unlocked or equal number of locked and unlocked items), Lock Group Items is displayed. |
||||
|
Lock/Unlock Item(s) |
Lock or unlock the item(s). When locked, the specific item is marked as locked (see the icons in Table Structure above). When multiple items are selected, the parameter name that is displayed depends the locked/unlocked state of the majority of the items in the group. For example, if most of the selected items are locked, then Unlock Items is displayed. In the other cases (majority are unlocked or equal number of locked and unlocked items), Lock Items is displayed. |
||||
|
Paste Item(s) |
Paste all the information of the copied item(s). |
||||
|
Paste Picture |
Paste a copied picture into the picture area. |
||||
|
Rename Group |
Edit the group name. |
||||
|
Rename Item |
Edit the item name. |
||||
|
Remove Picture |
Remove the existing picture of the group or item. This option is only available if the group has a picture. |
||||
|
Sort Items by Name |
Sort the items in the group by their names. |
||||
|
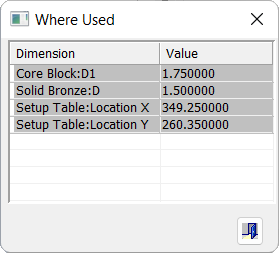
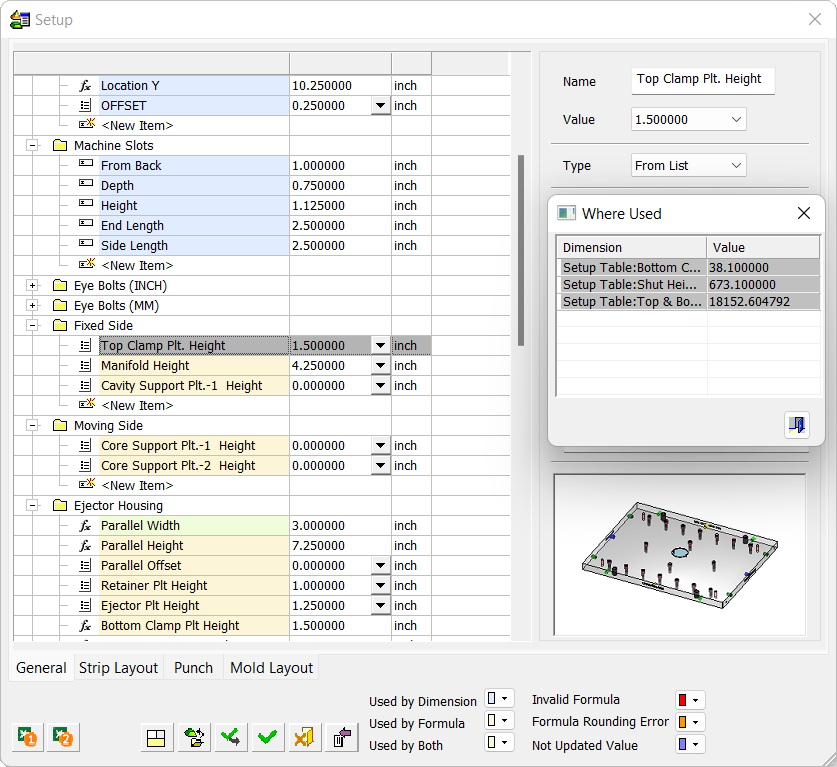
Where Used |
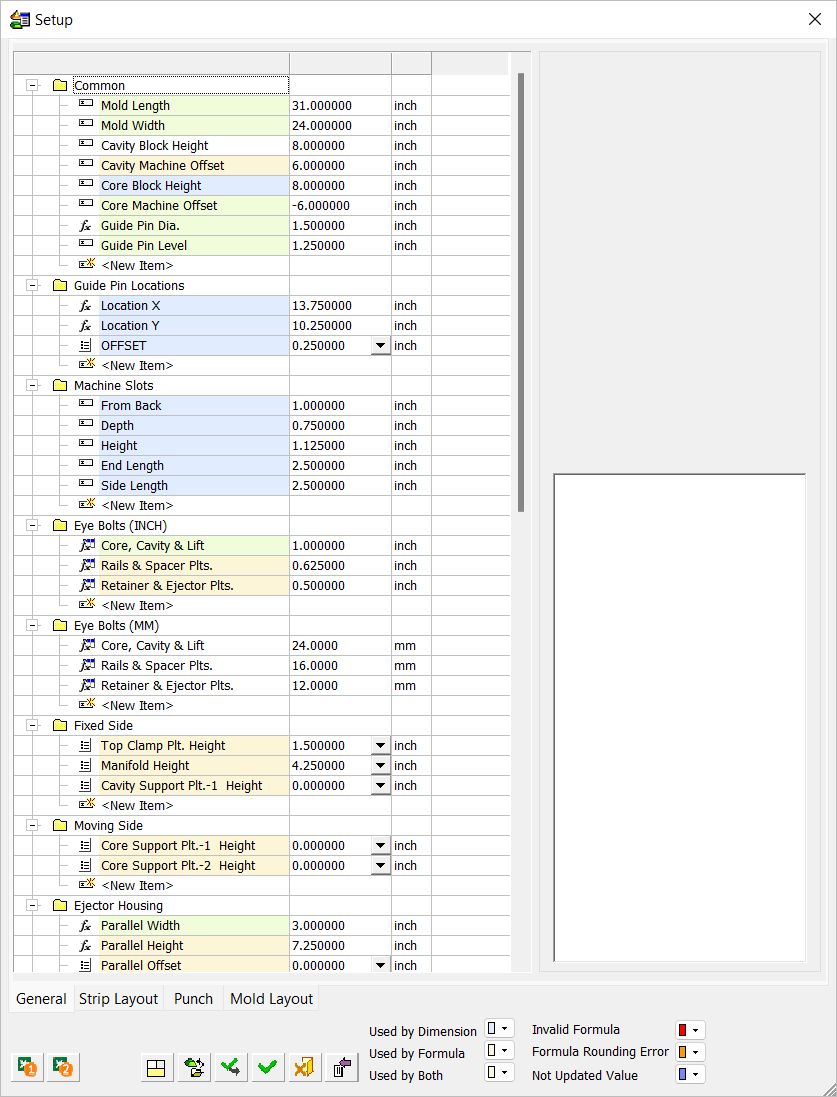
Display the dimensions in which the item is used. The Where Used dialog is displayed. When there is a parameter that is used in a formula, the parameter it is used in is displayed with the text Setup Table before it.
In these examples, the Where Used was invoked from the Setup parameter, Top Clap Plt. Height. The setup parameter is marked in selected mode and the parameter is highlighted in the display area.
When another parameter in the Where Used dialog is selected, the parameter row in the Setup dialog is highlighted. In addition, the formula of the selected parameter is also displayed.
|
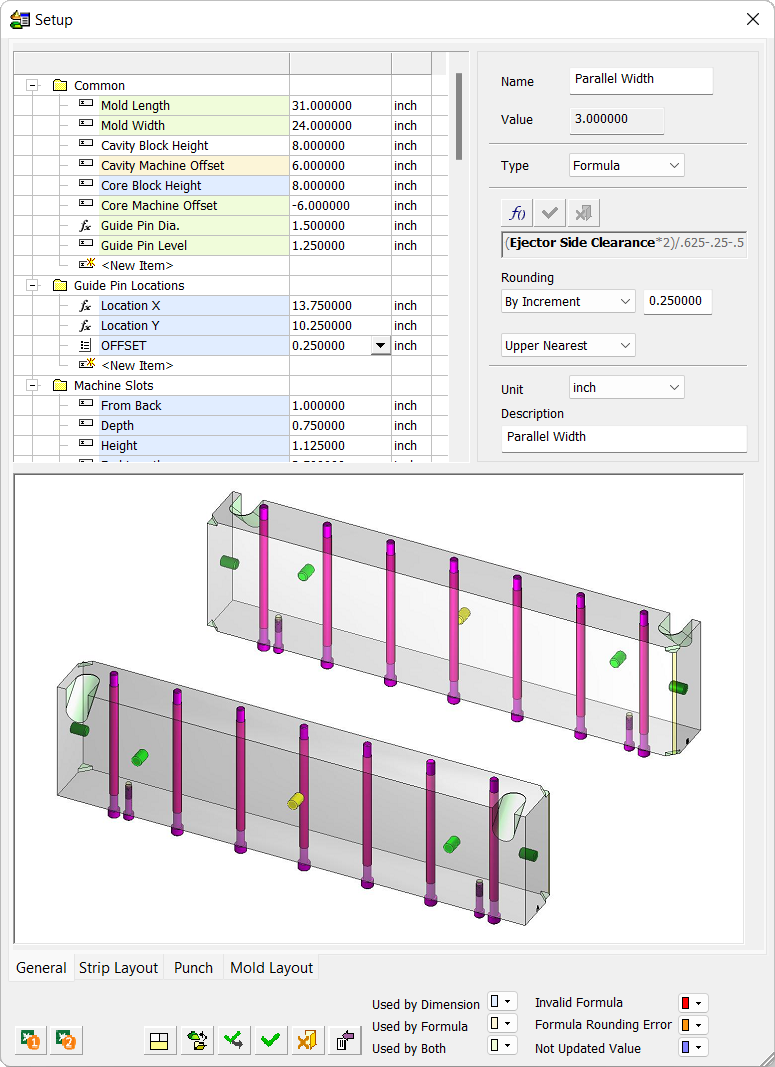

Data Parameter Area
The data parameter area is used to show and set additional data about the dimension.
This area also holds the picture (if one exists) of the item or group. When an item has no picture, the group picture is displayed instead.
In any type of dimension, the data area holds the following attributes:
|
|
|
Dimension Type
The following parameters are displayed for each of the options in the Type dropdown list:
|
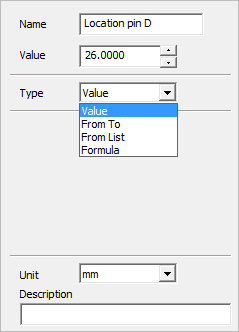
Type = Value |
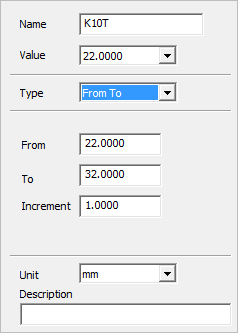
Type = From To |
Type = From List |
Type = Formula |
|
|
|
|
|


Type Options Parameters
Value
The default dimension type. The Value increment (for mm and inch) is taken from the Increment Preference.
ExampleExample
Add items to the Value list, as required. This list has the same editing options as the From List mentioned above.
Select the From Catalog checkbox to enable the catalog options (by default, this option is unselected). This enables you to create a list of values by selecting a column (dimension) from a catalog part.
|
|
Click the Catalog Part button When a catalog part is selected, the Dimension dropdown list is available and the Value list (on the left) becomes grayed out and is filled with the data of the selected catalog column (from the Dimension dropdown list). The Dimension dropdown list holds the list of all the dimensions in the selected catalog part. This field is only available after a catalog part has been defined. After selecting a column, its values are displayed in the grayed out Value list and cannot be changed. This Value list remains associative to the selected catalog (any change in the catalog is reflected in the list). If the From Catalog checkbox is subsequently unselected, the Value list remains but is not grayed out and can be edited.
|
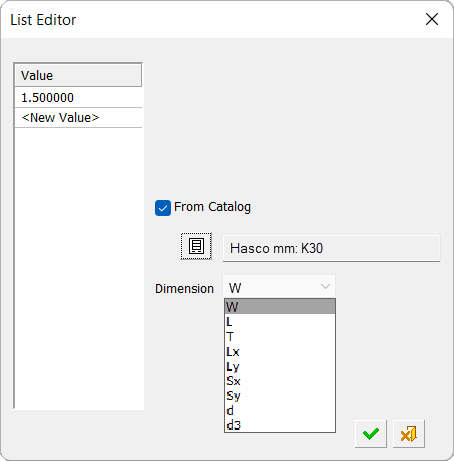
When exiting the List Editor, if a catalog was used, the Value list is grayed out and the catalog name is displayed below the list. (When hovering over the catalog name, a tool tip is displayed showing the full catalog name, in case it cannot fit inside the box.)
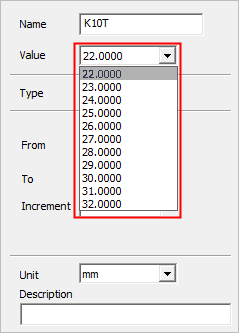
From To
This option is used to define a range of values and an increment. The range of values and increment also form the list of valid values.
ExamplesExamples
|
From To option showing the range of values and increment. |
The Value field displays the range of values with the set increment. |
|
|
|
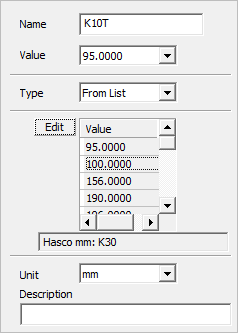
From List
This option is used to select a value from a closed list of values. The list of values can be edited and is automatically sorted in the Value field (the Value field displaying the valid values is always displayed as sorted).
Values can either be selected from the Value field or from the list itself.
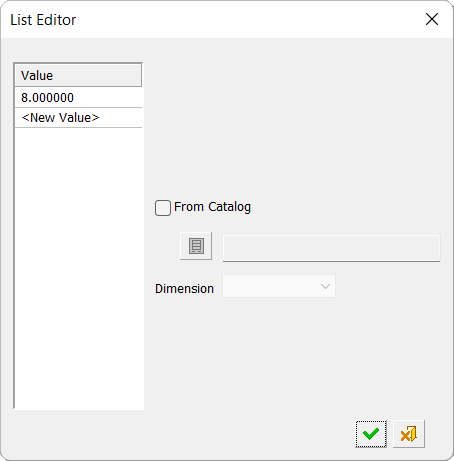
The last item on the list shows <New Value>; double-click this to add values. (Another way to add values to the list is via the List Editor dialog - see Edit Button in this field explanation, below.) Double-click an existing value to edit it. Right-click a value to display a popup menu of options to Copy, Paste, or Delete a value. The Paste option pastes copied values from the first selected cell and downwards; existing values are overwritten as needed. (When pasting copied Excel data, only values are pasted and if multiple columns were copied from Excel, only the first column is pasted.)
ExamplesExamples
| From List option showing list of values. | Double-click <New Value> to enter new values to the list. | The Value field contains the closed list of values – sorted. | Right-click a value to display a popup menu of options. |
|
|
|
|
|

Edit Button
This button is displayed next to the Value column header. Press the Edit button to display the List Editor dialog. This dialog is used to manually insert a list of values or to import values from a catalog.
ExamplesExamples
|
Value option showing the current value |
|
|
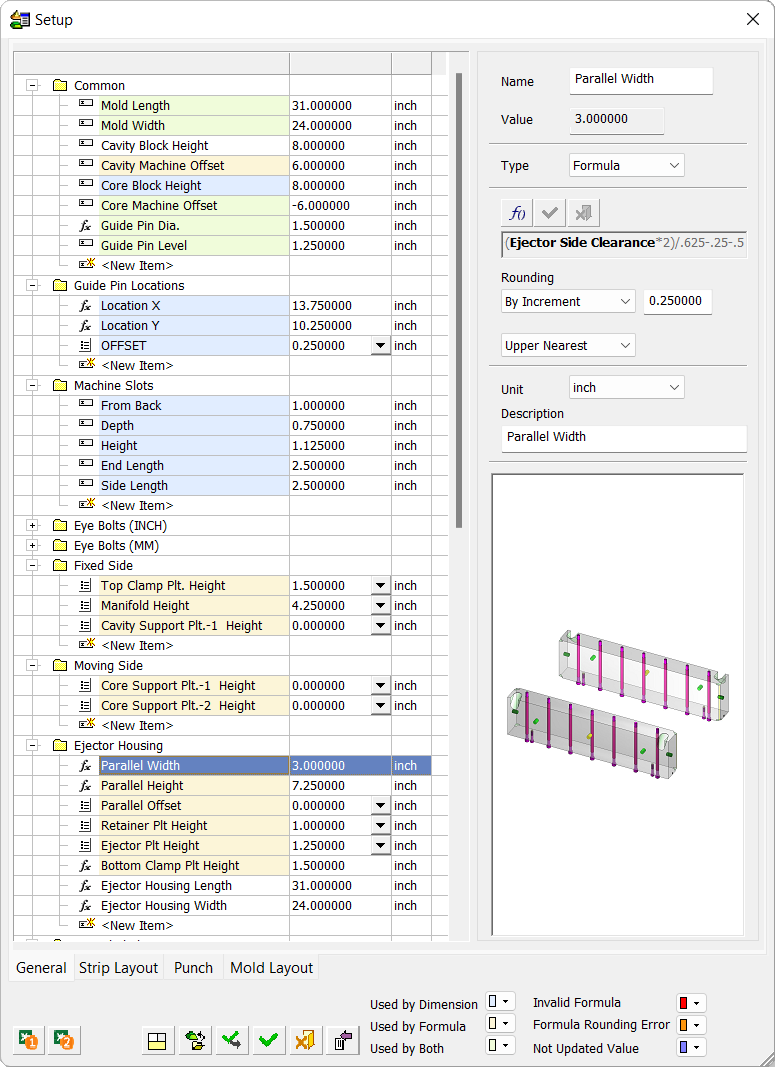
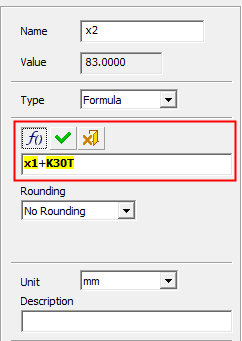
Formula
This option is used to create a formula using other values from the table.
To edit the formula, click the Edit Formula button ![]() . This is used to edit the formula field and to either press OK to accept the changes or Cancel to abandon the changes.
. This is used to edit the formula field and to either press OK to accept the changes or Cancel to abandon the changes.
While editing the formula, double-click any other item in the table to insert it into the formula. The name of the selected parameter will represent it and will have a yellow highlight on it.
ExamplesExamples
| Formula option showing the formula and available fields | To edit the formula, click the Edit Formula button |
Place the cursor over the formula to display a tooltip showing the full name of the items in the formula (Setup + <group name> + <item name>). |
|
|
|
|

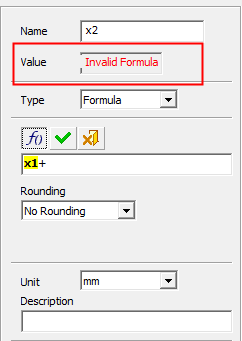
The Value field is read-only and shows the result of the formula. When there is no valid result, it will display the words 'Invalid Formula' in red.
ExampleExample
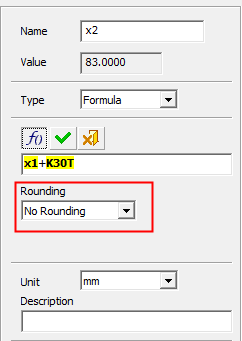
A Rounding dropdown list is used to select different types of rounding that can be applied to the result of a formula.
ExamplesExamples
|
(Rounding) No Rounding option |
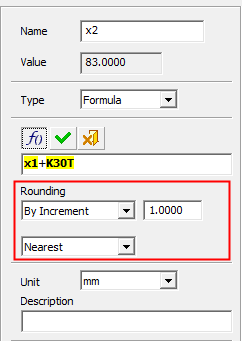
(Rounding) By Increment option showing the available fields |
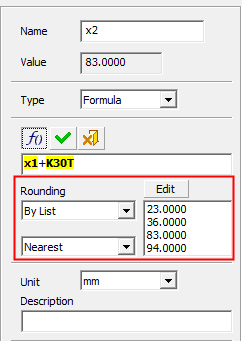
(Rounding) By List option showing the available fields |
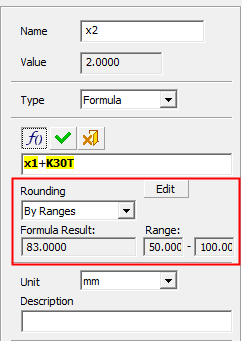
(Rounding) By Ranges option showing the available fields |
|
|
|
|
|
|
No Rounding |
No rounding – keep the exact formula result. |
||||||
|
By Increment |
Round by increment. Set the increment value by selecting one of the options from the dropdown list:
|
||||||
|
By List |
Round to a set of values from a list (usually the list of items in a catalog column). The value can only be rounded to one of the values on the list. This list of values is derived from the List Editor dialog, which is displayed by clicking the Edit button above the list. This is the same List Editor dialog mentioned in the From List explanation above. To edit the list, double-click it to display the List Editor dialog, and then edit the list as required. If the From Catalog checkbox is selected in the List Editor dialog, the values list cannot be edited. The Nearest / Lower Nearest / Upper Nearest mechanism works here also (see above). |
||||||
|
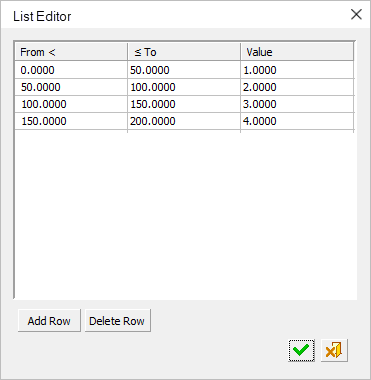
By Ranges |
Round to a predefined output value for each range. This is used to define different rounding for each range of formula results. The system identifies the range in which the actual result of each formula falls and then shows the relevant output value. This option comprises a list of ranges (From - To values), and for each range an output value is displayed. The system checks for the range that includes the actual result of the formula and then outputs the relevant value to the Value field. The actual result of the formula is displayed in the dimmed Formula Result field. Adjacent to this field are the Range fields that display two dimmed values fields showing the From - To values of the range that includes the result. This range of values is derived from the List Editor dialog, which is displayed by clicking the Edit button adjacent to the Rounding option. The contents of this List Editor dialog are different to those previously mentioned. This dialog has 3 columns with the titles: From <, ≤ To, Value. The actual range is defined so that it includes that To value (equal or smaller than condition) but not the From value (greater than condition). This means that if you have the range 100-200 and the next range is 200-300 and the formula result is exactly 200, it will be placed in the first range. The List Editor dialog showing the columns and values.
Notes:
Add Row: This button adds a row of values to the bottom of the list. By default, the values of the new row are automatically adjusted, such that:
Delete Row: This button deletes the row that currently has a selected cell. The values of subsequent rows are automatically adjusted, such that:
|