Section Line 

Access: Open this function from one of the following locations:
-
Click the
button in the toolbar. -
Select Views > View Creation > Section Line from the menu bar.
-
Select Drafting Symbols > Section Line on the popup menu (right-click the graphics area).
Add a section line to the drawing.
|
The Section Line dialog displays
|
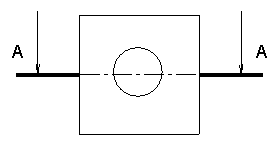
Below is an example of the symbol:
See Entity Overview for a general description. |


Note: See Align Section Line for details on how to define a section line through points.
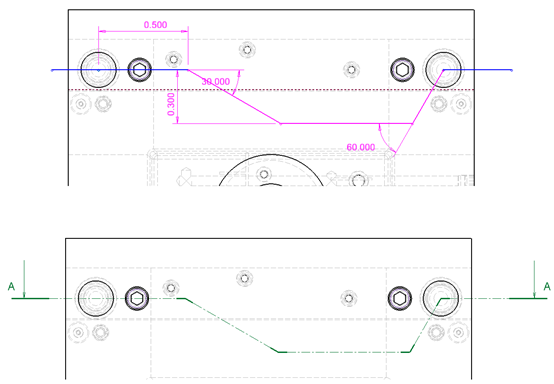
The section line dialog contains an option to generate the section line using the Sketcher. This allows for much easier creation and editing of complex section lines. It also allows adding dimensions to control distances and angles.
Click the Sketcher icon ![]() on the Section Line dialog to enter this mode. Select the view on which the section should be created and use the standard sketcher tools to sketch the section line.
on the Section Line dialog to enter this mode. Select the view on which the section should be created and use the standard sketcher tools to sketch the section line.
Note that acquiring a reference point requires hovering above the point for a short time or using the Add Reference tool. The Add Geometry tool may also be used to create lines.
The created lines are presented as lines while in this mode; they are only displayed as section lines when exiting this mode. If the sketch is not valid for a section line, a warning message is displayed. Exit this mode using the right-click popup menu and selecting the OK or CANCEL options.
Create a section line
-
InvokeInvoke the Section Line function.
-
Pick points and create a section line.
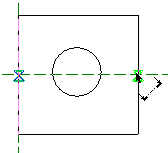
The section line is drawn through the picked points.
If the section line intersects with more than one view, it is necessary to define to which view the section line will be related.
-
Edit the section line points using the auto-alignment lines.
-
Edit its parameters with the help of the hot spots and tips either directly in the graphic area or on the popup submenu. Change font style
 and character size also, if required
 -
To complete the current operation and remain in the dialog, click the Apply
 button or <exit><exit>.
To exit the function, press the Close button.
Notes:
-
Right-click the entity itself to access the entity-specific (for editing) and general functions from the popup submenu.
-
Double-click the entity to edit it.
-
See the Symbol notes for additional information.