|
|
Hole Safety Distance  : Options and Results

Access: Open this function from one of the following locations:
-
Select Mold Design > Cooling > Hole Safety Distance from the menu bar.
-
Select Cooling > Hole Safety Distance > Hole Safety Distance from the Mold Design Guide Toolbar.
Verify safety distances between all hole types (cooling holes and non-cooling holes) and the distances between holes and part faces to ensure that these distances are above a defined safety threshold.
The Hole Safety Distance function identifies design errors that may lead to leakage in molds before manufacturing. Leakage may be caused by corrosion in cooling channels that are not far enough from other cooling channels and holes. The function enables you to analyze and to quickly detect design mistakes and fix the design before actually producing the mold.
The analysis result is displayed in the Hole Safety Distance Pane.
If analysis data already exists, the Hole Safety Distance Pane is automatically displayed, showing the results of the analysis.
If analysis data does not exist, the Hole Safety Distance function is opened. Set the parameters and click Start Analysis; the Hole Safety Distance Pane is displayed, showing the results of the analysis.
Required Step 1 
Select the objects and faces to be analyzed.
If an assembly or sub-assembly is active, select the entities and press <exit><exit> when finished.
When working in the Part environment or if there is an active part in the Assembly environment, all the objects in the part are automatically selected and the next step in the function is invoked.
Required Step 2 
Analyze the distances between holes (cooling holes and non-cooling holes) and the distances between holes and part faces, to ensure that these distances are above a defined safety threshold.
The part faces include non-hole faces, active faces (faces touching the plastic) and other faces (anything that is not a hole or active face).
Different thresholds may be defined for each analysis.
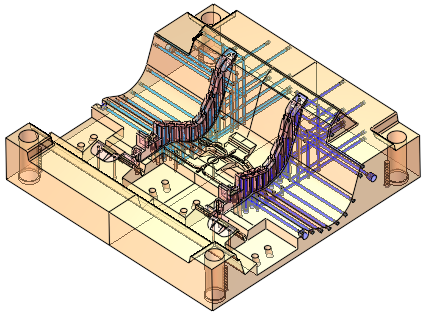
The objects/faces selected for analysis in step 1 are displayed as transparent (showing the holes) and the following analysis options (collision categories) are available:
|
|
|
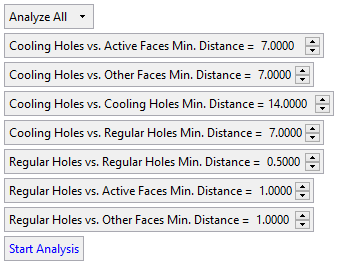

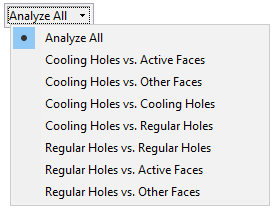
Either select the collision category on which the analysis is to be performed and also set the minimum distance threshold value, or select Analyze All to perform an analysis of all the collision categories and set each individual minimum distance threshold value for each analysis.
Set the minimum distance threshold for each of the analyses. If the distance between the objects being analyzed is less than the Min. Distance value, then these are considered as collisions.
The default minimum distance values are set in the Preferences.
|
Analyze All |
Select the analysis to be performed, from the dropdown list of collision category options.
|
||
|
Cooling Holes vs. Active Faces |
Checks the minimum defined distance of cooling holes against active faces (faces touching the plastic). |
||
|
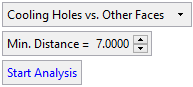
Cooling Holes vs. Other Faces |
Checks the minimum defined distance of cooling holes against other faces (anything that is not a hole or active face). |
||
|
Cooling Holes vs. Cooling Holes |
Checks the minimum defined distance of cooling holes against cooling holes. |
||
|
Cooling Holes vs. Regular Holes |
Checks the minimum defined distance of cooling holes against regular (non-cooling) holes. |
||
|
Regular Holes vs. Regular Holes |
Checks the minimum defined distance of regular holes against regular holes. |
||
|
Regular Holes vs. Active Faces |
Checks the minimum defined distance of regular holes against active faces (faces touching the plastic). |
||
|
Regular Holes vs. Other Faces |
Checks the minimum defined distance of regular holes against other faces (anything that is not a hole or active face). |
||
|
Min. Distance |
Set the minimum distance threshold for each of the analyses. If the distance between the objects being analyzed is less than the Min. Distance value, then these are considered as collisions. The default minimum distance values are set in the Preferences. |
||
|
Start Analysis |
Start the analysis to verify the safety distances between holes and other faces. The analysis result is displayed in the Hole
Safety Distance Pane.
|
Notes: Holes are recognized as 'cooling holes' if they were created by the Cimatron cooling functions, or if they are marked as a cooling circuit using the Analyze Cooling Circuit function.
The analysis result is displayed in the Hole Safety Distance Pane.
The objects/faces selected for analysis are displayed as transparent (showing the holes) and the Hole Safety Distance dialog is displayed.
|
|
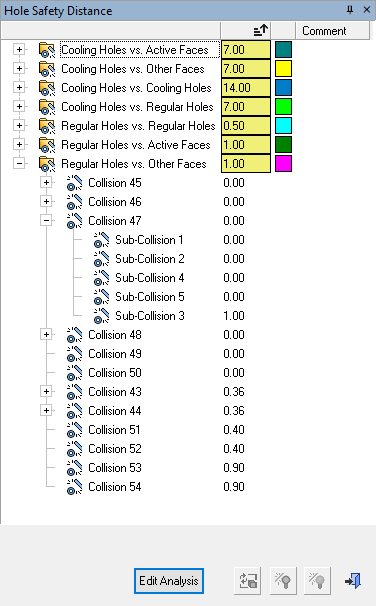
Example of the Hole Safety Distance dialog |
Press Close ![]() in the Feature Guide to complete the function.
in the Feature Guide to complete the function.
|