Import Dialog

Access: Select one of the following methods:
-
Click the
 button from the toolbar.
 -
Select File > Import > Import from the menu bar.
-
Select File > Import > To Current from the menu bar.
When the Import dialog is displayed, select the appropriate option from the Files of Type field.
Import a file from an external file format into a Cimatron file using the Data Interface Import Dialog mechanism. This involves importing a file created on a system supplied by a different vendor and requires data to be exchanged digitally from this system into a Cimatron file.
Whether you choose to import into a new Cimatron file or into the currently open Cimatron file, the Import dialog is displayed.
There are a number of ways of importing files into Cimatron:
-
Selecting individual or multiple files of the same file type (IGES, CATIA, etc.).
-
From a batch file (.bch) which lists the full path names of the files to be imported. These files may be of mixed file types.
Notes:
-
When another file is currently open, any file type (Modeling, Drafting, or NC) can be imported.
-
For information regarding associativity in import/export operations in the Part application, see Associativity.
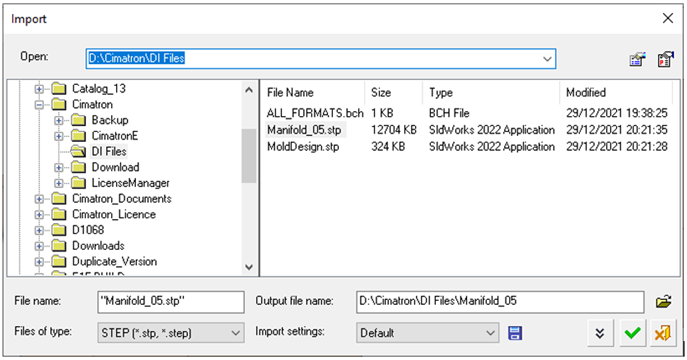
The Import dialog is shown below:
For a summary of the Data Interface Import/Export formats supported by Cimatron (including their CAD version numbers), see Cimatron's Import/Export Capabilities at a Glance.
Cimatron retains the settings of the data interface (Import/Export) dialog from its last use, including the menu state (expanded or collapsed) and the tab that was opened.
Click on an item in the dialog for a description.
Notes:
-
To define default conversion settings, use the Data Interface Preferences.
Press the button (on the top right corner of the Import dialog) as a short cut to the Preferences Editor and navigate to General > Data Interface.
 -
To display the File Information dialog, press the
 button (on the top right corner of the Import dialog). This dialog displays relevant information about the imported file.
 -
Press the Save Settings button
 to create customized parameter sets. This saves time by allowing you to pre-define and save parameter values for certain import or export operations, and then enabling you to "recall" these parameter values by selecting the appropriate setting.
 -
The Expand button
 displays an extension of the Import dialog that shows additional conversion parameters.
This dialog extension contains two tabs:- General: which displays general file conversion parameters.
- Parameters: which displays file conversion parameters that are specific to the file type being converted.
-
The Import and Export dialogs can be resized be dragging the edges/corners of the dialog.
Import Interaction
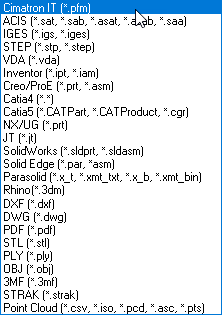
- Choose the type of file to import from the Files of Type field. Available options are shown below:
- Browse to the appropriate directory and select the required file. Multiple files of the same file type (IGES, PFM, SAT, and so on) can also be selected.
- Set the output file name and the destination path (browse to the directory where you wish to save the required file).
- For Import settings, either accept the default parameter values, or select an import setting (with predefined parameter values) from the drop-down menu, or create your own import setting.
- Either:
- Click OK
 to accept the default (or selected Import setting) parameters and import the file.
 - Click the Expand button to display an extension of the Import dialog that shows additional conversion parameters.
- Click OK
- Define the parameters and, if required save the parameter settings in a new Import setting, and then click OK .
- In specific cases (depending on which files types you import), the File Information dialog is displayed.
This dialog displays relevant information about the imported file. - To automatically open imported files at the end of import operations, select the Open Created File box in the Data Interface Preferences. If this box is not selected, the imported file is not automatically opened.
Information about the original source file is added to the Document Description attribute of the imported file, and a timestamp is appended to the name of an imported part file in the Feature Tree.