|
|
Pocket Manager: Advanced Selection

Access: Open this function from the following location:
-
Click the Advanced Selection option in the Pocket Manager dialog.
Manually define pockets that the automatic analysis was not able to detect due to the pocket recognition rules. Screen parameters are displayed to refine the pocket detection analysis.
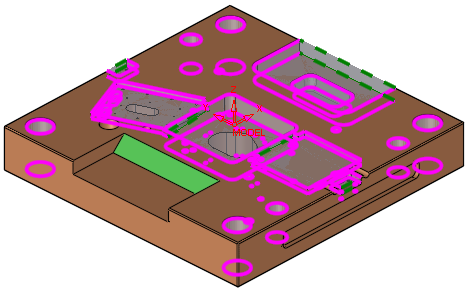
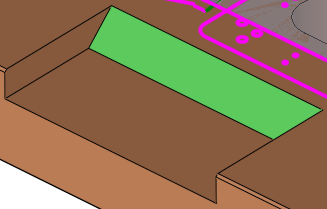
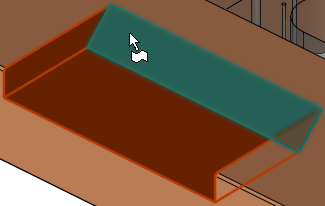
In some cases the automatic pocket analysis fails to detect pockets, due to the pocket recognition rules. For example, in the image below, after using the Select All Displayed Surfaces option, there is a pocket which the system failed to detect. This is because the green face has a different angle, and according to the detection logic, this is not a valid condition.
|
|
|
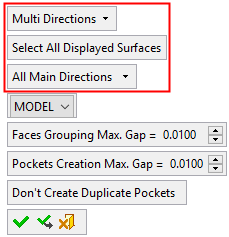
To manually detect this pocket, use the Advanced Selection option. When this option is invokedinvoked, the following screen parameters are displayed, depending on the selected dropdown options:
|
Free Selection or |
Multi Directions: |
|
|
|
|
|


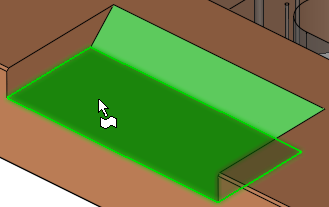
Free Selection example
-
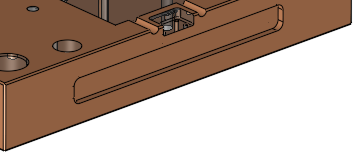
Click the bottom face of the pocket. The whole pocket is selected, using the Free Selection option.
-
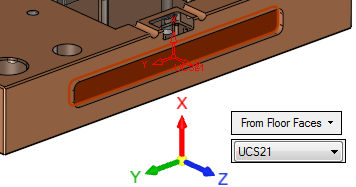
Click the face of the wall that has a different draft angle to deselect it. Press OK.
-
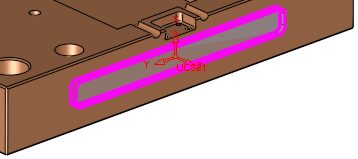
The result is a new manually defined pocket which contains only the flat floor. The green face is not included and the pocket is open on both sides.

Although it is not the full feature volume which is detected, the Advanced Selection option provides the means to manually define pockets which the automatic analysis was not able to detect.
Note: When the system is in pocket selection mode (for example, when selecting pockets for procedures), in addition to the selection options available in the Pocket Manager, the pockets can also be selected By Box.
Parameters:
|
Free Selection |
This is a dropdown list of the following options:
|
||||||||||||||
|
Select All Displayed Surfaces |
This option is displayed if the Multi Directions option is selected, above. |
||||||||||||||
|
All Main Directions |
This option is displayed if the Multi Directions option is selected. The list contains the following options:
|
||||||||||||||
|
<UCS List> |
This is a dropdown list of all the available UCSs, used to determine the direction in which the system detects the pockets. See the Pocket Manager: Active UCS option. |
||||||||||||||
|
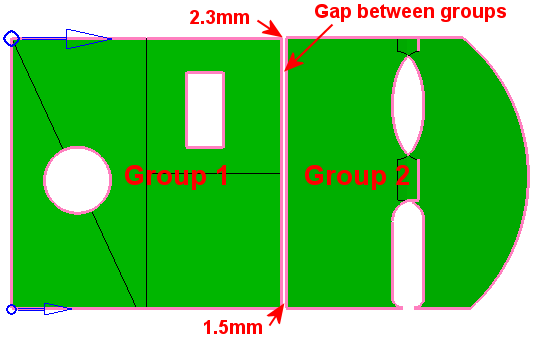
Faces Grouping Max. Gap |
Create NC pocket geometry based on this Max. Gap value. This maximum gap value is used to analyze the groups of selected faces and create the required geometry. This parameter is used to group faces according to the defined Max. Gap value (the selected faces are grouped considering the gaps between them). In the example below, there are two groups of faces separated by a gap
of 1.5 to 2.3 millimeters. In this example, the Faces
Grouping Max. Gap parameter = 1mm, hence the two groups.
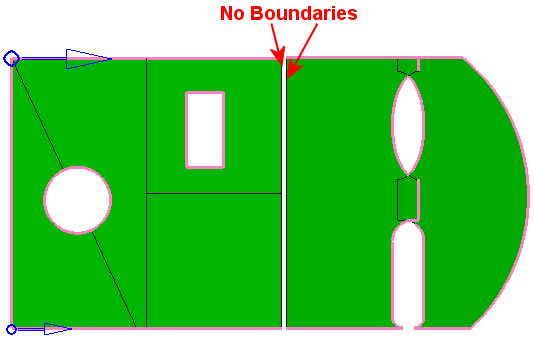
If the Faces
Grouping Max. Gap value is changed to 2.5 (greater than both gap
values), the boundary segments that were before on both sides of the gap
no longer exist. All faces are now grouped in one group.
See the note below regarding this parameter.
|
||||||||||||||
|
Pockets Creation Max. Gap |
Create NC pocket geometry based on this Max. Gap value. This maximum gap value is used to analyze the faces and create the NC pockets. This parameter is used to concatenate faces according to the defined Max. Gap value. See the note below regarding this parameter.
|
||||||||||||||
|
Don't Create Duplicate Pockets |
Toggle option Don't Create Duplicate Pockets / Allow Creating Duplicate Pockets:
|

Note: The detection of some pockets may be prevented if the Faces Grouping Max. Gap value is greater than the Pocket Creation Max. Gap value. In this case, an appropriate warning message is displayed.
Approval options
|
|
OK: Accept the changes, perform the operation, and close the current dialog/task. |
|
|
Apply: Accept the changes, perform the operation, and keep the current dialog/task open. |
|
|
Cancel: Cancel all changes and close the dialog/task without saving the settings. |
See also the Pocket Manager: Select All Displayed Surfaces option.
|