|
|
Pocket Manager 

Access: Open this function from one of the following locations:
-
Select NC Process > Model > Pocket Manager from the menu bar.
-
Click the
button in the
NC Guide Toolbar.
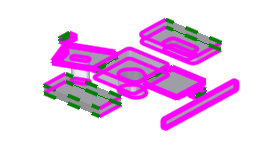
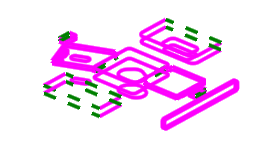
The Pocket Manager is a Feature Based Machining analysis function that recognizes pockets for safer and faster programming. The function automatically recognizes pocket (and slot) geometries, including open edges, and considers the height, shape, and draft angles of each pocket. The recognized pockets can be used in downstream procedures and templates and you can filter the selection by pocket attributes, such as open/closed walls, through/bottomed pocket, with or without draft angles.
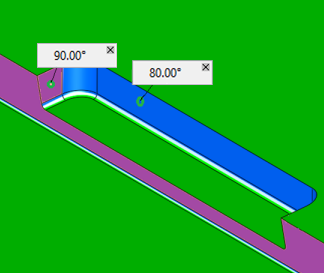
The image below shows an example pocket recognized by the system; an open pocket with different draft angled walls.
The data from these recognized pockets can either be used in procedures specifically tailored for pocket operations (such as the Contours from Pockets option or the Volume Pocket procedure) or general NC procedures.
In general, some of these pockets can then be milled using 2.5-axis procedures such as Pocket, Profile, Chamfer, and 2D Cleanup. Other pockets that include features that cannot be milled by 2.5-axis procedures (for example pockets that include round corners between the floor and walls) can be milled by 3-axis procedures such as the Volume Milling (Rough or VoluMill procedures) or the Surface Milling Finish procedures, with the relevant geometry from the Pocket feature being automatically selected by the procedure.
The pockets are stored as features in the feature table and relevant NC procedures can retrieve their input from this table.
See Pocket Output Geometry for Downstreaming.
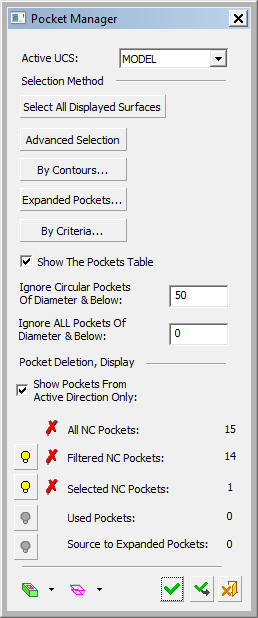
When this function is usedused, the Pocket Manager dialog is displayed.
|
This dialog is similar to that of the geometry Pocket Selection dialog and the Contour Manager dialog, with differences resulting from the functionality. Note: When selecting geometry to define pockets, screen parameters may also be displayed to provide additional control over the types of geometry to be defined as pockets for a specific operation.
|
Note: When the system is in pocket selection mode (for example, when selecting pockets for procedures), in addition to the selection options available in the Pocket Manager, the pockets can also be selected By Box.
The lower part of the Pocket Manager dialog, Pocket Delete, Display, enables you to hide/show and delete pockets and provides you with the following information:
|
Only show pockets created on the active UCS direction. |
|
|
All NC Pockets |
The number of all NC pockets detected with diameters greater than the threshold entered in the parameter Ignore Circular Pockets of Diameter & Below. |
|
Filtered NC Pockets |
The number of filtered NC pockets (the number of lines in the Pocket Table, whether or not the table is displayed). |
|
Selected NC Pockets |
The number of NC pockets currently selected. |
|
Used Pockets |
The number of used NC pockets. |
|
Source to Expanded Pockets |
The number of NC pockets used as a source for Expanded Pockets. |
The option to hide/show and delete each of the above mentioned pockets groups.
See Also
- Pocket Manager: Advanced Selection
- Pocket Associativity
- Pocket Output Geometry for Downstreaming
- Pocket Recognition Rules
- Pocket Template
- Popup Menu
- Buttons
Buttons
|
|
Original Display Attributes: Define the method of displaying the original geometry, from the following dropdown list of options:
|
||||||||||||
|
|
Volumes and Contours: Define the method of displaying the pockets, from the following dropdown list of options:
|
||||||||||||
|
|
OK: Accept the changes, perform the operation, and close the current dialog/task. |
||||||||||||
|
|
Apply: Accept the changes, perform the operation, and keep the current dialog/task open. |
||||||||||||
|
|
Cancel: Cancel all changes and close the dialog/task without saving the settings. |

See also
|