|
|
Post Process: GPP2 Runtime Environment Dialog

Access: To enable this dialog to be displayed, first select the Run GPP2 in Debug mode checkbox in the General NC Preferences.
The GPP2 Runtime Environment Dialog is then displayed when exiting the Post Process dialog after selecting a GPP2 Post Processor and pressing the OK ![]() approval option.
approval option.
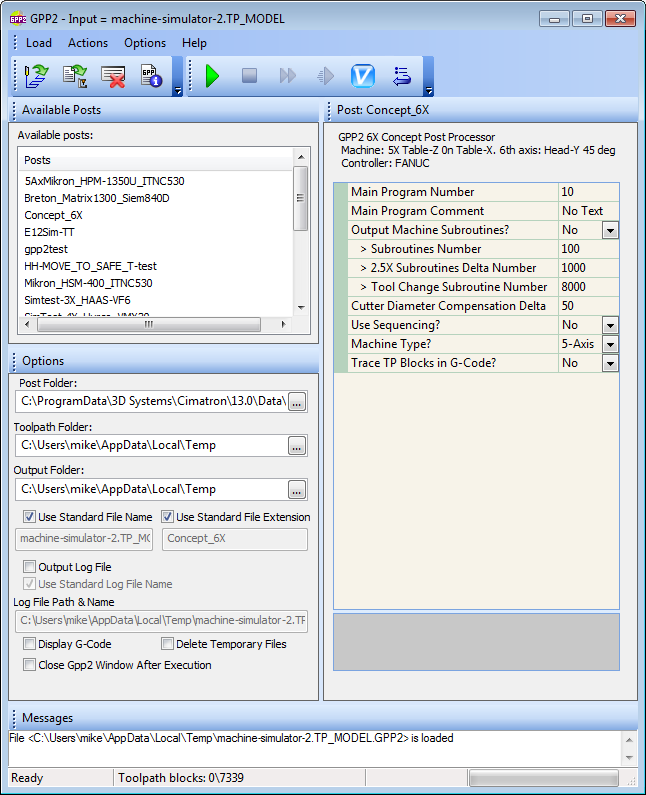
The GPP2 Runtime Environment Dialog is displayed (press the Access button above to see when this dialog is displayed). This dialog is used to generate the GPP2 G-Code.
|
|
The GPP2 dialog consists of the following sections: Toolbar Buttons To generate the GPP2 G-Code file, see the Interaction. |
Interaction
Generating the GPP2 G-Code file using the GPP2 Runtime Environment Dialog
Load the toolpath file ![]() , if required.
, if required.
Select the appropriate Post from the Available Posts pane.
If required, see the explanations on the following sections of the GPP2 Runtime Environment Dialog:
Toolbar buttons
Available Posts
Options
Post Data
Messages
Set the parameters in the Post Data pane.
Define the appropriate directory and file data in the Options pane.
Click Run ![]() .
.
The post file is generated. In the example below, note that the file name and extension are as shown in the Options pane above:
If your Post supports NC Setup Report and/or Tools Report, the report(s) will be created. The full path name of the report is displayed in the Messages pane.
At this stage, if your Post supports Machine Simulation, you can run the VERICUT Simulator by clicking ![]() (see below).
(see below).
Toolbar buttons
The following toolbar buttons are available:
|
|
Load a toolpath. |
|
|
Load a Post. |
|
|
Clear the messages pane at the bottom of the dialog. |
|
|
Show the Post reference file (available only if such a reference file exists). This is an MHT file that contains useful information about the nature of the post; it shows all the GPP2 blocks and their variables specific to the post. The file is created in the folder: |
|
|
Execute the Post. |
|
|
Stop the execution of the Post. |
|
|
Next. |
|
|
Run without debugging. |
|
|
Run the Cimatron to VERICUT Interface. This prepares the interface that enables you to run a VERICUT simulation on the G-Code created by GPP2. In order to actually run the simulation, VERICUT must be installed on your computer. This button is only enabled if the Post supports it and after executing the Post. |
|
|
Restore all the default parameter settings. |
Available Posts
The Available Posts pane lists all the posts located in the defined Post Directory.
Select the appropriate post using one of the following methods:
-
Double-click a post from the Available Posts list.
-
Load a post by either clicking the Load Post
 button, or by selecting Load > Post-Processor from the dialog menu bar.
Options
This pane enables you to define various output options.
|
Post Folder |
The folder where available posts are stored. |
|
Toolpath Folder |
The folder where the toolpath is stored. |
|
Output Folder |
The folder where the resulting post will be saved. |
|
Use Standard File Name |
If selected: Use the current (input) file name as the name prefix for the generated post file. In this case, the file name field is grayed out.
|
|
Use Standard File Extension |
If selected: Use the selected post name as the name suffix of the generated post file. In this case, the file name field is grayed out.
|
|
Output Log File |
If selected: Output a log file of the execution of the post.
|
|
Use Standard Log File Name |
This checkbox becomes active if Output Log File is selected. If selected: Use the current (input) file name as the name prefix of the generated log file.
|
|
Log File Path & Name |
This field becomes active if Use Standard Log File Name is unselected. |
|
Display G-Code |
Display the G-Code for the generated post file.
|
|
Delete Temporary Files |
Delete all temporary files created during the execution of the post. |
|
Close GPP2 Window After Execution |
Close the dialog after executing the post. |
Post Data
This pane displays the parameters for the selected post. Set these parameters as required.
Messages
This pane displays system messages.

|