|
|
Print: General Settings

Access: Open this function from the following location:
-
Press the General Settings button on the Print dialog.
The General Settings dialog is displayed when you press the General Settings button in the Print dialog. The General Settings dialog is used together with the Print dialog to define a number of print settings. See below.
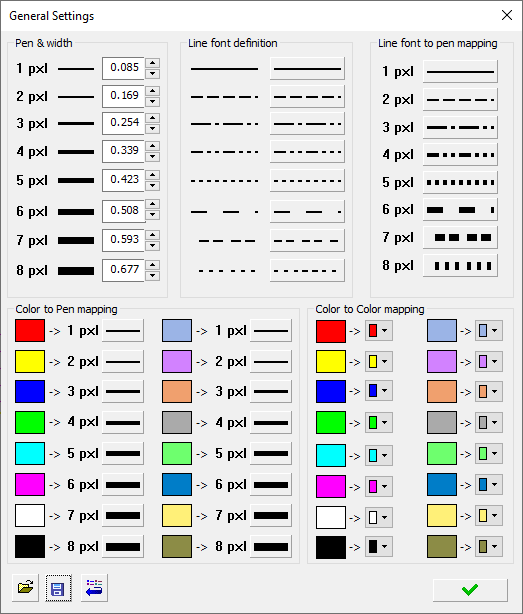
The following print settings can be defined in the General Settings dialog:
|
Pen & Width |
In the Pen & Width frame, you can change the actual print size of each pen. The system displays default pen widths for Inch and MM units. |
||||
|
Line Font Definition |
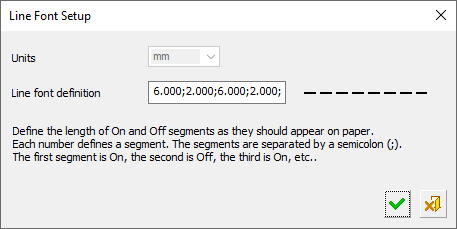
In the Line Font Definition frame, you can change the actual appearance of each line font. Clicking any of the buttons next to the line font opens the following dialog.
Define the length of On and Off segments as they should appear on paper. Each number defines a segment. Segments are separated by a semicolon (;). The first segment is On, the second is Off, the third is On, etc. Select the OK Select the Cancel |
||||
|
Line Font to Pen Mapping |
In the Line Font to Pen Mapping frame, you can assign a pen width to each line font. The pen width buttons open the pen width pull down menu with the currently selected pen width highlighted.
|
||||
|
Color to Pen Mapping |
In the Color to Pen Mapping frame, you can assign a pen width to each color. The pen width buttons open the pen width pull down menu with the currently selected pen width highlighted.
|
||||
|
Color to Color Mapping |
In the Color to Color Mapping frame, you can assign a different color to each color. The color buttons open the standard color pick tool. |
||||
|
|
Load: Load a saved INI file containing preset print configurations. The print settings are saved to an INI file. The default INI file is named CimPlot.INI located in the following folder: |
||||
|
|
Save: Save the settings. The print settings are saved to an INI file. The default INI file is named CimPlot.INI located in the following folder: |
||||
|
|
Reset: Reset all values and settings to the system defaults. |
||||
|
|
OK: Accept the changes, perform the operation, and close the current dialog/task. Return to the Print dialog. |
|