|
|
Print 

Access: Open this function from the following location:
-
Select File > File Tools > Print from the menu bar.
Print out the current file.
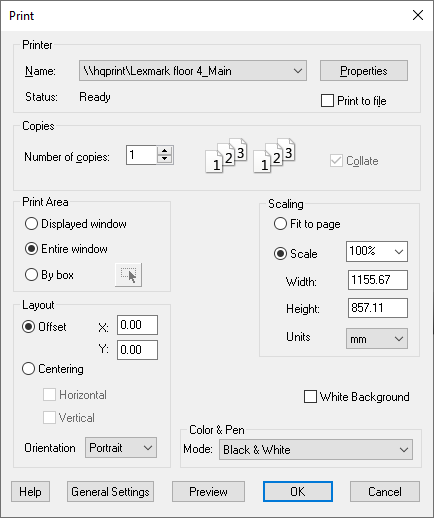
The Print dialog is displayed.
To print the current view in the graphics area:
-
Define the parameters:
|
Printer |
The Printer frame is similar to the one presented in the standard print interaction of Microsoft® Windows®. (A list of available printers, the printer's status, a button for the standard properties window of the printer, and the print to file option.) The CimatronPDF printer driver is provided and enables you to print to PDF files. Note: See Printing the Online Help for the requirements to view a PDF file and also for links to the PDF versions of the Online Help.
|
||||||||||
|
Copies |
The Copies frame enables you to define the number of copies to print and whether to collate them or not. If the number of copies is more than 1, the Collate checkbox is enabled and by default is checked. Collate enables you to define how to produce multiple copies of a print job. For example, if you have a 5 page print job and you wish to produce 3 copies:
|
||||||||||
|
Print Area |
The Print Area frame allows you to define the area to be printed. Naturally any definition here has an immediate effect on the Width and Height fields in the Scale frame. It could also affect the scale if the Fit to Page option is used (see the next item). The printed area can be defined in the following ways:
|
||||||||||
|
Scaling |
The Scaling frame enables you to define the printing scale, using the following options:
|
||||||||||
|
Layout |
The Layout frame enables you to set the position and orientation of the print area on the page, using the following options:
|
||||||||||
|
White Background |
Set the background color. This can either be white or the default color
in the current display. |
||||||||||
|
Color & Pen |
The Color & Pen frame allows you to switch between the following options:
|


 . The cursor changes to :

-
Press the appropriate button:
|
Help |
Display this Online Help topic. |
|
General Settings |
The General Settings button opens the General Settings dialog (see below). |
|
Preview |
The Preview button shows a rough sketch of the page, its margins and the space the printed area is going to use on it. It takes into account the page defined on the printer and its margins. The preview is displayed in the Print Preview dialog. |
|
OK |
OK: Accept the changes, perform the operation, and close the current dialog/task. This sends the selected data to the printer. |
|
Cancel |
Cancel: Cancel all changes and close the dialog/task without saving the settings. |
Note: The Print tool works with a save-last-parameter mechanism that ensures that whenever the tool is used, you will get the parameters you used the last time (also across sessions). This also goes for the General Settings dialog.
|