Previewing a Procedure


Access: Press the Preview button  on the Work Mode Dialog when a procedure is open.
The Preview dialog provides a set of parameters that can be quickly previewed and gives an analysis of the predicted result of running the procedure without having to actually calculate the procedure.
This reduces the overall NC planning time, by giving you more information at an early stage and allowing you to change parameters and see the effect of the estimated result, without having to calculate the toolpath of the procedure.
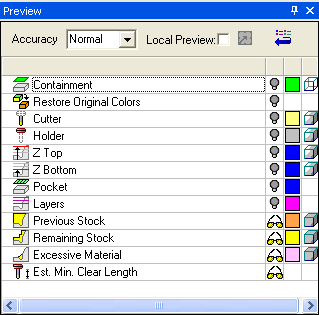
The Preview dialog is displayed:
Preview Mode Options
The following preview mode options are available on the top row of the Preview dialog:

|
Accuracy
|
This parameter enables you to define the accuracy level when calculating the following previews: Previous Stock, Remaining Stock and Excessive Material.
The Accuracy dropdown list contains the following options:
|
Normal
|
This is the default accuracy level.
|
|
High
|
The High accuracy level displays more accurate results. However, the preview calculation times are longer.
|
|
|
Local Preview
|
Default preview operations cover the whole part (Global Preview). By selecting the Local Preview option, you can define a specific area of the part to be previewed.
When Local Preview is selected, a box defining the local preview area is displayed on the Containment preview plane. All subsequent preview operations are limited to the defined local area. Initially, this box covers the whole part.
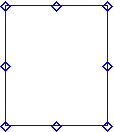
To define a specific local area, press the Edit Local Box button  (which becomes active when Local Preview is selected). When the Edit Local Box button is pressed, the button changes to (which becomes active when Local Preview is selected). When the Edit Local Box button is pressed, the button changes to  and the local box is displayed in edit mode with 8 control points on the box. Pick and drag these control points to resize the local preview box over the specific required area of the part. and the local box is displayed in edit mode with 8 control points on the box. Pick and drag these control points to resize the local preview box over the specific required area of the part.
|
Initial local preview area, covering the whole part.
|
The local preview box in edit mode after the Edit Local Box button  is pressed. is pressed.
|
The local preview box in edit mode after picking and dragging the control points to resize the box over the specific required area of the part.
|
|

|
|

|
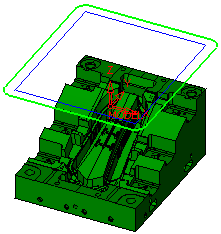
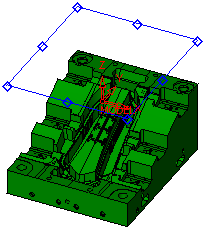
Local Preview examples:Local Preview examples:
|
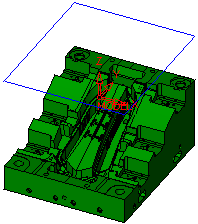
Initial local preview area, covering the whole part.
|
The local preview area is displayed on the Containment preview plane (shown here in green).
|
|
|
|
|
The local preview box in edit mode after the Edit Local Box button  is pressed. is pressed.
|
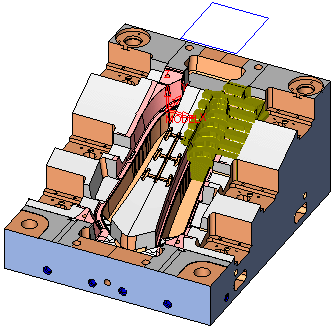
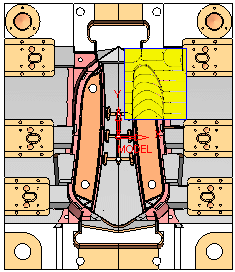
The local preview box dragged to a specific area of the part.
|
|
|
|
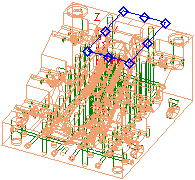
An example of a Remaining Stock preview within the local box:
Notes:
-
When the Edit Local Box button  is pressed (and changes to is pressed (and changes to  ), the items in the Preview dialog are temporarily grayed out. ), the items in the Preview dialog are temporarily grayed out.
-
Switching between Local Preview and Global Preview causes the preview of the following items to be reset (returns to the  button): button):
-
When in High Accuracy mode, the Est. Min. Clear Length is grayed out.
-
Upon reentering Local Preview, the last local box size and position is used.
-
After a UCS change (only if the Z direction is changed), the Local Preview option in unselected and reset. This means that the preview has returned to the Global Preview mode and that the local box is deleted.
|
|

|
Restore the default preview attributes as defined in the Preferences.
|
Preview Display Options
The following icons control the display of items in the Preview dialog:
|
 
|
Fast Preview: This preview is a fast operation and is automatically updated whenever changes are implemented (such as procedure parameters, accuracy, etc.). Hide / Show items for immediate preview.
|
|

|
Manual Update Preview: This preview is a bit slower due to more complex calculations.
Once the item has been calculated and previewed, the  icon changes to hide/show icon changes to hide/show   for immediate preview. Any changes which affect the preview result, resets (deletes) the preview and the icon changes back to for immediate preview. Any changes which affect the preview result, resets (deletes) the preview and the icon changes back to  . In this case, press the . In this case, press the  icon again to recalculate the preview according to the new parameters. icon again to recalculate the preview according to the new parameters.
|
|

|
Change the color of a previewed item.
|
|
  
|
Change the render mode (shade / transparent / wireframe) of a previewed item.
|
Preview Options
The following options are available in the Preview dialog.
The options available in the Preview are dynamically changed according to the milling technology selected. For example, Pocket and Layers are not displayed in Surface milling.
|

|
Containment
|
Hide or Show ( / / ) a preview of the user contours in the current procedure, including contour offset conditions. The Containment shows the area that can be covered by the current tool inside defined contours and the machining area (a combination of the user contour and part surfaces). ) a preview of the user contours in the current procedure, including contour offset conditions. The Containment shows the area that can be covered by the current tool inside defined contours and the machining area (a combination of the user contour and part surfaces).
|
|

|
Restore Original Colors
|
Hide or Show ( / / ) a preview of the original color of the faces rather than the default display of selected faces in the default color. ) a preview of the original color of the faces rather than the default display of selected faces in the default color.
|
|

|
Cutter & Holder
|
Hide or Show ( / / ) a preview of the cutter and/or holder. The cutter is displayed at the Containment plane. ) a preview of the cutter and/or holder. The cutter is displayed at the Containment plane.
|
|

|
|

|
Z Top & Z Bottom
|
Hide or Show ( / / ) a preview of the Z Limits (Z-Top and Z-Bottom). ) a preview of the Z Limits (Z-Top and Z-Bottom).
|
|

|
|

|
Pocket
|
Hide or Show ( / / ) a preview of the pocket parameters, showing the toolpath. The preview is displayed within the Containment and at the Containment plane. ) a preview of the pocket parameters, showing the toolpath. The preview is displayed within the Containment and at the Containment plane.
|
|

|
Layers
|
Hide or Show ( / / ) a preview of the Z layers as contours. ) a preview of the Z layers as contours.
|
|

|
Previous Stock
|
Calculate ( ) a preview of the previous stock status. The preview is displayed based on the updated stock before the current procedure. ) a preview of the previous stock status. The preview is displayed based on the updated stock before the current procedure.
|
|

|
Remaining Stock
|
Calculate ( ) a preview of the remaining stock status. The preview is displayed based on the updated stock after the current procedure. ) a preview of the remaining stock status. The preview is displayed based on the updated stock after the current procedure.
|
|

|
Excessive Material
|
Calculate ( ) a preview of the excessive material status. The preview is displayed based on the excessive material after the current procedure. ) a preview of the excessive material status. The preview is displayed based on the excessive material after the current procedure.
|
|

|
Est. Min. Clear Length
|
Calculate ( ) a preview of the estimated minimum clear length. The preview determines the minimum clear length that should be used to machine a part without leaving unmachined regions due to holder collisions. ) a preview of the estimated minimum clear length. The preview determines the minimum clear length that should be used to machine a part without leaving unmachined regions due to holder collisions.
|
 on the Work Mode Dialog when a procedure is open.

 ) and items that can be previewed after a calculation process (
 (which becomes active when
  and the local box is displayed in edit mode with 8 control points on the box. Pick and drag these control points to resize the local preview box over the specific required area of the part.


