|
|
Trim/Extend 
Access: Invoke the Sketcher, define the sketch plane and then invoke this function from the following location:
-
Click the Trim (Split) / Extend button
 in the Sketcher
toolbar.
If this button is not displayed in the toolbar, it is displayed in the Dynamic Trim button flyout in the Sketcher toolbar.
The last used function of this group is displayed in the toolbar.
Trim, split and extend one or more curves with a selected curve or a point.
Trimming will delete the part of the chosen entity beyond the splitting entity. If the trimming entity is a point, the system will trim and extend the entity based on its normal plane. The procedures and examples below show different scenarios for trimming or extending curves. These include multiple selections, trimming/extending an arc/spline based on the selection points, and more.
Trim a curve at a point
-
Create entities to trim in Sketcher.
-
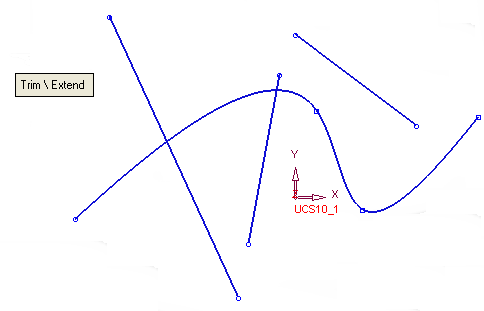
From the Sketcher toolbar click the Trim (Split) Extend
 button to enter the Trim/Extend function, as shown below.
-
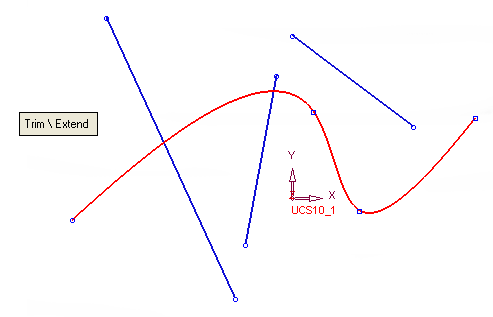
Ensure the Trim/Extend toggle option is selected and pick the curve (the red spline in this case) to trim and then <exit><exit>, as follows:
-
Pick the trimming entity (in this case the red line) and <exit><exit>, as follows:
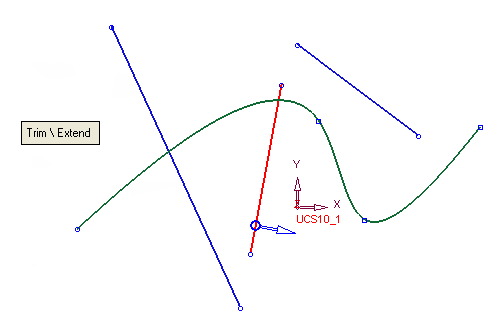
Note: You can select and turn the blue arrow to define the removal direction. The arrow now points to the removal direction.
-
Click OK
 or Apply
  from the Feature Guide to complete the function. The result is displayed, as follows:
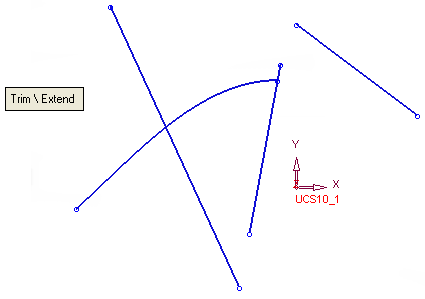
In this case the selected curve was trimmed at the intersection point, between the curve and the selected trimming entity according to the selected direction.
Additional Examples
Example 1: Trim & Extend - Multiple Selections
The example below shows how you can use multiple selections to perform both trim and extend using one Trim/Extend operation.
-
Pick the curves to trim, split or extend (the three red lines) and then <exit><exit>, as follows:
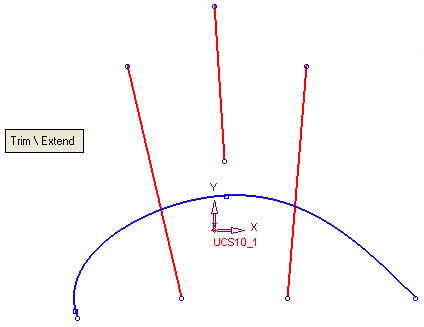
-
Pick the trimming entity (the red spline) and <exit><exit>, as follows:
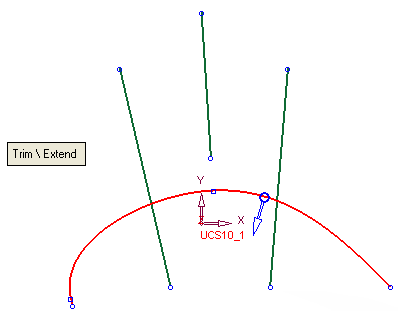
Note: You can select and turn the blue arrow to define the removal direction. The arrow now points to the removal direction.
-
Click OK
 or Apply
  from the Feature Guide to complete the function. The result is displayed, as follows:
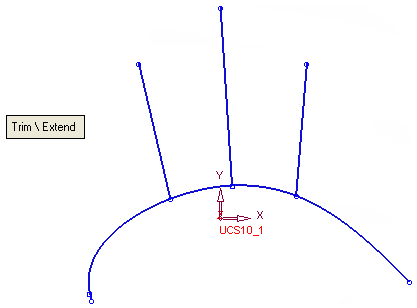
In this case, the middle line has been extended to the trimming entity (which is the curve) and the other two lines have been split according to the selected removal direction.
Example 2: Two Arcs - Two Intersection Points
When arcs are used the results can differ depending on the pick location on the arc. Meaning, selecting point A on the arc can result in a trim result, and selecting point B on the same arc can result in an extend operation. The results can differ, depending on the selection points, as described in the following examples:
Trim: Two Arcs - Two Intersection Points
The example below shows how selecting a point on a specific location on the arc, creates a trimming result.
-
Pick the curve to trim (the red bottom arc, shown below). The pink dot indicates the selection point. <exit><exit>, as follows:
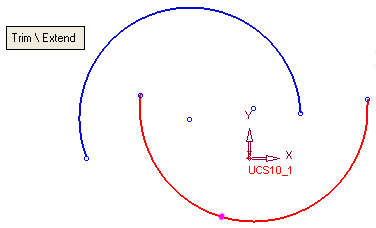
-
Pick the trimming entity (the red top arc, shown below). The pick dot indicates the selection point. <exit><exit>, as follows:
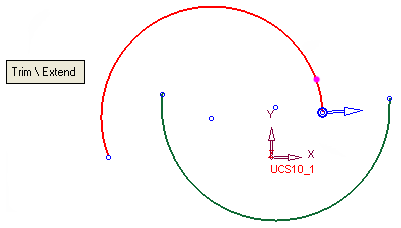
Note: You can select and turn the blue arrow to define the removal direction. The arrow now points to the removal direction.
-
Click OK
 or Apply
  from the Feature Guide to complete the function. The result is displayed, as follows:
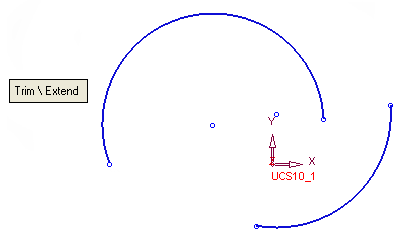
In this case the arc that was selected as the arc to be trimmed, was trimmed according to the selection points in the selected removal direction.
Extend : Two Arcs - Two Intersection Points
This example shows how selecting a point on different location on the same arc that was shown above, creates an extension instead of a trimming result.
-
Pick the curve to extend (the red bottom arc, shown below). The pink dot indicates the selection point. <exit><exit>, as follows:
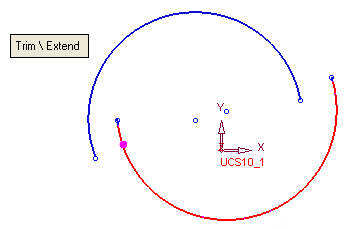
-
Pick the trimming entity (the red top arc, shown below). The pick dot indicates the selection point. <exit><exit>, as follows:
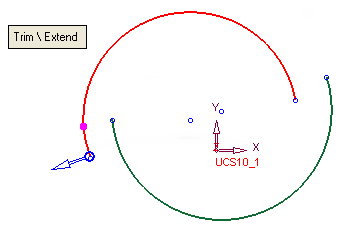
Note: The blue arrow is not relevant in this case since the result is an extension of the curve and no removal is performed and the arrow indicates the removal direction.
-
Click OK
 or Apply
  from the Feature Guide to complete the function. The result is displayed, as follows:
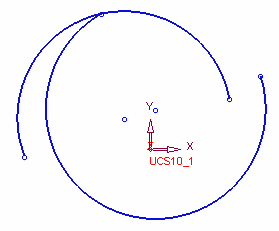
In this case the arc that was selected as the arc to be extended was extended according to the selection points.
Example 3: Arc and Spline - Two Intersection Points
When arcs and splines are used, the results can differ depending on the pick location on the arc and spine. Selecting point A on the arc and point B on the spline can result in a trim operation, and selecting different points on the same arc and spline can result in an extend operation. The results differ, depending on the selection points, as described in the following examples.
Extend: Arc and Spline
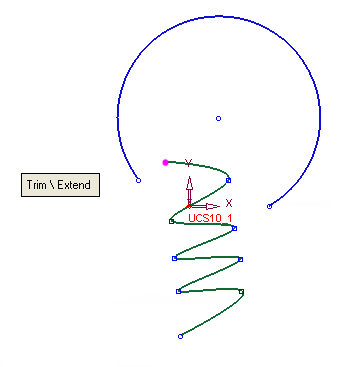
This example shows how selecting two points on the spline and arc creates an extension instead of a trimming result.
-
Pick the spline as the curve to extend. The pink dot indicates the selection point. <exit><exit>, as follows:
-
Pick the arc as the trimming entity. The pick dot indicates the selection point. <exit><exit>, as follows:
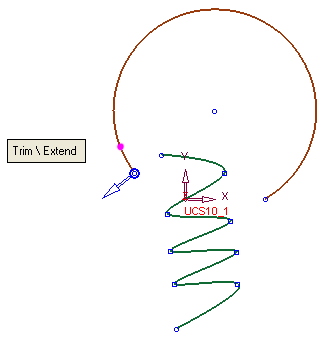
Note: The blue arrow is not relevant in this case since the result is an extension of the curve and no removal is performed and the arrow indicates the removal direction.
-
Click OK
 or Apply
  from the Feature Guide to complete the function. The result is displayed, as follows:
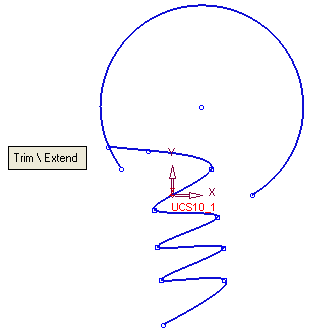
In this case the spline has been extended to the intersection point between the arc and the spline.
Trim: Arc and Spline
This example shows how selecting two points on the spline and arc creates a trimming result.
-
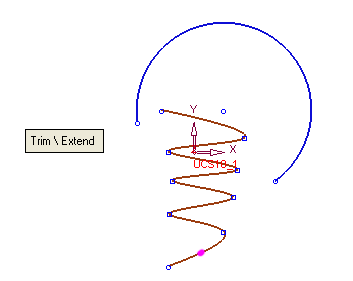
Pick the spline as the curve to trim. The pink dot indicates the selection point. <exit><exit>, as follows:
-
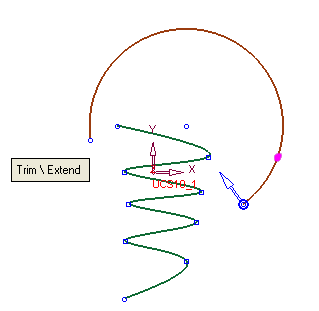
Pick the arc as the trimming entity. The pick dot indicates the selection point. <exit><exit>, as follows:
-
Click OK
 or Apply
  from the Feature Guide to complete the function. The result is displayed, as follows:
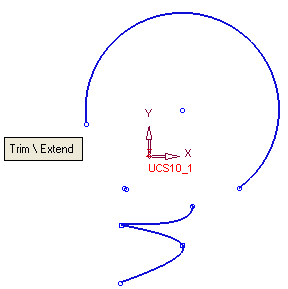
In this case, the spline has been trimmed at the intersection point between the arc and the spline (at the point where the closed contour meets the spline).
|
