|
|
Transfer Die Setup Wizard 
Access: Invoke this function from one of the following locations:
-
Click the Transfer Die Setup Wizard
 button from the initial
toolbar.
 -
Select Tools > Setup Wizards > Transfer Die Setup Wizard from the initial menu bar.
The Transfer Die Setup Wizard assists you in setting up a new Die file by prompting you to define the appropriate parameters. The die application enables you to set up two different forming shape parts. You can import parts containing other formats, such as, DXF, IGES and more.
The Setup Wizard can be invokedinvoked at any time, whether or not another file is open.
General Interaction
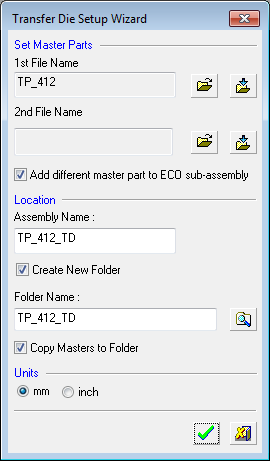
The Transfer Die Setup Wizard dialog is displayed.

-
Define the following parameters:
Use the 1st File Name field to select or import the required die assembly file:
-
Open File
 : Open a Cimatron Part or Assembly file (from the Cimatron Explorer) to create a new Die file.
 -
Import File
 : Import an external file (PFM, IGES, SAT, etc.).
The Assembly Name for the die assembly file is automatically created with a 'TD' (Transfer Die) suffix.
Note: If required, you can select another file using the 2nd File Name field. Cimatron supports all situations where the ECO participants are in different locations.
-
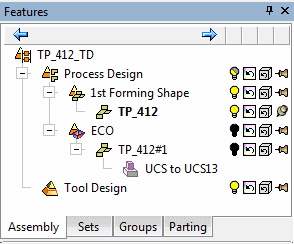
- Select the Add different master part to ECO sub-assembly checkbox if required. This option opens a new sub-assembly (ECO) under the main Die Layout assembly and places a copy of the master file used by the work file. (The copied master file will be used later for compare operations.) See the example assembly tree structure at the end of this Help topic.
-
In the Folder Name field, either:
-
Accept the default location to save the die assembly file
-
Mark the Create New Folder checkbox to activate the Folder Name field.
-
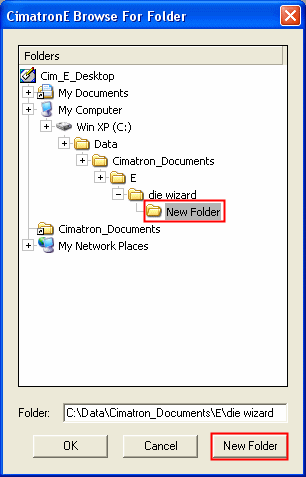
Browse to display the Cimatron Browse For FolderCimatron Browse For Folder window.

-
Click Create New Folder to define the folder name.
-
Click OK.
Note: If you marked the Create New Folder checkbox, the Copy Masters to Folder checkbox becomes available. Optionally, mark this checkbox to add the master part to the project folder, to maintain an organized environment.
-
-
-
In the Units area, select mm or inch as the required units of measurement for the die file.
-
Click the appropriate confirmation button:

OK: Accept the changes, perform the operation, and close the current dialog/task.

Cancel: Cancel all changes and close the dialog/task without saving the settings.
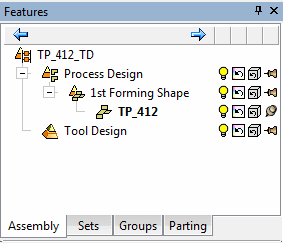
When OK is pressed, the following assembly tree structure is displayed (using the data as shown in the dialog above) - note that the Transfer Die assembly icon is displayed as
 :
:The assembly tree structure:
The assembly tree structure when the Add different master part to ECO sub-assembly checkbox is selected (the ECO sub-assembly is created):


Templates can be used to control the default structure of a die set for Transfer Dies. These templates are located in the following folder:
...\ProgramData\Cimatron\Cimatron\2026.0\Data\Die\Transfer
Templates can be used to control the default structure of a die set for Transfer Dies. These templates are located in the following folder:
...\ProgramData\Cimatron\Cimatron\2026.0\Data\Die\Transfer
Templates can be used to control the default structure of a die set for Transfer Dies. These templates are located in the following folder:
...\ProgramData\Cimatron\Cimatron\2026.0\Data\Die\Transfer
|
