|
|
Cooling Labels  : Options and Results


Access: Open this function from one of the following locations:
-
Select Mold Design > Cooling > Cooling Labels from the menu bar.
-
Select Cooling > Cooling Labels from the Mold Design Guide Toolbar.
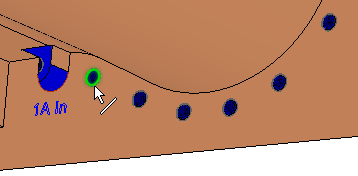
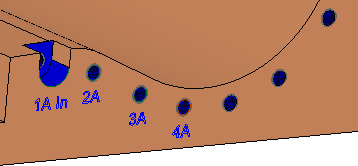
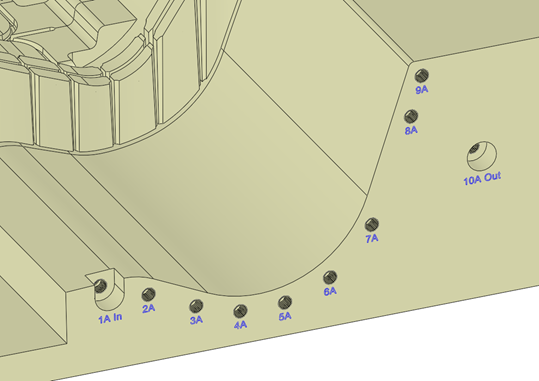
Create text labels next to cooling holes.
This function enables you to set the appearance of the text as well as its position, including an option to set the delta between the selected hole and the text.
Note: The Cooling Labels function can only be used when an assembly is active, since it can be used on several parts and creates an assembly feature.
Required Step 1 
After defining the text parameters in the Cooling Labels dialog, pick cooling hole curves one after another to set the relevant text adjacent to each selected hole.
The Cooling Labels dialog is displayed. Set the required parameters to define the cooling label text.
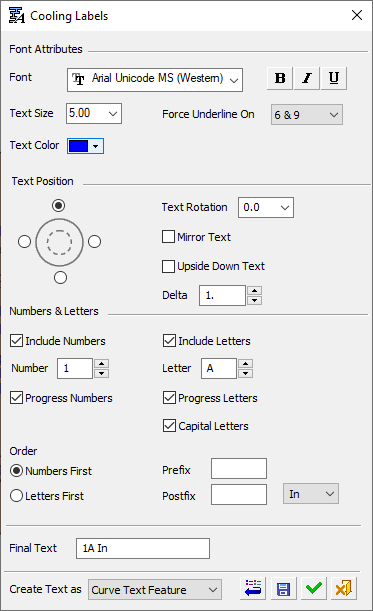
The following parameters are displayed:
|
Font Attributes |
Set the Font type, bold, italics and underline. |
|
Text Size |
Set the required font size in the text. Default = 5 |
|
Text Color |
Select the color of the displayed text. |
|
Force Underline On |
Select the color of the displayed text. Force Underline On enables you
to put an underline under certain numbers even if the Underline option
is turned off. The dropdown options are:
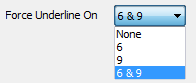 This means that the underline will be under 6 for example, but not under 16. The default is 6 & 9, to differentiate between 6 and 9. |
|
|
|
|
Text Position |
Select the appropriate radio button to position the text on the component, when looking from the top view of the mold. |
|
Text Rotation |
Rotate all text by the entered degree amount. Either enter the degree amount in the field (from -360° to +360°), or select it from the dropdown list. |
|
Mirror Text |
Display the text as mirrored text. This is useful if you are viewing the mold from the bottom. |
|
Upside Down Text |
Display all text upside down. |
|
Delta |
Set the delta distance between the selected hole and the text. |
|
Numbers & Letters |
Define the text format for the labels, whether numbers and/or letters are to be included and their order in the label. |
|
Include Numbers |
When this checkbox is marked When this checkbox is unmarked, numbers are not included in the text and the number-related parameters/options in this section of the dialog become unavailable (grayed out). |
|
Number |
Enter the number on the text or use the spinbox. |
|
Progress Numbers |
When this checkbox is marked When this checkbox is unmarked, the numbers are not incremented after each text selection. |
|
|
|
|
Include Letters |
When this checkbox is marked When this checkbox is unmarked, letters are not included in the text and the letter-related parameters/options in this section of the dialog become unavailable (grayed out). |
|
Letter |
Enter any text or combination of text/numbers. The spinbox increments the last letter/number of the text by 1. |
|
Progress Letters |
When this checkbox is marked When this checkbox is marked |
|
Capital Letters |
When this checkbox is marked When this checkbox is marked |
|
Order |
Set the number/letter order. |
|
Numbers / Letters First |
Select the relevant radio button to define whether numbers or letters should be first in the text. |
|
Prefix/Postfix |
Add a prefix and/or postfix for cooling labels. These pieces of text are added before or after the 'main' text respectively. A dropdown list adjacent to the Postfix field contains the following options: For the In, Out and Alternate In/Out options, a Preference option enables you to define alternative text to be used instead of the words In or Out. If alternative text is defined, it is used; if it is not defined, then the In/Out text is used. |
|
Final Text |
This field displays a preview of the final text, taking into account the previous parameter settings. This field is editable, however, any subsequent change in the Numbers & Letters section will reset any manual changes to the Final Text field. |
|
Create Text as |
Text, including prefix and postfix text, can be created as standard wireframe Curve Text or as PMI Curve Text. Select the required option from the dropdown list. |
|
Curve Text Feature |
Create a wireframe (curves) out of text. Create and position wireframe text (arcs & lines only) from text defined in any language, font, or according to specific parameters. The result is a Text feature.
This is the default option. |
|
Curve Text PMI |
Create PMI Text that can be used as a curve. Create and position PMI text from text defined in any language, font, or according to specific parameters. The result is an annotation that behaves as geometry when exported to NC, Drafting, or external files. |

The following approval options are available in the dialog:
|
|
Restore Default: Reset all values and settings to the system defaults. |
|
|
Save as Default: Save the current settings as the default. These default settings will be used whenever this operation is re-invoked. |
|
|
OK: Accept the changes, perform the operation, and close the current dialog/task. The last used values of all the parameters are kept for the current file. |
|
|
Cancel: Cancel all changes and close the dialog/task without saving the settings. |
The text creation is done by selecting one cooling hole curve after another, where the text progresses as defined in the dialog.
|
|
|
|
|
|
Cooling labels attached to cooling holes with relevant suffixes. Note the In/Out text used to label the entrance/exit, respectively, of the cooling channel holes. |
When OK ![]() or Apply
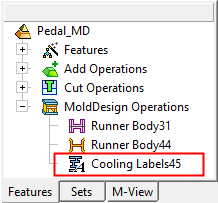
or Apply ![]() is pressed in the Feature Guide to complete the function, the Cooling Labels feature will appear in the Feature Tree as follows:
is pressed in the Feature Guide to complete the function, the Cooling Labels feature will appear in the Feature Tree as follows:
|
|
|
|