|
|
Parting Setup Wizard 

Access: Invoke this function from one of the following locations:
-
Click the Parting Setup Wizard
button from
the initial
toolbar.
-
Select Tools > Setup Wizards > Parting Setup Wizard from the initial menu bar.
Setup a new Mold Project.
The Parting Setup Wizard assists you in setting up a new Parting project by prompting you to define the appropriate parameters.

The Working part file you define in the wizard is then opened, and the Parting Guide is displayed on the right side of the screen.
Upon completion of the Parting Setup Wizard, continue with the Parting setup creation using the Parting Guide to guide you through the logical order.
Depending on whether you wish to create a work part or parting assembly, the parameters displayed in the Wizard differ.
|
Create Work Part: |
Create Parting Assembly: |
|
|
|
|
Create Work Part Interaction
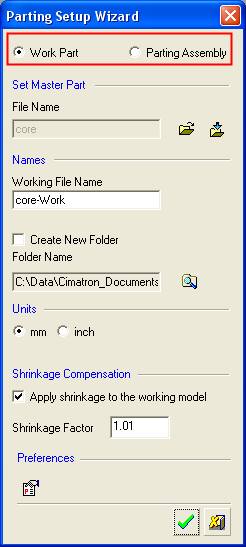
The Parting Setup Wizard dialog is displayed. Define the following parameters:
Select the create a new Work Part option.
Define the Master Part file in one of the following ways:
-
-
Open File
 : Open a Cimatron Part file from the Cimatron Explorer.
 -
Import File
 : Import an external file (PFM, IGES, SAT, etc.).
-
Set the Working File name.
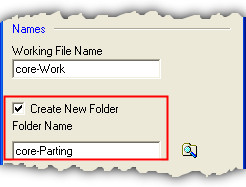
If the Create New Folder checkbox is turned on, a new folder will be created under the folder which holds the master file. The working file will be created inside that folder. If the new folder is to be placed under a different folder, click the browse button ![]() to select that parent folder.
to select that parent folder.
The name of the new folder will have an extension as defined in the Folder Name Preferences.
Define the units of measurement for the file.
Select the Shrinkage Compensation and define the Shrinkage Factor.
(Increase/decrease the volume of an object(s) or the size of a face or sketch. This allows you to produce mold shrinkage. You can also apply shrinkage parameters to one or more objects, open or closed.)
Click the Preferences button ![]() to change the Preferences if required.
to change the Preferences if required.
Click the appropriate confirmation button:
|
|
OK: Accept the changes, perform the operation, and close the current dialog/task. |
|
|
Cancel: Cancel all changes and close the dialog/task without saving the settings. |
Create Parting Assembly Interaction
The Parting Setup Wizard dialog is displayed. Define the following parameters:
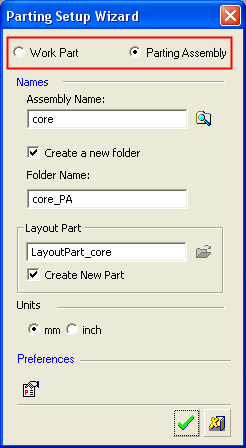 Select the create a new Parting Assembly option.
Browse ![]() to select a folder (or to create a new folder) under which to create the parting assembly.
to select a folder (or to create a new folder) under which to create the parting assembly.
If the Create New Folder checkbox is turned on, a new folder will be created under the selected folder. The parting assembly will be created inside that folder. The name of the new folder will have an extension as defined in the Parting Assembly Folder Name Preferences.
Define the Layout Part name or create a new part.
Define the units of measurement for the file.
Click the Preferences button ![]() to change the Preferences if required.
to change the Preferences if required.
Click the appropriate confirmation button:
|
|
OK: Accept the changes, perform the operation, and close the current dialog/task. |
|
|
Cancel: Cancel all changes and close the dialog/task without saving the settings. |
|