|
|
Trim Face : Trim Face > By Face / Plane


Access: Open this function from one of the following locations:
-
Click the
button
in the toolbar. -
Select Faces > Main Tools > Trim Face from the menu bar.
-
Select Trim Face on the popup menu if no geometry is selected.
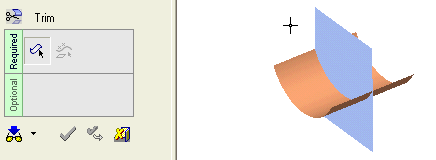
Trim faces by geometry.
Trim one or more faces by a face or plane. This is performed by selecting the first group of faces, exit (middle mouse button), and then selecting the trimming face.
|
Demo: Press the button below to view
a short movie demonstrating the function:
|
Practice: Press the button below to open Cimatron with a practice ELT file similar to that used to create the movie (if the relevant feature already exists in the ELT file, you can either edit it or delete it and create a new feature). |
|
|
|

Required Step 1 
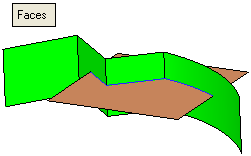
Pick the face(s) or object to be trimmed.
The Faces / Object toggle option is displayed, enabling you to pick either face(s) or an object to be trimmed. For this example the Faces toggle option is selected (see the trim methods for additional information). You can select multiple faces, but only one face / plane can be selected as the trimming geometry.
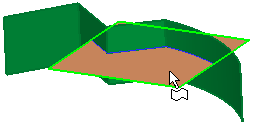
Note: In Trim operations, when using the Faces option and picking the entity to be trimmed, the position of the cursor is important; by default the picked side remains. For example, if you pick the top half of a face that is to be trimmed, the top half is the side that remains after the trim operation. You can use the Flip Trimming Side button in step 2 to change the side that is trimmed.
|
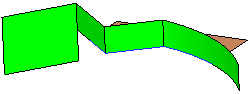
Multiple faces selected: |
|
|
|
|

<exit><exit> when the faces are selected.
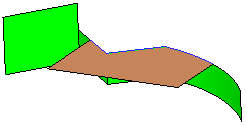
Required Step 2 
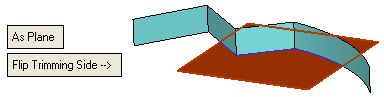
Pick the trimming entity (face or plane).
The following parameters are displayed:
|
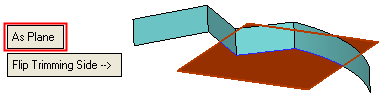
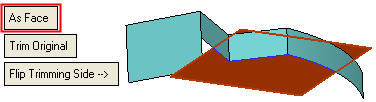
As Face |
This is a toggle option to enable you to define the trimming entity As Face / As Plane.
|
||||||||||
|
Trim Original |
Select which entities are to be trimmed. This is a toggle option: Trim Original / Trim Both. This toggle option is only displayed is the As Face toggle option is selected.
|
||||||||||
|
Flip Trimming Side |
Toggle the Flip Trimming Side button to define which side of the trimmed faces will remain (in this case, the upper side or lower side).
|
||||||||||
|
Flip Trimming Side (Second Group) |
Toggle the Flip Trimming Side (Second Group) button to define which side of the trimming faces will remain (in this case, the inner side or the outer side). This parameter is only displayed is the Trim Both toggle option is selected. In this case both the faces and the trimming entities are trimmed, and depending on the combinations of the Flip Trimming Side buttons, multiple results could occur, of which the following are examples:
|

Click OKOK![]() or ApplyApply
or ApplyApply![]() in the Feature Guide to complete the function.
in the Feature Guide to complete the function.
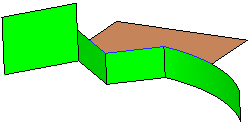
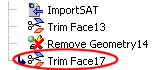
When completed, the Trim Face feature will appear in the Feature Tree as follows:

|