Cutting Object 


Access: Open this function from one of the following locations:
-
Select Solid > Creation > Cutting Object from the menu bar.
-
Select Mold Design > Lifter > Cutting Object from the menu bar.
-
Select Lifter > Cutting Object button in the Mold Design Guide Toolbar or Parting Guide Toolbar.
-
Select Die Design > Insert Tools > Cutting Object from the menu bar.
-
Select Mold Design > Insert > Cutting Object from the menu bar.
-
Select Insert > Cutting Object button in the Mold Design Guide Toolbar or Parting Guide Toolbar.
-
Select Catalog > Cutting Object > Cutting Object from the menu bar.
Create a new object that will be marked and used as a cutting object.
This function creates a new, hidden solid inside a part, tagged as a cutting object and based on the part shape. Small part features such as holes and rounds are eliminated from the cutting object, and offsets can be applied to allow clearance in the pocket where needed.
|
Entity for which a cutting object is to be defined: |
Cutting object with global offsets: |
Cutting object with local offsets: |
Cutting object with optional settings: |
|
|
|
|
|

See the Cutting Object Notes that refer to a cutting object after it is created.
General Interaction
The following is the Feature Guide for Cutting Object.
|
|
|
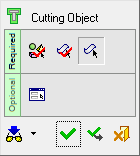
Required Step 1 ![]() : Pick the object for which a cutting object is to be created. Only a closed solid object can be selected.
: Pick the object for which a cutting object is to be created. Only a closed solid object can be selected.
Required Step 2 ![]() : Pick the faces (pockets, holes, rounds) to be removed (on the cutting object).
: Pick the faces (pockets, holes, rounds) to be removed (on the cutting object).
Required Step 3 ![]() : Set the global and local offset values.
: Set the global and local offset values.
Optional Step 1 ![]() : Define the split plane, top and bottom offset and the angle between the offsets.
: Define the split plane, top and bottom offset and the angle between the offsets.
Detailed Interaction
See Options and Results.