|
|
Replace Master Part  : Options and Results

Access: Open this function from the following location:
Access: Open this function from one of the following locations:
-
Select Die Design > Forming Shapes > Replace Master Part from the menu bar.
-
Select Forming Shapes > Replace Master Part from the following Die Design Guide: Die Process Design Guide (Forming).
-
Select Tools > ECO Tools > Replace Master Part from the menu bar.
-
Right-click the All ECO root folder in the ECO Tree and select Replace Master.
-
Right-click the relevant ECO# folder in the ECO Tree and select Replace Master.
-
Right-click the relevant comparison folder (in the ECO# folder) in the ECO Tree and select Replace Master.
-
Right-click the relevant part in the comparison folder in the ECO Tree and select Replace Master.
Note: Activate the target part - this is the part to be replaced. The Replace Master function can only be used when a part is active.
Replace the original part with an imported modified ECO "Master" part, and automatically apply all the operations that were performed on the original part onto the new part. This replaces a time consuming manual ECO change operation with a fast, automatic mechanism.
In a typical system development cycle, the specification or the implementation is likely to change during engineering development or during integration of the system elements. These last-minute design changes are commonly referred to as Engineering Change Orders (ECOs) and affect the functionality of a design after it has been wholly or partially completed.
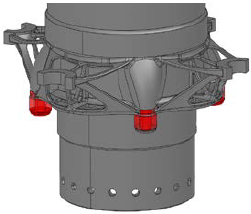
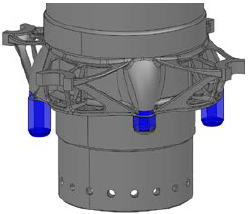
The images below show that the engineering change is to be applied to the model to the left, with the changes seen on the model on the right (replacing the red geometry with the blue one).
|
|
|
|
When this function is invoked, a message is displayed informing you that replacing the Master Part is IRREVERSIBLE (after you approve the operation), prompting you to create a backup before the replace operation. You are also required to confirm continuation of the operation.
Note: Default ECO comparison colors are defined in the Preferences. The colors set in the Preferences are given to any new comparison. Changes in the ECO dialog do not affect the Preferences.
The following dialog is displayed.
|
|
Activate the target part - this is the part to be replaced. The Replace Master function can only be used when a part is active. The Target Part field shows the name of that part. Click the browser icon and select the file that is the new (changed) model. The file name is displayed in the New Master File field in the dialog. Once the new master file has been selected, the OK button See the notes below. |

Notes:
-
The Target Part must have ImportModel<n> as the first feature in its Feature Tree. If it does not, an appropriate message is displayed.
-
If the Replace Master Part function is invokedinvoked from a comparison folder in the ECO Tree, the system automatically selects the target and new master parts.
-
If the Replace Master Part function is invoked from a part in the ECO Tree, the system automatically selects the target part.
Press OK ![]() to replace the master part or Cancel
to replace the master part or Cancel ![]() to cancel the operation.
to cancel the operation.
After you click OK, the system replaces the Import feature with an import of the new feature and starts regenerating all the features that follow it.
An exclamation mark then is displayed at the relevant folders in the ECO Tree indicating that the folder(s) need to be updated. For each of the folders where the exclamation mark appears, right-click the folder name and select Update Comparison from the popup menu. When the update process for an ECO# folder is complete, mark the folder as "Done".
|