|
|
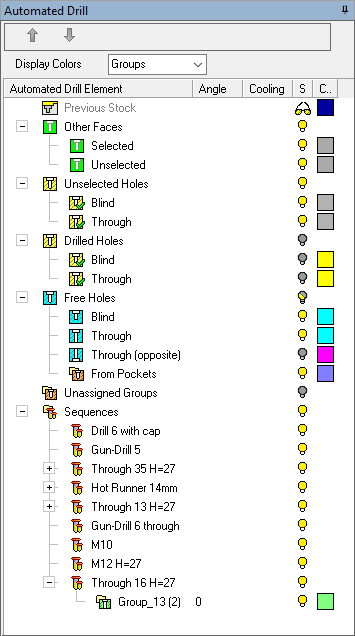
Automated Drill: Group and Sequence Manager (Tree)
The Group and Sequence Manager of the Automated Drill procedure is part of the function interaction and is displayed to view the data that is of interest.
|
|
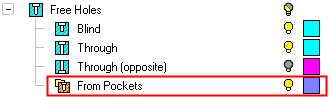
In the Automated-Drill Tree, the holes that came from pockets are represented in the From Pockets branch, initially under the Free Holes branch:
Creating Groups from Holes from Pockets: A group created by pocket behaves as a single hole and has the following segments:
Pockets that have identical heights and hole diameters are automatically assigned to the same group. For additional information regarding Holes from Pockets (parameters, etc.), see Pocket Selection for Automated Drill
|
Dialog Structure
The dialog displays the analysis results in a tree structure. It displays the following information:
-
Information about the previous stock. This is important when the part geometry or stock are changed. Assigned sequences (whether automatically or manually assigned) are not lost when the part geometry or stock are changed. See Automated Drill: Stock or Geometry Changes.
-
Information about the selected holes and the hole groups
-
Information about the sequences
-
Options for moving a selected sequence up or down the sequence list
-
Options for choosing the display color of holes and surfaces
-
Hide / Show of hole groups
-
Color changing of hole groups
-
A popup that supplies a set of relevant services (e.g. Attach Holes, Delete).
-
Update status
-
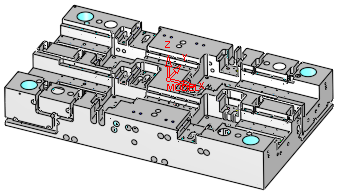
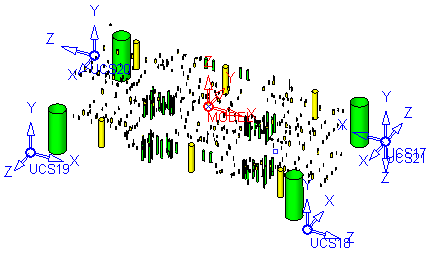
Bidirectional highlight with the entities on the graphic area.
When clicking on the name of a particular group in the Hole Recognition dialog, the holes of that group are highlighted in the model. Conversely, when clicking on a hole in the model, all the holes in the same group are highlighted, as is the group name in the Group and Sequence Manager.
The dialog displays the following columns:
|
|
Move a selected sequence up or down the sequence list. Note: Other methods of moving sequence(s) are Drag and Drop, or by right-clicking one or more sequences and using the Cut and Paste options from the popup menu. |
|||||||||||||||||||||||||||||||||||||||||||||||||
|
Display Colors |
Choose the display color of holes and surfaces. The following options are available from the dropdown list:
|
|||||||||||||||||||||||||||||||||||||||||||||||||
|
Automated Drill Element |
Displays the various elements found after the analysis. The elements are assigned to Other Faces , Unassigned Groups and Sequences. Hole groups can be found under the unassigned groups branch as well as the various sequence branches. Branch DescriptionsBranch Descriptions
|
|||||||||||||||||||||||||||||||||||||||||||||||||
|
Angle |
Displays the angle of the hole from the Z direction (the angle that is taken into account in the NC Drilling parameter Max. Inclination Angle). This is the maximum gap allowed
between the selected geometries, when joining them into a single geometry.
If the gap between the selected geometries is greater than the Max. Gap value, they are treated as separate
geometries.
|
|||||||||||||||||||||||||||||||||||||||||||||||||
|
Cooling |
Displays the word Cooling next to groups that are defined as cooling. |
|||||||||||||||||||||||||||||||||||||||||||||||||
|
S |
Hide / Show specific items. The appropriate bulb status is displayed.
|
|||||||||||||||||||||||||||||||||||||||||||||||||
|
C |
Change the color of an item . The appropriate color icon is displayed.
|


Dialog Operations
Double clicking an unassigned group will open the sequence definition.
Double clicking a sequence will open its sequence definition for editing.
Double clicking a group will display the view of the group.
Popup Menu
Right-click on one of the following tree items and the relevant popup menu is displayed.
|
Unselected Holes |
Drilled Holes |
Free Holes |
|
|
|
|
|
Hide everything except for the selected/highlighted geometry. |
Unassigned Groups (branch)
|
Popup before selecting one of the options in the Automated Drill Guide. |
Popup after selecting one of the options in the Automated Drill Guide. |
Popup after selecting one of the options in the Automated Drill Guide and after selecting a hole in the display area. |
|
|
|
|

|
Search for a sequence and attach it to the selected group. |
|
|
Define/edit a Hole Sequence. |
|
|
Delete All Groups |
Delete all the groups under the selected item. |
|
Delete Empty Sequences/Groups |
Delete all the groups with no holes and/or all the sequences with no groups. |
|
Hide everything except for the selected/highlighted geometry. |
|
|
New Group |
Create a new group of unassigned holes. |
|
Select |
Select all the holes (in the graphics area) that belong to this group. |
Unassigned Groups (element)
|
Popup before selecting one of the options in the Automated Drill Guide. |
Popup after selecting the Group Manager option in the Automated Drill Guide or after selecting a hole in the display area. |
Popup after selecting an option other than Group Manager in the Automated Drill Guide. |
|
|
|
|

|
Attach |
Attach the selected hole(s) to the specific group. |
|
Search for a sequence and attach it to the selected group. |
|
|
Define/edit a Hole Sequence. |
|
|
Delete |
Delete the selected item. |
|
Opens the Group Manager option in the Automated Drill Guide. |
|
|
Hide everything except for the selected/highlighted geometry. |
|
|
Rename |
Rename the selected item. |
|
Select |
Select all the holes (in the graphics area) that belong to this group. |
Sequences (branch) and Sequence (twig - under the Sequences branch)
|
Popup before selecting one of the options in the Automated Drill Guide. |
Popup after selecting the Group Manager option in the Automated Drill Guide or after selecting a hole in the display area. |
Popup after selecting an option other than Group Manager in the Automated Drill Guide. |
|
|
|
|

|
Cut / Paste |
Cut / Paste a sequence. |
|
Define/edit a Hole Sequence. |
|
|
Delete |
Delete the selected item. |
|
Delete All Groups |
Delete all the groups under the selected item. |
|
Delete All Sequences |
Delete all the sequences. All the groups contained in the deleted sequences are transferred to Unassigned Groups. |
|
Delete Empty Sequences/Groups |
Delete all the groups with no holes and/or all the sequences with no groups. |
|
Hide everything except for the selected/highlighted geometry. |
|
|
Remove From Sequence |
Remove the group from the sequence. |
|
Rename |
Rename the selected item. |
Group (under a Sequence twig in the Sequences branch)
|
Create/Edit Hole Groups |
Opens the Groups Handling tool to edit the group of holes. |
|
Delete |
Delete the selected item. |
|
Edit Sequence |
Define/edit a Hole Sequence. |
|
Hide everything except for the selected/highlighted geometry. |
|
|
Rename |
Rename the selected item. |
|