|
|
Post Process  : GPP - Post Dialog

Access: Open this function from one of the following locations:
-
Select NC Process > Post & Report > Post Process from the menu bar.
-
Click the Post Process button
in the NC
Guide. -
Click the Post Process button
in the Job
Manager. -
Right-click on an item in the Process Manager, or anywhere in the graphics window when no procedure is active, and select NC Guide Commands > Post Process from the popup menu.
GPP is a post processor developed by Cimatron.
The Post Process dialog is displayed.
|
|
Set the following:
Set the GPP Machine Parameters.
Notes:
|
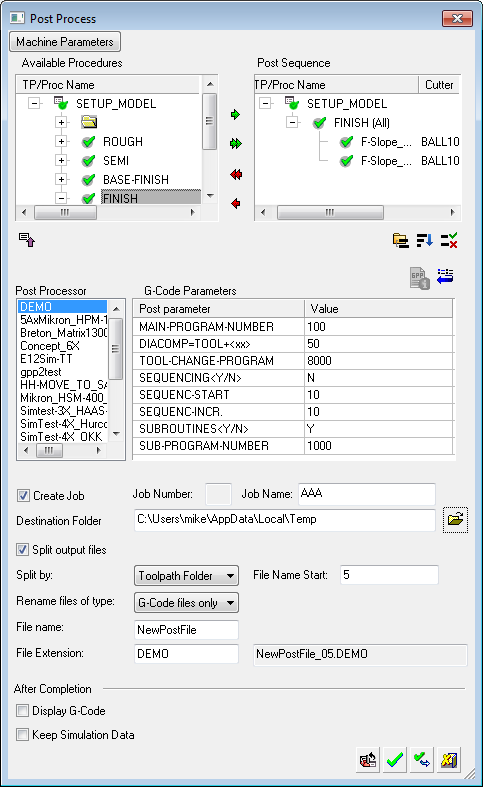
Dialog Structure
This dialog is divided into the following areas:
Available Procedures / Sequence Panes - Select and Reorder Procedures
Post Selection & G-Code Parameters
Post file name & destination folder
Run a Post
Create a Post, GPP or GPP2, as required (for a specific CNC machine tool). Your Cimatron Provider or Reseller can create one for you.
InvokeInvoke the Post Process function. The Post Process dialog is displayed; see above.
Select and order the procedures for posting, in the top two panes.
Note: Post processing a suspended procedure will result in an error message. As cutter motions are not calculated for suspended procedures, G-Codes cannot be created.
Select the required Post from the Post Processor list and set the relevant G-Code parameters.
Set the remaining parameters, such as the Post file name and destination folder.
Set the Machine Parameters.
Press the relevant approval button.
Note: During execution, all information including warnings is displayed in the Output Pane of the Cimatron display. When you return to the relevant NC file, the status flags in the Process Manager will indicate procedures that have been executed.
|
|
Reload all NC Setup Settings: Reload the settings defined in the NC Setup that are relevant to this dialog. |
|
|
OK: Accept the changes, perform the operation, and close the current dialog/task. |
|
|
Apply: Accept the changes, perform the operation, and keep the current dialog/task open. |
|
|
Cancel: Cancel all changes and close the dialog/task without saving the settings. |

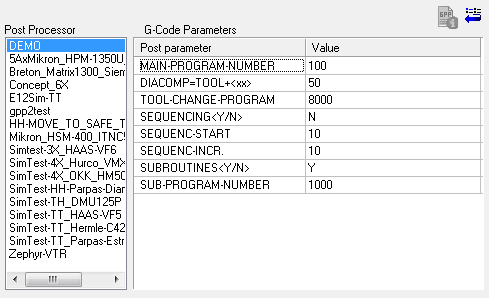
Post Selection & G-Code Parameters
In the middle of the dialog, select the required Post from the Post Processor list and set the relevant G-Code parameters.
|
|
The following buttons are displayed in the center section of the dialog:
|
Post file name & destination folder
In the lower part of the dialog, the following parameters are displayed:
|
Create Job |
Select the Create Job checkbox to create a new job in the Job Manager. The Job ID Number is automatically generated when invoking the Job Manager. This number is displayed in the Post Process dialog and also in the NC Report dialog when they are invoked from the Job Manager. The Job Name can be entered in the Post Process and NC Report dialogs. This name is used in the Job Manager dialog, where it can be edited (the name can also be defined in the Job Manager itself). |
||||||||||||||
|
Destination Folder |
Set the destination folder of the post file. Use the adjacent Browse button, if required. |
||||||||||||||
|
Split output files |
Create a single post output file or create multiple output files based on selected criteria. This checkbox is only displayed if splitting is enabled in the Preferences. If this checkbox is OFF, a single post output file is created. If this checkbox is ON, multiple output files are created based on selected criteria; the following criteria are displayed:
|
||||||||||||||
|
Rename files of type |
Rename files according to the criteria selected from the following dropdown list of options:
|
||||||||||||||
|
File Name |
Set the post file name. The resulting file name is displayed in a non-editable field. |
||||||||||||||
|
File Extension |
Set the post file name extension. The resulting file name is displayed in a non-editable field. |
In addition, the following parameters appear in the After Completion section of the dialog:
Display G-Code |
Select this checkbox to display
G-Code, after the Post Process is completed. The G-Code files
are created in the destination folder specified in the Post Process
dialog. If only one G-Code file was created, it will be opened; for
example: If more than one G-Code file was created, the destination folder of these files is opened. The default state for this parameter is unselected. |
Keep Simulation Data |
Select this checkbox to create simulation data files containing all the required information for the simulation of the Job. These files are created in a subfolder under the destination folder specified in the Post Process dialog. The subfolder name is identical to the G-Code file name (with the exception of an underscore instead of a period before the extension). The simulators on this data can only be opened via the Job Manager. This parameter is displayed only if you have a Machine Simulator license. The default state for this parameter is unselected. |
A log file is created containing all the information that is displayed in the Output Pane. The log file is created in a subfolder under the destination folder specified in the Post Process dialog. The log file name is identical to the G-Code file name, with the addition of a "log" extension after the G-Code extension. This log file cane be viewed via the Job Manager.
|