|
|
Job Manager 

Access: Open this function from one of the following locations:
-
Select NC Process > Post & Report > Job Manager from the menu bar.
-
Click Job Manager
in the NC Guide. -
Right-click on an item in the Process Manager or anywhere in the graphics window when no procedure is active and select NC Guide Commands > Job Manager from the popup menu.
The Job Manager lists all jobs. A job is defined as an execution of either Post Processing (PP) or NC Report (NCR). Each time you execute either of these functions, a new job is created capturing the session. Using the Job Manager, you can follow up the relevant data for each execution, such as the list of the participating procedures, the post-processor used, the post interaction parameters, the session time, and the output file location. The Job Manager enhances control over the milling process and results in easier management of the deliverables to the shop floor.
The Job Manager can be accessed at any time and the jobs can be re-executed (for re-posting, to create reports, or for simulation).
The Process Manager is linked to the Job Manager. When a procedure is posted, the name of the job is added that procedure’s row in the Process Manager for monitoring and easy access.
The Job Manager dialog is displayed.
|
|
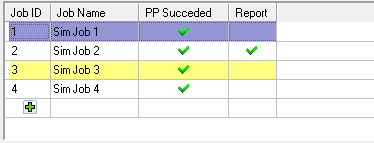
In this example: The top section shows the three post-processor jobs just completed; two include a report. The middle section shows the interaction used when posting the third job. The bottom section shows the G-Code files that were created during the third job. |
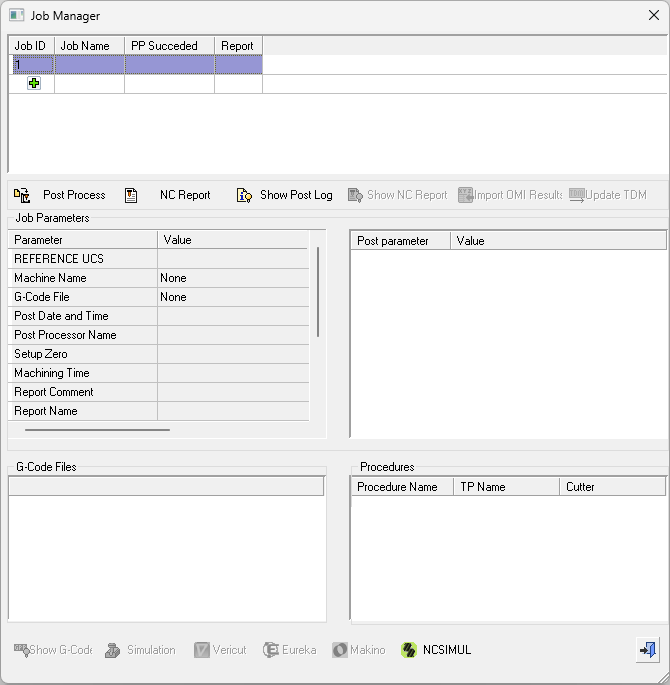
Dialog structure
The dialog consists of the following sections:
Table
The Job Manager table displays a row of information for each job. You can control which columns are displayed in the table by using the Column Chooser and also customize the width of each column. The following columns are displayed by default:
|
Job ID. |
The job ID number automatically generated. |
|
Job Name |
The job name. Double-click this field to edit it. |
|
PP Succeeded |
This displays an indication of the post-processing success or failure. |
|
Report |
This displays an indication of the report generation success or failure. |
For Not Up-to-Date Jobs (highlighted in the table in yellow), see below.
The ![]() button enables you to manually add a new job. When pressed, the Job Tree Selection dialog is displayed.
button enables you to manually add a new job. When pressed, the Job Tree Selection dialog is displayed.
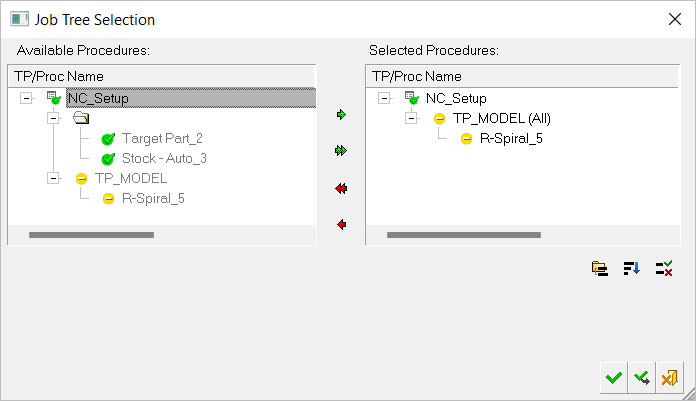
Select the procedures to be included in the new job:
Available Procedures / Sequence Panes - Select and Reorder Procedures
When OK ![]() or Apply
or Apply ![]() are clicked, a new job is created with no Post or Report data. You can now duplicate that job and post it (or remove some of its procedures and then post).
are clicked, a new job is created with no Post or Report data. You can now duplicate that job and post it (or remove some of its procedures and then post).
Dialog buttons
The following buttons appear below the table.

| Post Process |
Display the Post Processor dialog with the data included in the job. |
| NC Report |
Display the NC Report dialog with data. |
| Show Post Log |
Display the post processor output log. |
| Show NC Report |
Display the generated NC Report associated with the job. |
|
Update TDM |
Export the list of the cutters used in a specific job and the machining time used by each cutter. |
Job parameters
For each job selected in the above table, the job parameters are displayed in this section.
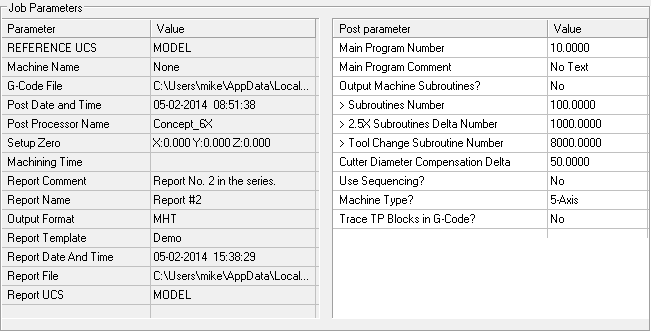
The parameters displayed here are those that are NOT chosen using the Column Chooser in the table above.
|
Reference UCS |
The Reference UCS used by the job. |
|
Machine Name |
The machine name used for simulation jobs. |
|
G-Code File |
The full path name of the G-Code file used. If there may be multiple file names in each job, the system lists the first file name, and adds "..." to indicate that additional files exist. |
|
Post Date and Time |
The Post creation date and time. |
|
Post Processor Name |
The Post Processor name. |
|
Setup Zero |
The Setup Zero as defined in the Post dialog. |
|
Machining Time |
The total machining time of the job. |
|
The following parameter details are only displayed if an NC Report has been generated. |
|
|
Report Comment |
The report comment as entered in the NC Setup Report dialog. |
|
Report Name |
The report name as entered in the NC Setup Report dialog. |
|
Output Format |
The output format as entered in the NC Setup Report dialog. |
|
Report Template |
The report template as entered in the NC Setup Report dialog. |
|
Report Date and Time |
The report creation date and time. |
|
Report File |
The full path name of the created report file. The destination folder is set in the NC Setup Report dialog. |
|
Report UCS |
The report UCS. |
G-Code files
This pane lists all the G-Code files in the job; in most cases, this is one file.
By default, the G-Code files in this pane are all selected. For each selected G-Code file, the procedures included in it are listed in the adjacent Procedures pane (see below).
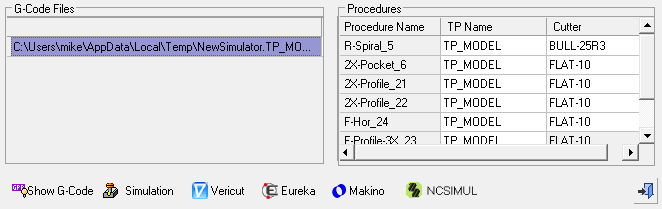
The following buttons appear below the pane. These buttons become active once a G-Code file is selected.
|
Show G-Code
|
View the G-Code file. |
|
Simulation
|
Simulate the G-Code. The Simulation button is only available if one G-Code is selected, and only if a machine simulation file (CIM file) is available. This invokes the Machining Simulation dialog, using the data saved in the job. |
|
Vericut
|
Run the VERICUT simulator for the selected G-Code file. This button is only available if a VERICUT license exists and a machine simulation file (CIM file) is available. |
|
Eureka
|
Run the Eureka simulator for the selected G-Code file. This button is only available if a Eureka license exists and a machine simulation file (CIM file) is available. |
|
Makino
|
Run the Makino simulator for the selected G-Code file. This button is only available if a Makino license exists and a machine simulation file (CIM file) is available. |
|
NCSIMUL
|
Run the NCSIMUL simulator for the selected G-Code file. This button is only available if a NCSIMUL license exists and a machine simulation file (CIM file) is available. |


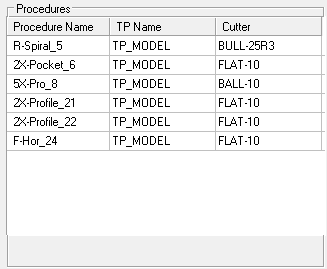
Procedures
This pane lists all the procedures included in the G-Code file(s) selected in the adjacent G-Code Files pane (see above).
Dialog operations
Operations can be performed on single or multiple jobs selected from the table section of the dialog. Select the jobs and right-click to display the popup sub-menu of available operations.
For a single selected job, the following operations are available from the sub-menu:
|
Post Process |
Run the Post Processor. This is the same as pressing the Post Process button below the table. |
|
Report |
Run the report. This is the same as pressing the NC Report button, below the table. |
|
Duplicate Job |
Create a duplicate job(s) at the end of the list. |
|
Delete Job |
Delete the job after approving a confirmation message. |
For multiple selected jobs, only the Duplicate Job and Delete Job options are available.
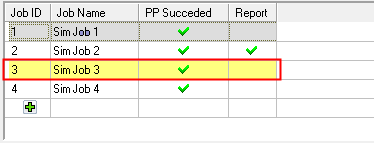
Not Up-to-Date job
A job is defined as "Not Up-to-Date" if a procedure included in it was Deleted, Suspended, Re-executed, or Moved. For this purpose, 're-execute' means also a procedure that finished execution while the Job Manager dialog was open.
A job that is not up-to-date is highlighted in yellow in the job list, as shown below:
|