|
|
Automated Drill: Auto Fit Sequence Options

Access: Open this function from one of the following locations:
Select an Automated Drill procedure (from the Process Manager) and choose one of the following:
-
In the parameters table, click the Auto Fit Options - Access button under the Motion Parameters > Drill Parameters table.
-
Select Auto Fit Sequence from the Automated Drill Guide.
-
Select NC Utilities > Automated Drill > Auto Fit Sequence from the menu bar.
-
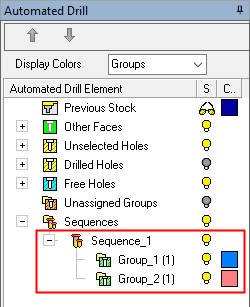
Right-click the Unassigned Group branch in the Group and Sequence Manager and select Auto Fit Sequence from the popup menu.
-
Right-click the appropriate Group under the Unassigned Group branch in the Group and Sequence Manager and select Auto Fit Sequence from the popup menu.
Search for predefined matching Hole Sequences for unassigned groups.
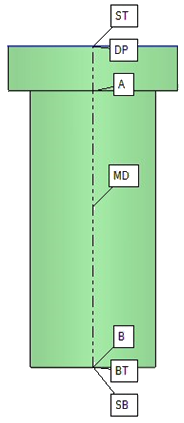
A Hole Sequence is a set of faces describing a hole.
This function enables you to search for a sequence and attach it to the selected group. The system stores as default the values that were used last.
When invoking the Automated Drill Auto Fit Sequence option, the system searches for a sequence and attaches it to the selected group. This option works on groups with unassigned holes or on all the Unassigned Groups branch of the Group and Sequence Manager.
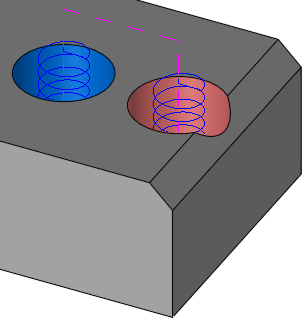
This option looks for geometric matching between the geometry of the group and the geometry of existing sequences. This geometric matching includes identical geometry and identical hole attributes (threads, etc.).
The Sequence Auto-Search Options dialog is displayed.
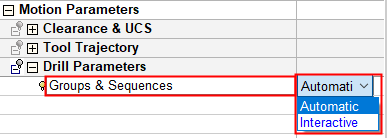
The options that are available in this dialog depend on whether the Automatic or Interactive mode set in the Groups & Sequences parameter under the Motion Parameters > Drill Parameters table.
|
|
|
|
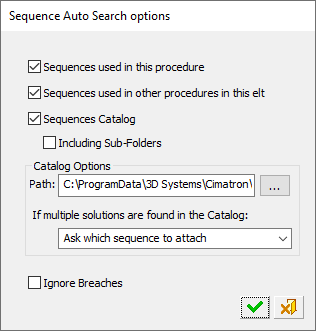
Dialog displayed in the Groups & Sequences Interactive mode |
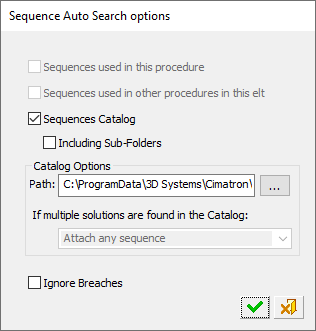
Dialog displayed in the Groups & Sequences Automatic mode |
The following options are available:
|
Sequences used in this procedure |
Look for matches in the current procedure's sequences. This is used to attach the group to an existing sequence. In the Groups & Sequences Automatic mode, this parameter is dimmed. |
||||||
|
Sequences used in other procedures in this elt |
Look for matches in other procedures. If the same hole is rough drilled before heat treatment in a previous procedure and then finished in the current procedure, it is advisable to unselect this option. In the Groups & Sequences Automatic mode, this parameter is dimmed. |
||||||
|
Sequences Catalog |
Look for matches in the Sequences Catalog. You can save your sequences in a folder on the network. Different folders can be used for different technological catalogs such as before/after heat treatment, machine A or B, per material, etc. When the Sequences Catalog checkbox is selected, additional parameters become available. Including Sub-Folders: Select the checkbox to include sub-folders in the search for sequences. Sub-folders of the folder in the Path field (below) are searched. By default, the checkbox is unselected. Catalog Options - Path: After the first installation, the default path is to the default Cimatron Sequence Library. After you reopen the Browser, the last path used is displayed as default. Catalog Options - Multiple Solutions: When searching for matching sequences in a catalog, if more than one appropriate sequence was found per group, the following options are available: Attach any sequence (in the Groups & Sequences Automatic mode, this option is locked to Attach any sequence and dimmed). Don't attach, I'll attach them manually later See below for dialogs that are displayed depending on the option selected. |
||||||
|
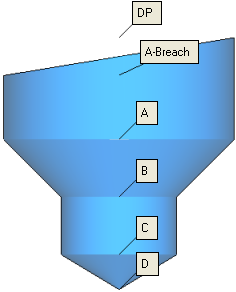
Ignore Breaches |
When attaching sequences, ignore or don't ignore holes with Breaches.
When this checkbox is OFF When this checkbox is marked This means that:
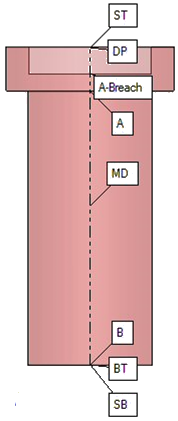
Example for Ignore Breaches = ON:Example for Ignore Breaches = ON: Ignore Breaches = ON: The image below shows a sequence used for two groups of holes of the same dimension, with and without a breach. They can be drilled with the same sequence. The same sequence can be Auto Attached to both groups.
|


Don't attach, I'll attach them manually later
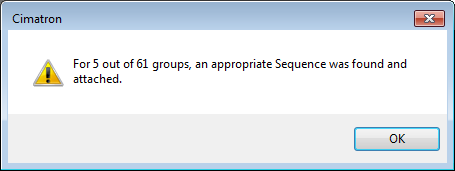
If the search for predefined matching hole sequences results in multiple solutions (more than one fit) for one or more groups, the system uses one of the sequences (with some internal optimization).
The system automatically attaches a sequence and a message is displayed informing you that the selected groups have been assigned suitable drill sequences:
Don't attach, I'll attach them manually later
If the search for predefined matching hole sequences results in multiple solutions (more than one fit) for one or more groups, the system does not attach these sequence(s). You will have to manually attach them. Details of these sequences are displayed in the Output Pane.
If a single sequence was found for a group(s), the system attaches it.
A message is displayed informing you of the above situation.
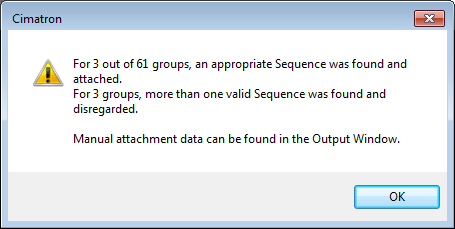
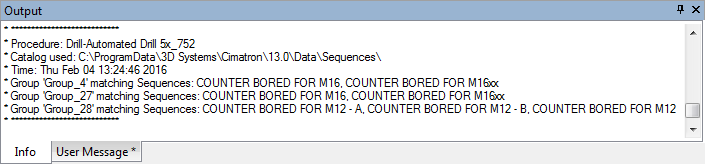
Display the Output Pane to see details of the multiple sequences matching each group. Manually attach sequences, as required.
If the search for predefined matching hole sequences results in multiple solutions (more than one fit) for one or more groups, the Attach Sequence dialog is displayed enabling you to choose which group to attach to which sequence.
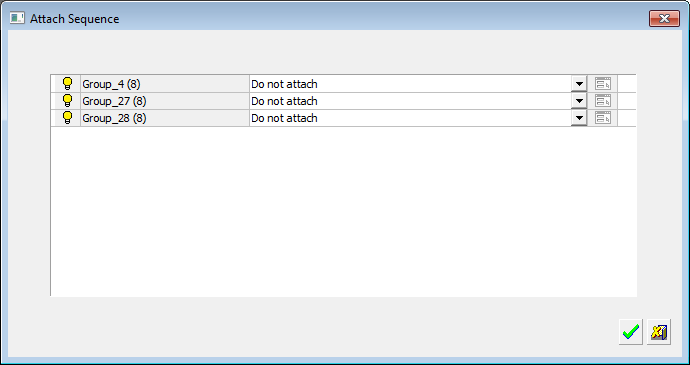
For each group where more than 1 fit was found, a dropdown list shows the possible sequence fits.
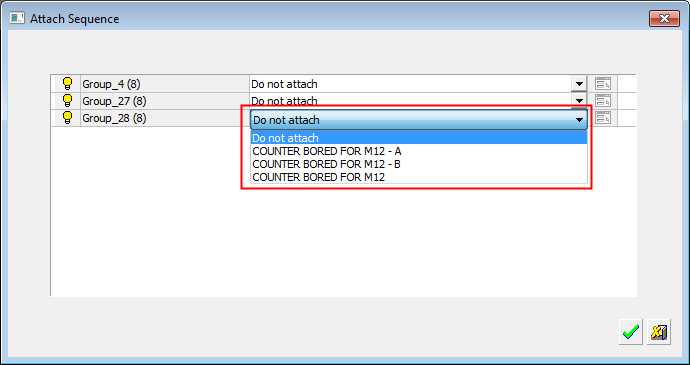
Select the required sequence from the list.
When finished, press one of the approval options.
|
|
OK: Accept the changes, perform the operation, and close the current dialog/task. Sequences are attached to the groups, as you defined. |
|
|
Cancel: Cancel all changes and close the dialog/task without saving the settings. Sequences that have multiple solutions are not attached. However, sequences that have unique solutions are attached. |
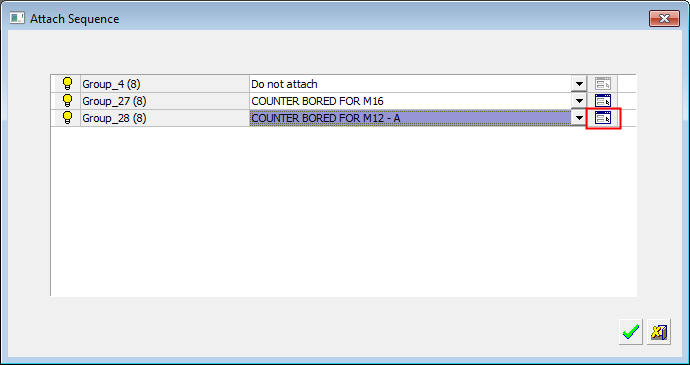
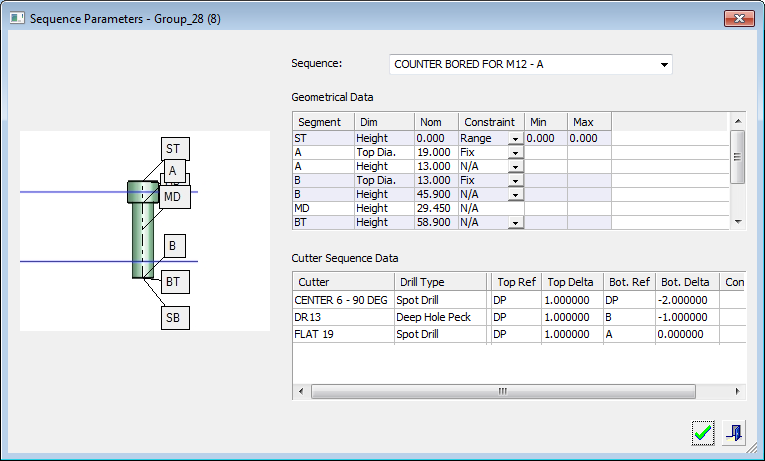
When a sequence is selected from the above dialog, the Show Sequence button becomes available. Clicking this displays the Sequence Parameters dialog that describes the selected sequence.
When finished, press one of the approval options.
|
|
OK: Accept the changes, perform the operation, and close the current dialog/task. |
|
|
Exit: Exit the operation and close the dialog/task. |
|