|
|
UCS Normal to Plane 


Access: Invoke this function from one of the following locations:
-
Click the
button in the toolbar. -
Select Wireframe > Datum > UCS Normal to Plane from the menu bar.
Create a UCS by defining a plane that will be normal to its Z axis.
|
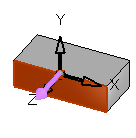
Pick the plane: |
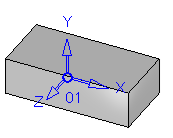
The new UCS is created: |
|
|
|
|
Demo: Press the button below to view a short movie demonstrating the function: |
|
|

General Interaction
The following is the Feature Guide for Normal to Plane.
|
|
Remember: You can open the Feature Guide at any time on the graphic display by right-clicking. |
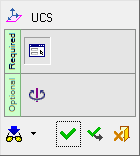
The two options for creating a Normal to Plane UCS are:
Required Step 1 
Pick a plane or use the display plane on which to create the UCS. After picking the plane, the UCS is positioned on the projection point of the active UCS on the selected plane.
The following parameters are displayed:
|
Create a UCS on a planar face or plane while the Z direction of the UCS is normal to the picked face/plane and the X-Y directions are defined according to the active UCS. The UCS is positioned on or outside the face according to the active UCS of the part to which the face belongs. Pick the planar face or plane on which to create the UCS. After picking the plane, the UCS is positioned on the projection point of the active UCS on the selected plane. At this stage, you can pick a point and the UCS will move to this point (provided it is on the plane) or to the projection of this point on the plane.
|
|||||
|
Create a UCS normal to the "current" display plane and its origin on the picked point. The +Z direction is normal to the screen (display) plane and towards the user (at the time of picking). X is positioned on the right while the Y points to the top of the screen.
Picking another point changes the origin point of the UCS but does not update the orientation of the UCS. To update the UCS orientation to reflect the current screen orientation, click Reset Direction. |

The following parameters are also displayed:
UCS Name |
The name of the UCS being created. Click this parameter to edit the name. |
Activate UCS Off |
This
is a toggle option Activate
UCS On / Off, which enables you to activate (or not) the UCS
being created. Note: In NC operations, the default is set in the NC UCS Preferences (in the Activate Created UCS parameter). |
Optional Step 1 
Rotate the UCS by entering the X,Y, and Z rotation values. The UCS is reorientated accordingly.
If the UCS creation is complete, press OK ![]() or Apply
or Apply ![]() in the Feature Guide.
in the Feature Guide.
When completed, the UCS feature will appear in the Feature Tree as follows:

|