|
|
Add Cooling Item With Channel 


Access: Open this function from one of the following locations:
-
Select Mold Design > Cooling > Add Cooling Item With Channel from the menu bar.
-
Select Cooling > Add Cooling Item With Channel from the Mold Design Guide Toolbar.
Add cooling items (plugs, nipples, baffles, and so on) from the catalog and create cooling channels for them.
When adding a cooling item such as a nipple, plug or baffle, the associated cooling channel (drilled hole) is automatically created in the mold plate at the same time. The system also creates separate sub-assemblies for each type of cooling item.
Several options exist for automated control of the drilled line length, but you can also choose a simple delta value or even no hole at all. When using automated hole length, you can control the dimensions (length and width) of the channel, and have the option to define a safety distance around the channel to prevent any collisions with other mold features or components. The depth of the cooling channel holes can also be adjusted according to the geometry of the drilled part.
In addition, when placing a baffle, the length is automatically optimized according to the geometry of the work/active part. In cases where a baffle is defined with a standard length, the closest standard length is selected. You can also create a baffle table for manufacturing purposes containing information about the baffles in the model, such as baffle length, location, type, and BOM ID.
For information regarding the catalog dimensions required to maximize the abilities of the Add Cooling Item With Channel function, see Catalog Building Rules: Baffle.
|
When plugs are added to the core plate, each plug’s corresponding cooling channel is automatically created. |
Baffles are added to the project. Each baffle length and its cooling channel are automatically adjusted to correspond with the shape of the part. |
|
|
|
Important: Make sure that the required assembly is activated before using this operation.
Note: Once the cooling items have been added, they can easily be edited or deleted.
General Interaction
The general interaction is similar to that for adding mold parts. The differences are as follows:
-
The function name on the Feature Guide.
-
The dialog displayed during the required step 1.
The Component Selection dialog is displayed with the appropriate catalog Category and Sub-Category component types automatically displayed (depending on the Category type you selected when you invoked the Add Mold Component function). -
When adding a cooling item with channel;
-
The Same Component / Different Component option enables you to add multiple copies of the same part with or without a cooling channel of a specified depth.
-
The Drilled end options retain the last-used values for drilled end type and drill tip angle.
-
-
The Required Step 2 parameters.
The following is the Feature Guide for Add Item With Channel.
|
|
|
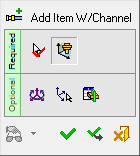
Required Step 1 ![]() : Select a cooling component from the catalog.
: Select a cooling component from the catalog.
Required Step 2 ![]() : Position the mold part.
: Position the mold part.
Optional Step 1 ![]() : Set the optional positioning parameters.
: Set the optional positioning parameters.
Optional Step 2 ![]() : Select a UCS on the added component to position the component.
: Select a UCS on the added component to position the component.
Optional Step 3 ![]() :The Cut Manager is displayed; select the parts to be cut.
:The Cut Manager is displayed; select the parts to be cut.
Detailed Interaction
See Options and Results.
|