Displaying Leading Dimensions 

Access: Open this function from one of the following locations:
-
Select Edit > Feature Management > Leading Dimensions from the menu bar.
The dialog is not displayed if any of the parts are not updated (i.e. if the symbol is displayed in the Assembly
Tree). Update the part first, then invoke the dialog.
symbol is displayed in the Assembly
Tree). Update the part first, then invoke the dialog.
-
Select the Edit Leading Dimensions option from within the Add Duplicate function.
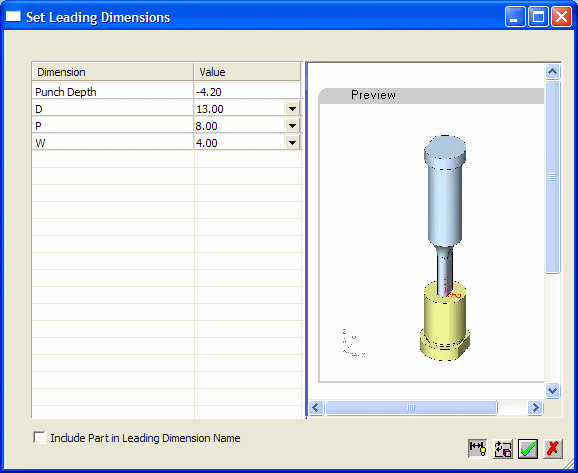
Display (and edit) all the leading dimensions in a file (assembly or part) via the Set Leading Dimensions dialogSet Leading Dimensions dialog.
In the Assembly application, all leading dimensions belonging to any component in an assembly are displayed. The Part application is supported in the same way, however, dimensions are not added from other components.
The Set Leading Dimensions dialog is displayed:
|
|
See:
|

See also:
Dialog Structure
The order in which the leading dimensions are displayed in the dialog is defined by the following criteria:
-
The order in which components were added to the assembly (this is not applicable in the part component).
-
The alphabetical order of dimension names within a part for non-catalog parts, or the order of columns in catalog parts.
For example, if "part A" has two leading dimensions "h" and "L" and was added to the assembly prior to "part B", which has "h2" and "Width" leading dimensions, the appearance order within the dialog would be - "PartA:h", "PartA:L", "PartB:h2", "PartB:Width".
Notes:
-
Nesting levels are ignored (ALL leading dimensions from ALL levels are displayed).
-
The dialog may be displayed empty if, for example, an assembly/part contains no leading dimensions, or for a new component.
-
The dialog is not displayed if any of the parts are not updated (if the
symbol is displayed in the Assembly Tree). Update the part first, then invokeinvoke the dialog.
Dialog Buttons
|
|
Show/Hide Dimensions. This toggle button shows or hides the dimensions of the part in the graphics area. |
|
|
Update Apply |
|
|
OK. The results of using this button depend on how you invoked the Set Leading Dimensions dialog.
|
|
|
Cancel. This returns the part to its state before the last update. |