|
|
Extract by Contour  : Options and Results


Access: Open this function from the following location:
-
Select Assembly > Tools > Extract by Contour from the menu bar.
Extract geometry to a separate file by defining a contour containing the required geometry.
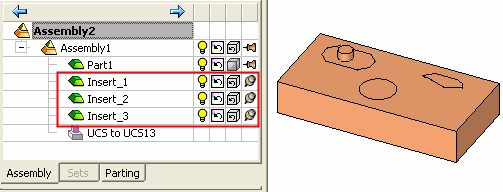
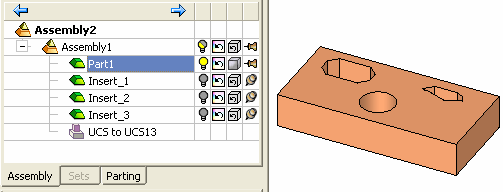
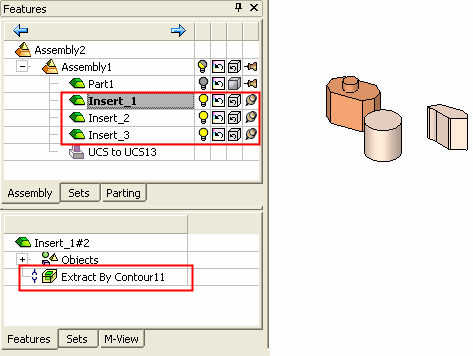
Create insert parts automatically by defining a 2D contour. The 3D geometry inside a contour you select will be removed from one part and added to a new part in the assembly within a pocket created where the 2D contour was drawn. This function is useful for both mold and die makers.
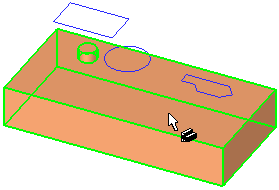
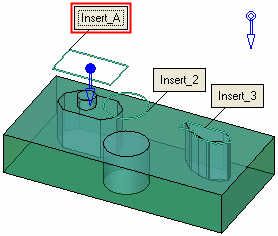
Required Step 1 
- Pick the component from which the required geometry (insert) will be created, as shown here:
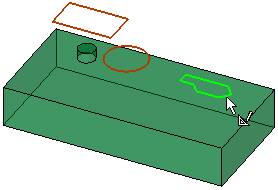
Required Step 2 
- Pick the contours that define the shape of the new geometry (insert). The component selected in required step 1 is divided by these contours.
- The contours:
-
Can be sketches or composite curves.
-
Must be closed, planar, and not self intersecting.
-
May reside in a component(s) other than the one selected in Required Step 1.
-
- Click MMB to <exit><exit> when finished.
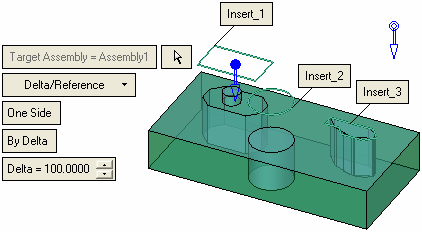
Required Step 3 
Pick a target assembly, set the direction arrow, and define the insert names and insert parameters. The new insert is imported into a new part created in the selected assembly.
The following interaction is displayed:

-
Pick a target assembly by clicking the
 button next to the red Target Assembly parameter.
 -
Pick the assembly in the graphics area (or select the assembly name in the Assembly Tree).
The Target Assembly parameter is displayed in red when it is empty (before a target assembly is picked or if you clear the selection).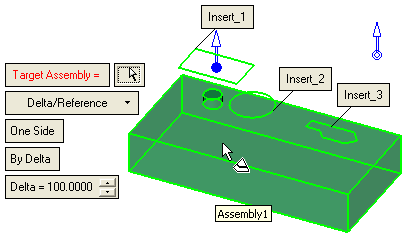
After a target assembly has been picked, the parameter is dimmed and displays the name of the selected component. The insert part(s) are previewed inside the target assembly, as configured in the displayed parameter settings.
-
Pick the assembly in the graphics area (or select the assembly name in the Assembly Tree).
The Target Assembly parameter is displayed in red when it is empty (before a target assembly is picked or if you clear the selection).After a target assembly has been picked, the parameter is dimmed and displays the name of the selected component. The insert part(s) are previewed inside the target assembly, as configured in the displayed parameter settings.
-
Set the directional arrow.
-
Define the insert names in the text boxes attached to the selected contours. These insert names will be the names of the new insert parts.
Select the text box.
Enter the required insert name.

-
Define the insert parameters:
Define the extrude parameters.
Select an option from the dropdown list.
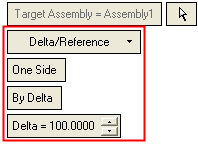
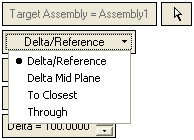
For additional information on these options and parameters, see Add/New > Extrude: Delta/Reference.
Optional Step 1 
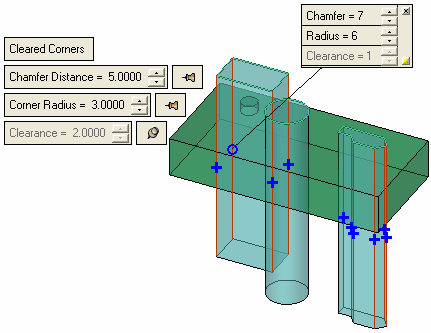
Create chamfers on all the selected side edges of the insert(s) and create corners on all the selected side edges of the resulting pocket(s).

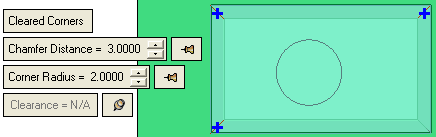
If you use this optional step and toggle the Cleared Corners option, all the edges where chamfers and corners can be defined are automatically selected and marked with a blue + symbol. Edges can be added or removed by clicking on them.
The edges marked with the blue + sign will acquire the displayed global parameter settings.
To define local parameter settings for a specific edge, pick the edge to display a blue O symbol with an attached parameter label and then set the required local values in the parameter label, as shown below:
A single parameter value may be fixed by clicking the adjacent pin button and toggling it from Float ( ) to Fix (
 ). Only one parameter value can be defined as fixed.
|
Cleared Corners |
This is a toggle option, Cleared Corners / None , used to create chamfers on all the side edges of the insert(s) and create corners on all the side edges of the resulting pocket(s). When toggling the Cleared Corners parameter to None, all edges are cleared and all global and local controls are removed. When toggling back to Cleared Corners, the interaction is the same as entering the optional step for the first time. |
|
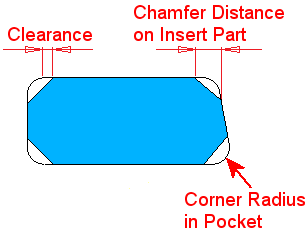
Chamfer Distance |
Create chamfers on all the selected side edges of the insert part(s).
See the example usage below. |
|
Corner Radius |
Create corners on all the selected side edges of the pocket(s) in the selected target assembly. See the image above. See the example usage below. |
|
Clearance |
This is the distance between the chamfer edge on the insert part and the corner edge of the pocket. If the Clearance value is negative, it is displayed in red. In some cases, the Clearance cannot be specified. This occurs if a sweep direction is not perpendicular to the sketch plane and a draft angle is used. In these cases, the Clearance parameter is unavailable in both the global and local controls (only the Chamfer Distance and Corner Radius can be specified). See the Usage Examples below. |
Usage Examples:
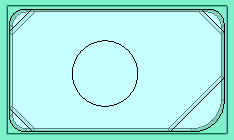
Example 1: Global and Local parameters are defined:

Result
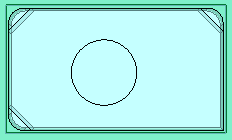
Example 2: The bottom right edge is not selected:
Result
Optional Step 2 
-
Create draft angles on the insert(s) and the resulting pocket(s). Click OKOK
 or ApplyApply
 in the Feature Guide to complete the function.
One or more insert parts are created in the target assembly and the Assembly and Feature Trees are updated.
-
Toggle the Hide/Show icons to display the target assembly with the created pockets or the new insert parts.
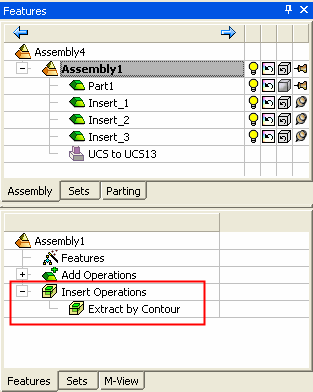
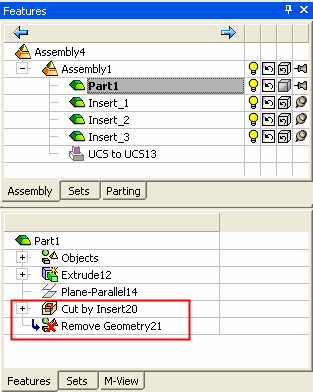
An Extract by Contour feature is created in the Feature Tree; As in any import geometry type feature, the insert feature is disassociated.
The Feature Tree of the activated target assembly shows an Extract by Contour feature.
The Feature Tree of the original part displays Cut by Insert and Remove Geometry features.

|