|
|
Piercing Faces  : Options and Results
Access: Open this function from the following location:
-
Select Die Design > Piercing Design > Piercing Faces from the menu bar.
Create faces marked as punches in the piercing hole islands. This function can be invoked after running the Hole Analysis function.
Required Step 1 
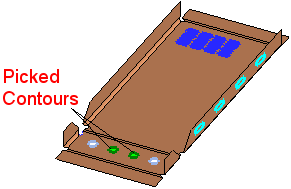
- Pick contours created by the Hole Analysis function to create/edit piercing faces.
- ExitExit the step.
Required Step 2 
-
Pick the location of the actual piercing.
The contour(s) picked in the 1st step (in the selected forming shape) are displayed in green. The corresponding contour(s) in previous forming shapes are displayed in pink, and those in later forming shapes are displayed in black.In the next forming shapes (process wise), the color of the contours around the corresponding holes to those picked in the 1st step, is pink.
In the forming shape select in the 1st step, the color of the picked contours is green. These are the contours around holes where the piercing faces are about to be created
In the previous forming shapes (process wise), the color of the contours around the corresponding holes to those picked in the 1st step, is black.
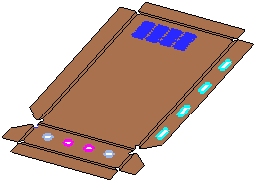

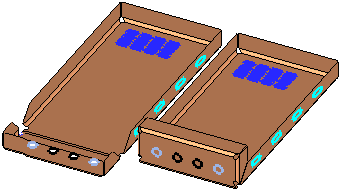
The initial location of the piercing is in the forming shape selected in the 1st step, however, you can pick another forming shape to indicate that the piercing faces will be created there.
Piercing faces are created in selected holes (formerly having green contours). Capping faces are created in corresponding holes of all previous forming shapes (formerly having black contours). Contours are removed in corresponding holes of all future forming shapes (formerly having pink contours).
Notes:
-
Piercing faces are created with the relevant color and are used later to place punches and punch units.
-
All previous forming shapes have capping faces, that have not yet been pierced.
-
All future forming shapes have no markings on already processed holes. This enables you to quickly determine what holes still need to be processed.
When picking the location of the actual piercing:
-
Contours too close to each other should not be picked; otherwise the punch units placed on the resultant piercing faces will intersect each other.
-
All picked contours within a single operation must be of the same hole group and forming shape.
-
Picking By Box can only be performed if you first pick at least one contour.
-
If you wish to restart the whole process in another location, you can clear the selection in the 1st step and start again.
-
Optional Step 1 
-
Display piercing forces for all holes, current and previous. The optional stage enables you to quickly determine what forces act on each forming shape, not only piercing forces but also bending forces.
When this option is opened, the precalculated forces are automatically displayed, for example: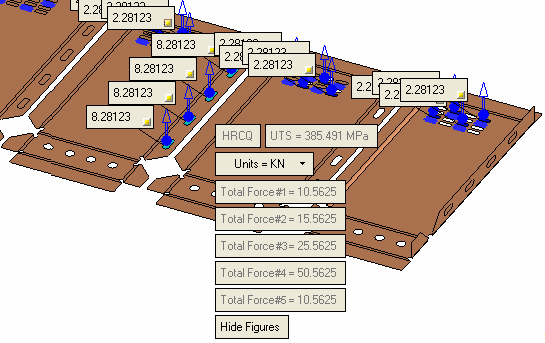
The system generated screen parameters (the ones that are displayed dimmed), show the type of material used, ultimate tensile strength (UTS) of the picked material and the total piercing force per forming shape.
The piercing forces are displayed for all the forming shapes, and for all piercing faces created in current and previous sessions.
Figures
 are shown only for forces relevant in the current session.
User controlled screen parameters are:
Units
This determines the units of force value. Options are as shown (for metric and inch unit files). Default force units are Kilo Newton (KN) for metric and Libra forces (Lbf) for inch files. This also determines the (system generated) Total Force value.
Units of force for mm files:
Units of force for inch files:


Hide Figures / Show Figures
A toggle button to show or hide all force value figures.

When the
 button (in the figures
  ) is pressed, the value is hidden. Restore the value by pressing Show Figures. Irrespective of the hide/show status, the arrow figure is still displayed.
 - Click OKOK or ApplyApply in the Feature Guide to complete the function.
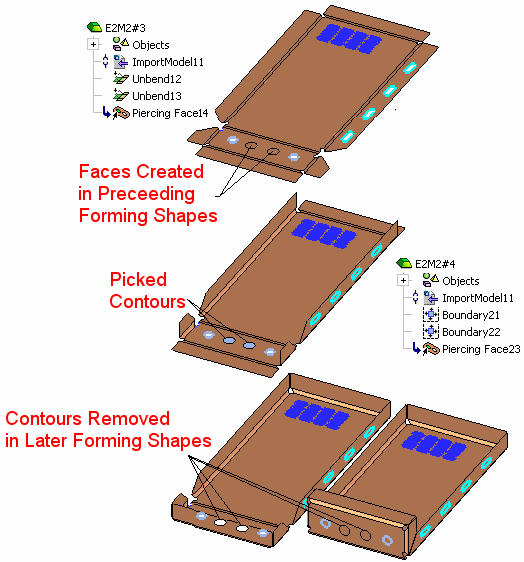
Faces having a Piercing Face attribute are created per selected contour, on relevant holes and have the same color as the picked contour.
Faces are also created on holes with edges that have the same ID in all preceding forming shapes.
These faces have the same color as the surrounding face in the relevant forming shape.
Contours on all holes having the same edge ID in all forming shapes are removed.
The Piercing Face feature is created in the Feature Tree of all forming shapes in which faces are created (the picked and also preceding forming shapes).
|

