|
|
Blank Tool  : Options and Results


Access: Open this function from one of the following locations:
-
Select Die Design > Blanking Tools > Blank from the menu bar.
-
Select Blank from the followingDie Design Guide: Die Process Design Guide (Forming).
Create or edit the blank for the electrode, using finite element analysis (FEA).
This function uses a finite element enginefinite element engine for blanking a set of adjacent (stitched) faces and creating a flat wire-body. This includes selecting which faces to create a wire body result for, defining the required parameters, defining the fixed boundaries, and transferring entities.
The Finite Element Analysis (FEA) engine used in the DieDesign application is based on technology supplied by the Forming Technologies Inc (FTI) 3rd party engine. For additional information on FTI, see www.forming.com.
The finite element engine is used in the following functions:
Whenever the finite element engine is used, resultant forces are calculated and stored for usage in the Die Forces operation.
Force Calculation: The force calculation employed depends on the type of operation being calculated. For additional information and to define some of the values used in force calculations, see the Die Force Calculation Preferences.
Correction Factor: A Die Preference option enables the setting of a default Correction Factor to manipulate forces calculated by the finite element engine. The forces displayed in the above mentioned functions will be multiplied by this factor.
The result is based on a list of parameters such as material type, thickness, some 2D boundary conditions, and more.
Required Step 1 
-
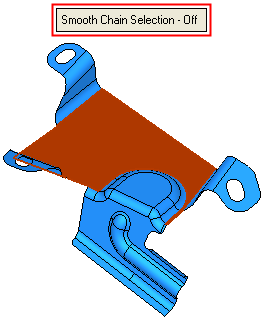
Pick the faces to blank
Smooth Chain Selection - On: the system automatically identifies (and selects) all adjacent smooth faces. Deselect faces if required.
Smooth Chain Selection - Off: only the picked faces are marked as selected.

Required Step 2 
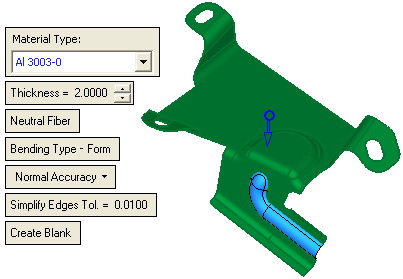
- Set the parameters, define the material side.
Some of these parameters appear in the following DieDesign functions:
These common parameters are:
Material Type
From the Material Type dropdown list, select the required material provided by the finite element engine.
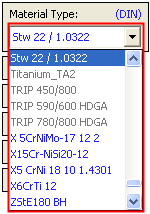
The materials displayed in this list have been entered into the Material Database. The Material Standard that is used is displayed in brackets next to the Material Type parameter name.
Materials that are defined in the selected regional standard are shown in blue. Other (generic) materials (which have no name in the defined standard) are shown in gray.
Thickness
Enter the required thickness of the sheet metal in the relevant field. The default value is derived from the Die Setup. However, you can change this value according to your requirements.
Neutral Fiber
This is a toggle option Neutral Fiber / Selected Skin:
Neutral Fiber
Select this option to offset the skin.
Selected Skin
Select this option to perform the operation without offsetting the skin.
Bending Type - Form
This is a toggle option Bending Type - Form / Bending Type - Draw:
Bending Type - Form
Select the Bending Type - FormBending Type - Form option to form the bending type.
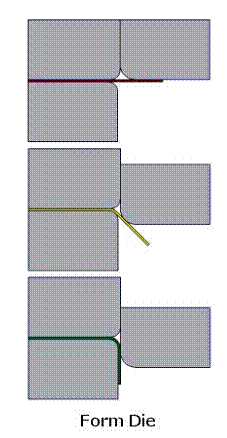
Form Die
When forming a part using a Form Die (illustrated below) use the Form Die forming process. This process is typically used in progressive dies and simple flanging operations.
In this type of operation, the blank material is not pulled through a radius, it is simply bent around it. As a result, there are no additional strains produced by friction.
Bending Type - Draw
Select the Bending Type - DrawBending Type - Draw option to draw the bending type.
Draw Die
When forming a part using draw die (as illustrated below), it is recommended to use the Draw Die forming process. As material passes over the radius on the die, additional strain is added to the part due to the friction between the part and the die and the bending and unbending process. These additional strains are not present when a part is manufactured using a form die.
The friction and bending effects are automatically considered by Forming Suite when the Draw Die setting is turned on. The Draw Die process formulation determines the areas of curvature on the part and adds the required forces and strains to any material that would flow over them during forming.
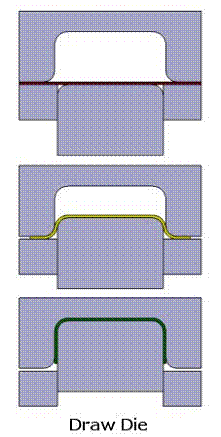
Note: when applying bend lines manually, the Draw Die process should not be used.
Normal Accuracy
Select this option to create the blank at a regular accuracy level. The dropdown list displays the Low Accuracy and High Accuracy options.
In addition to the above parameters, the following parameters also appear in the Blank function:
Simplify Edges Tol.
Enter the required Simplify Edges Tolerance value. In this case the system attempts to create analytical geometry within the specified tolerance, that is defined here.
Create Blank
This is a toggle option - Create Blank / Create Analysis Data. Select Create Blank to create the blankblank or toggle to Create Analysis Data (the analysis can also be activated from the Optional Step 3, Show Analysis Results).
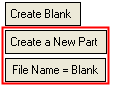
If the Blank function is used on a forming shape, an additional toggle option is displayed, Create New Part / Create a Feature in the Active Part:
 or
or 
Create New Part
Create a new part in the forming shape. An additional parameter is displayed enabling you to define the file name of the part.
Create a Feature in the Active Part
Instead of creating a new part, this option enables you to create a new feature in the active part.
Note: If required you can click the blue arrow to change the direction of the blank operation.
- ExitExit the step.
Optional Step 1 
- Define the forming conditions. The following parameters are displayed:
|
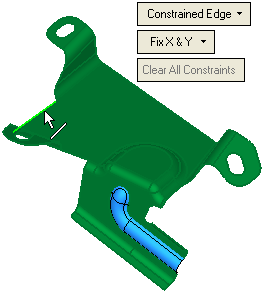
Constrained Edge |
Define the forming condition. Different forming conditions can change the forming behavior of the stamped part, and therefore the following may be dramatically affected: Blank Shape, Formability Analysis (springback and safety zone), and Forces. The various constraint options are displayed in a dropdown list.
The following forming conditions appear in the dropdown list:
|
||||||||||||||||||||||||||||||||||||||||||||||||||||||||||||||||||||||||||||||
|
Clear All Constraints |
Clear all constraints from the display. If no constraints have been defined, this parameter is dimmed. |
Optional Step 2 
-
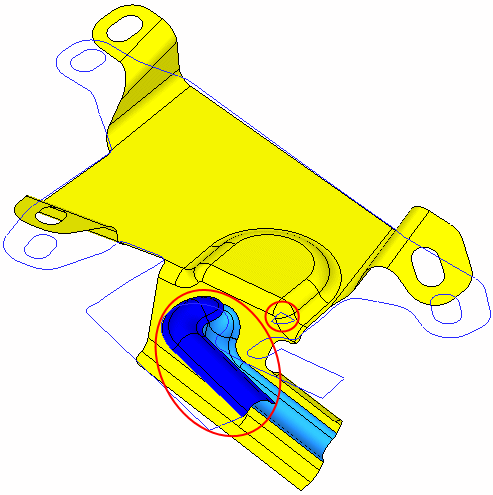
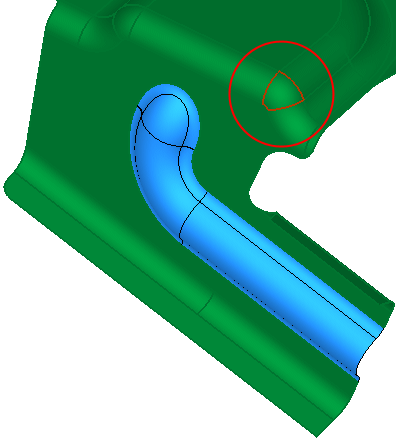
Pick additional entities to be transferred or pick point(s) that lie on the highlighted faces.
In this example, the following edges were selected, using the Filter Edges and Curves
 button:
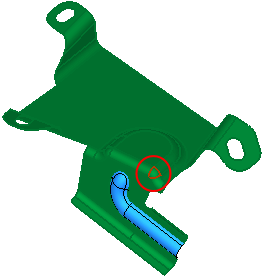
Optional Step 3  :
:
Show the analysis results. This step is identical to the appropriate options in the Show Analysis function.
![]()
Press OK ![]() or Apply
or Apply ![]() in the Feature Guide to complete the function,
in the Feature Guide to complete the function,
![]()
The entities that were selected in Optional Step 2 have been transferred to the blank shown above (marked in red).
When completed, the Blank feature will appear in the Feature Tree
![]()
|