|
|
ECO Documentation  : Dialog

Access: Open this function from one of the following locations:
Open the ECO documentation function.
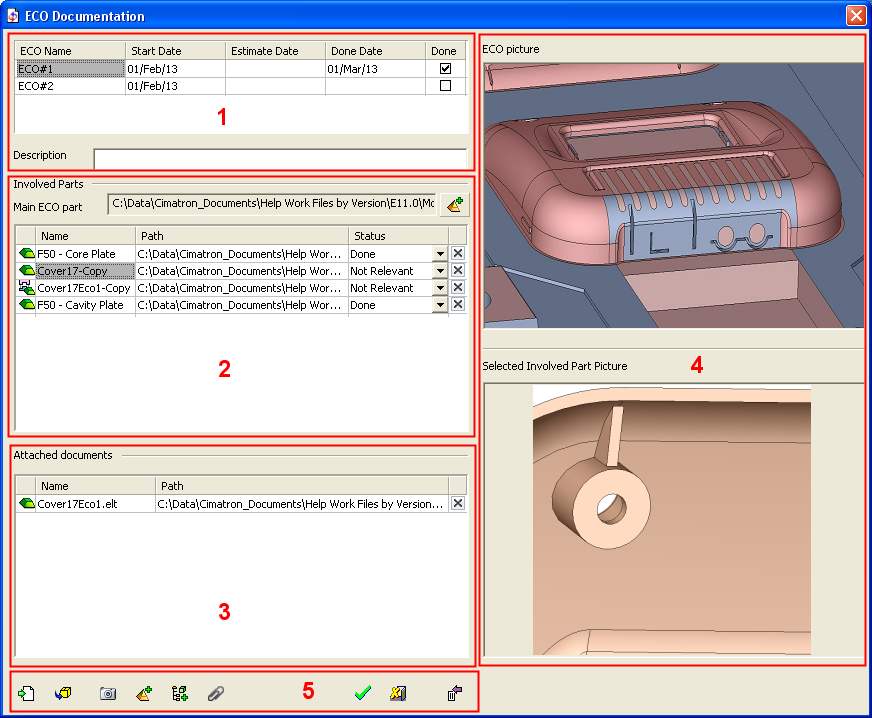
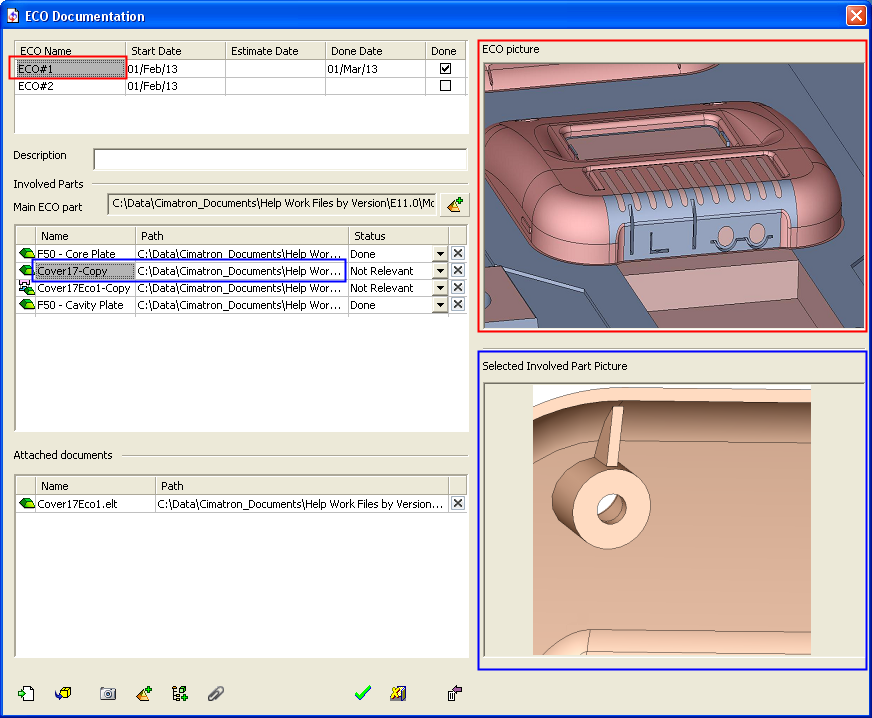
This function holds records of all ECOs done in a certain mold project. A record consists of an "ECO Name", a description of the ECO, pictures, data regarding associated ECO files, etc. It also holds the "Status", indicating what the current status of the ECO implementation is for each of the involved parts (Not Started, In Work, Done, etc.).
In a typical system development cycle, the specification or the implementation is likely to change during engineering development or during integration of the system elements. These last-minute design changes are commonly referred to as Engineering Change Orders (ECOs) and affect the functionality of a design after it has been wholly or partially completed.
The Cimatron ECO Documentation function enables you to create a log of all engineering changes, store pictures and files relevant to each ECO, generate a detailed report of all engineering changes, and backup the entire project before going into a new ECO.
Note: Default ECO comparison colors are defined in the Preferences. The colors set in the Preferences are given to any new comparison. Changes in the ECO dialog do not affect the Preferences.
The ECO Documentation dialog is displayed. The dialog is divided into the following areas (click on the links below for an explanation of the relevant area).
ECO List: This contains the ECO name, start date, estimate date, done date, status, and description.
Involved Parts List: This lists the main ECO part and the other parts involved. This list of parts is manually added.
Attached Documents List: This lists all the files attached to the ECO. Any kind of file can be attached.
Picture Area: This displays any pictures (screen images) that you wish to add to show the ECO changes, etc.
ECO List
This contains the ECO name, start date, estimate date, done date, status, and description.
|
ECO Name |
This column shows the name of the ECO as it appears in the ECO Tree. This name cannot be changed in this dialog. By default, the list is ordered by Done Date so that the most recent one is on top. To make an new item on this list, save an empty ECO folder on the ECO Tree. |
|
Start Date |
This column shows the date that this ECO first appeared on the tree. |
|
Estimate Date |
This column is created empty. It is for the customer to estimate when the ECO work will be done. |
|
Done Date |
This column shows the date when you last clicked the DONE checkbox on the right. If the checkbox is turned off, nothing will appear on this cell. |
|
Done |
This is a checkbox for you to mark the ECO as done. |
|
Description |
Enter a description of the ECO if required. |
All cells in the table area can be edited, except those in the ECO Name column. All edits change the data on the ECO Tree.
When you select a row from the table, the data related to the selected ECO is displayed in the other areas of this dialog.
Involved Parts List
This lists the main ECO part and the other parts involved in the ECO. This list of parts is manually added. The order of the rows can be changed in this dialog using Drag and Drop.
|
|
To add parts to the table, click one of the following buttons from the toolbar at the bottom of the dialog and select the required file (the part file details are then listed in the table):
Clicking ESC or <exit><exit> will cancel the add part operation and re-display the ECO Document dialog. |
 - Add a part from the
  - Add a part from the
|
Main ECO Part |
Add the main ECO part from the Cimatron window. Press the adjacent Clicking ESC or <exit><exit> will cancel the add part operation and re-display the ECO Document dialog. |
|
Name |
This column shows the name of the part. The tooltip of these cells show their full content in case you can't see all of it. |
|
Path |
This column shows the full path of the part. Double-clicking the cell opens the Cimatron Explorer on the selected path and the part is highlighted. The tooltip of these cells show their full content in case you can't see all of it. These paths are updated automatically according to the assembly’s knowledge of the files (for those that are inside the assembly). This means that when the dialog opens, the correct path is always shown. If a part was removed from the assembly or is not in the assembly, its last position is displayed. Right-click the path cell to copy the entire path. |
|
Status |
This column holds a dropdown list of status options describing the state of the ECO progress on the specific file. The content of the list is controlled from the ECO Management Preferences. The default values are:
|
|
Delete |
This column holds a Delete button for each row. Press the appropriate button to the row. |
Attached Documents List
This lists all the files attached to the ECO. Any kind of file can be attached. This list of documents is manually added. The order of the rows can be changed in this dialog using Drag and Drop.
|
|
To attach a file to the table, click the following button from the toolbar at the bottom of the dialog and select the required file (the file details are then listed in the table):
|
 - Browse and attach a file to this ECO.
|
Name |
This column shows the name of the file, including its extension. The tooltip of these cells show their full content in case you can't see all of it. |
|
Path |
This column shows the full path of the part. Double-clicking the cell opens the relevant application (based on your Microsoft® Windows® operating system). The tooltip of these cells show their full content in case you can't see all of it. |
|
Delete |
This column holds a Delete button for each row. Press the appropriate button to the row. |
Picture Area
This area displays any pictures (screen images) that you wish to add to show the ECO changes, etc.
|
|
This area displays a picture to show the changes relevant for each ECO.
To save the current screen image in the ECO Documentation dialog:
Select the ECO (in the document dialog) for which you wish to add a picture (for example, in the image above, ECO#1).
Click the ![]() button from the toolbar at the bottom of the dialog.
button from the toolbar at the bottom of the dialog.
The saved picture is displayed whenever the ECO#1 is selected.
Selected Involved Part Picture:
This area displays a picture of the Involved Part selected from the table of parts involved in the ECO. If a picture of the selected part exists, it is displayed.
The saved picture is displayed whenever the involved part is selected in the Involved Parts table.
Toolbar
The following buttons appear in the toolbar:
|
|
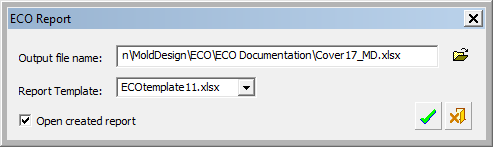
Create Report: Create a report detailing all the information contained in the dialog. The ECO Report dialog is displayed. The default name and location of the report file is that of the involved assembly. Set the options as required.
The following report file format is available: Excel File (*.xlsx) File Format Information for ReportsFile Format Information for Reports Definitions of the available report file format templates are listed below. The last used save type is retained for the next save.
|
|
|
Pack to CTF: Create a CTF out of all the involved parts and files. The Pack to CTF dialog is displayed enabling you to change the save location. The default name and location of the report file is that of the main ECO part as defined in the ECO Documentation dialog. Set the options as required. |
|
|
Save Screen Image: Save the current screen image and set it as the ECO image in the ECO Documentation dialog. |
|
|
Add Involved Part from Assembly: Add a part to the Involved Parts table, from the Cimatron window. The Cimatron window is displayed; select the required part, either from the graphics area or from the Tree area. Selecting a part will re-display the ECO Document dialog, with the selected part listed in the table. Clicking ESC or <exit><exit> will cancel the add part operation and re-display the ECO Document dialog. |
|
|
Add Involved Part from Browser: Add a part to the Involved Parts table from the Cimatron Explorer. The Cimatron Explorer is displayed. Select the required part. Selecting a part will re-display the ECO Document dialog with the selected part listed in the table. |
|
|
Attach Document: Attach a file to the Attached Documents table. A dialog is displayed. Select the required file. Selecting a file will re-display the ECO Document dialog with the selected part listed in the table. |
|
|
Legacy ECO Doc.: Open the Legacy ECO Documentation tool. This button only appears in the toolbar if legacy ECO documentation information is available for the ECO. The Legacy ECO Documentation tool can only be accessed from the current ECO Documentation tool and only if legacy ECO documentation information is available for the ECO. |
|
|
OK: Accept the changes, perform the operation, and close the current dialog/task. |
|
|
Cancel: Cancel all changes and close the dialog/task without saving the settings. |
|
|
Collapse / Expand: Collapse/Expand the dialog to hide/show the right half of the dialog containing the pictures. |


|