|
|
Electrode Setup Wizard 
![]()
![]()
Access: Invoke this function from one of the following locations:
-
Click the Electrode Setup Wizard
button from the initial toolbar. -
Select Tools > Setup Wizards > Electrode Setup Wizard from the initial menu bar.
Setup a new Electrode Project.
A Cimatron electrode project starts by creating an assembly and then adding the cavity to be burned. The Electrode Setup Wizard assists you in setting up a new Electrode file by prompting you to define the appropriate parameters.
An Assembly file is then opened. The Assembly Name defined in the wizard is displayed in the assembly tree on the left of the screen, and the Electrode Guide is displayed on the right side of the screen. The component file is added to the assembly (see below).
Upon completion of the Electrode Setup Wizard, continue with the Electrode creation using the Electrode Guide Toolbar to guide you through the logical order.
The Setup Wizard can be invokedinvoked at any time, whether or not another file is open.
General Interaction
The Electrode Setup Wizard dialog is displayed. Define the following parameters:
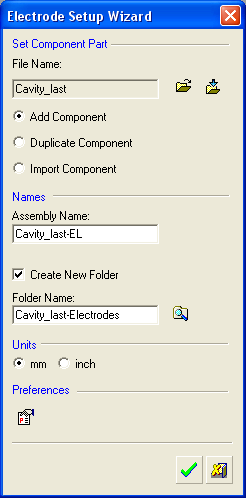
-
Select the Component Part file in one of the following ways:
-
Open File
 : Open a Cimatron Part or Assembly file (from the Cimatron Explorer) for which you wish to create an electrode (mold component).
 -
Import File
 : Import an external file (PFM, IGES, SAT, etc.).
-
The Assembly Name and Folder Name for the electrode are automatically created based on the Name Generator fields defined in the Electrode Preferences.
-
Select the appropriate radio button option to add the cavity to be burned:
|
Add Component |
The selected component is added to the assembly. This option creates a direct link so any change made to the cavity in the electrode assembly will also be seen in the mold design. |
|
Duplicate Component |
Create a copy of the selected component. This option creates a copy of the cavity block part for the electrode project. Working on a copy means that no accidental damage can be made to the mold design, but it also means that it will become out of sync if the mold design changes.
|
|
Import Component |
Import the geometry of the component into a new part. This option also creates a copy of the cavity for electrode use but uses an associative Import feature. This creates a one-way relationship that provides the benefit of getting design changes updated automatically, coupled with the safety measure of having a separate file for the electrode project.
|
Note: For each of the above options, if a part with the same name already exists, a counter is added to the part name (#01).
-
Set the working Assembly file name.
If the Create New Folder checkbox is enabled, a new folder will be created uner the folder that holds the master file. The working file will be created inside that folder. -
Set the new folder name.
If the new folder is to be placed under a different folder, select the new folder location in the Folder Location field (see step 5.) -
Set the folder location.
Click the Browse button to select the folder location that will contain the working Assembly folder and related file(s). By default, the location is C:\Cimatron_Documents.
 -
Define the units of measurement for the file.
-
Select the appropriate component part material from the Component Part Material pulldown menu.
By default, the material value is taken from the part. If the part file already has a material defined, this selection will be grayed out and you will not be able to select a material. If the part does not have a material defined, you can use the Component Part Material pulldown menu to select a material from the Cimatron Global Material Library Table. -
Click the Preferences
 button to change the Electrode Preferences, if required.
 -
Press the appropriate confirmation button:
 Cancel and exit the dialog.
 OK to accept the data in the dialog and continue with the Electrode creation using the Electrode Guide to guide you through the logical order.
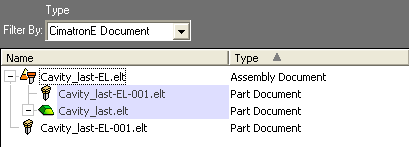
The assembly file is opened with the Assembly Name displayed in the Assembly Tree. The Assembly Name for the electrode is automatically created based on the Name Generator fields defined in the Electrode Preferences.
The component file is added to the assembly

In the Cimatron Explorer, these appear as follows (in the example below, an Electrode has been added):
|