|
|
Parametric Import  : Options and Results

Access: Open this function from the following location:
-
Select File > Import > Parametric Import from the Part menu bar.
Import the geometry of a part file while allowing to change the values of its leading dimensions and merge it with an existing body.
Parametric import enables you to import models (via the Cimatron Explorer), as well as edit the model’s leading dimensions (which allows adjusting the size or shape of the imported geometry) both on-the-fly and in edit mode. Positioning the imported part can be done by points or coordinate systems, and the import can be merged with the working model.
When Parametric Import is selected, the Cimatron Explorer is displayed.
Required Step 1 
The Cimatron Explorer is displayed. Select the part to be imported.
The model is displayed in the graphics area and is positioned by default on the Model UCS of the current part file. The imported part can be repositioned and rotated as required.
Required Step 2 
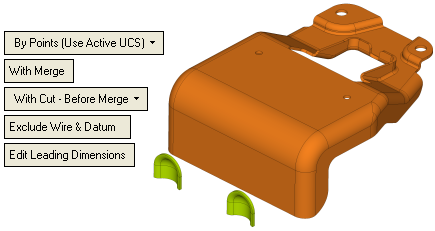
Select points or UCS, and set import options or edit leading dimensions (which allows adjusting the size or shape of the imported geometry). The following parameters are displayed:
|
By Points (Use Active UCS) |
Select the option to position the imported part. The following dropdown options are available:
|
||||||
|
With Merge |
Add the model, with or without merging it, by toggling between With Merge / Without Merge. If the imported part contains only cutting objects, Without Merge is the only displayed option (it is displayed grayed out). |
||||||
|
With Cut - Before Merge |
Add the model with or without cut. The following dropdown options are available:
If the imported part does not contain cutting objects, only the Without Cut option is displayed (it is displayed grayed out). The With Cut options enable you to choose whether to cut before or after merging the imported part. |
||||||
|
Exclude Wire & Datum |
Add the model with or without wire and datum information by toggling between Import All Geometry and Exclude Wire & Datum. |
||||||
|
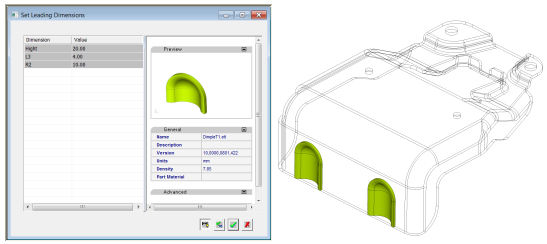
Edit Leading Dimensions |
Edit the leading dimensions of the imported model (which allows adjusting the size or shape of the imported geometry). The following dialog box is displayed:
|
Optional Step 1 
Set the offset and rotation parameters. The following options are available:
Press Flip to rotate the added component by 180 degrees.
Optional Step 2 
Pick a UCS on the added part to position the part. The following options are available:
Optional Step 3 
Change the active object (temporarily).
When you have set the parameters, press OK ![]() or Apply
or Apply ![]() in the Feature Guide to complete the function.
in the Feature Guide to complete the function.
A Parametric Import feature is displayed in the Feature Tree with the disassociate icon  .
.
Note: For information regarding associativity in import/export operations in the Part application, see Associativity.
Notes:
-
You can import more than one part to a model file.
-
The location and orientation of the imported part will be set according to that of the source part.
-
All sets in the source file will be imported into the client file. Sets already existing in the client file are not overwritten by imported sets.
-
Imported sets are unassociated with the source file.

|