|
|
Edit Add Rules  / Rules Editor
Access: Open this function from the following location:
-
Select Catalog > Catalog Part Definitions > Edit Add Rules from the menu bar.
Edit the rules used when adding components.
When adding a catalog component, you can apply certain rules regarding the location and/or size of the added components, by using the Add Rules functionality. The Rules Editor is an editing tool that enables you to add new rules, delete rules or modify existing rules.
InvokeInvoke the Rules Editor to display the Rules Editor dialog showing information about the catalog and any existing rules:
|
|
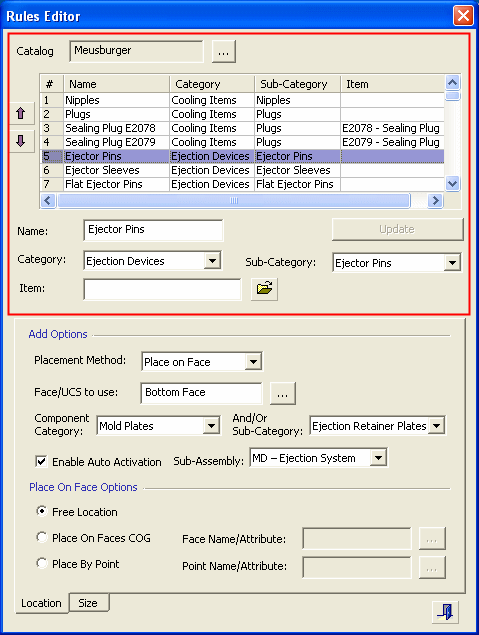
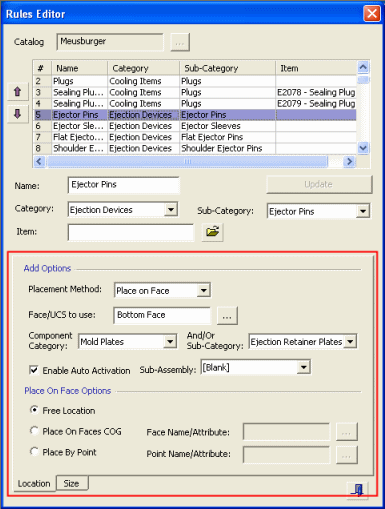
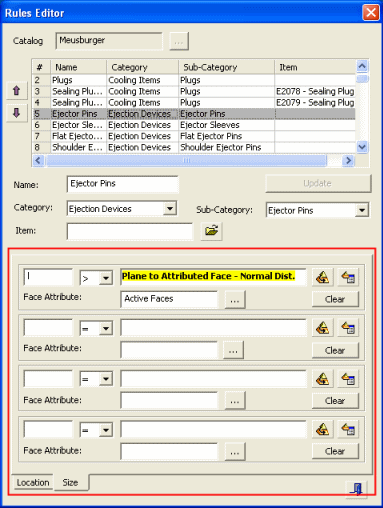
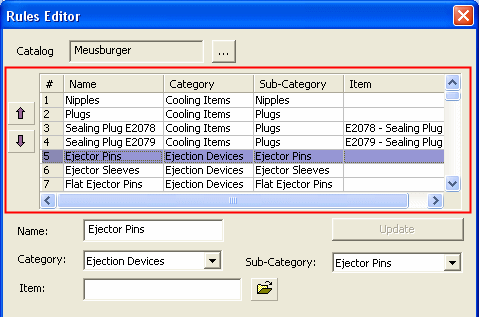
The top half of the Rules Editor dialog (marked by the red box in the image on the left) is a general area which displays the catalog name, all rules defined for the catalog, and whether each rule is defined for the catalog Category, Sub-Category or a specific Item. This general area is also used to create, edit and delete rules and enables you to change the order of the rules in the displayed table. For detailed information, see: The bottom half of the dialog displays the specific rule data in Location and Size tabs; see the examples below. See Using Add Rules and Examples of Add Rules. |
Examples of the bottom half of the Rules Editor dialog displaying the specific rule data in Location and Size tabs.Examples of the bottom half of the Rules Editor dialog displaying the specific rule data in Location and Size tabs.
|
Locations tab displaying the Location Rules: |
Size tab displaying the Size Rules: |
|
|
|
Add Rules are divided into two categories, Location (Placing) Rules and Size Rules.
Location/Placing Rules:
-
Define on which plane the component is located.
-
When applied, the rule will automatically select a placement plane, cone face or the UCS where the component is to be placed. In addition, when placed upon a plane, the components can be positioned on predetermined points or the center of geometry of predefined faces.
Size Rules:
-
Define the parametric relation between the added part and other components that are already in the assembly.
-
The rule defines a parametric relation between one of the new component dimensions, to other component dimensions in the assembly. For example, a rule can define that the length of the "Support Pillars" is equal to the width of the "Riser Plate". When applied, the rule will automatically select parameter values for added components. The parameter value may be linked to a local parameter such as the distance from an active face, or to a global setup parameter.
General Area Parameters
|
Catalog |
The name of the catalog currently being edited. Browse to select a different catalog. If the Rules Editor was invoked from within an "Add Component" dialog (by pressing the Edit Rules button), the corresponding catalog is already selected and the browsing button is disabled (grayed-out). Rule Table:
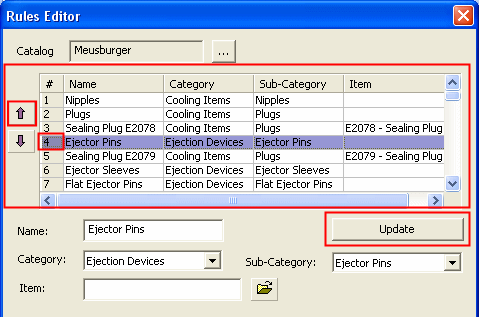
If required, change the table order by selecting a rule row and moving it up or down using the arrow buttons next to the table.
|
|
Name |
The name of the rule. |
|
Category |
The catalog category to which the rule applies. A dropdown list of categories is available. If only a Category name is defined, the rule applies to the whole category.
Notes:
|
|
Sub-Category |
The catalog sub-category to which the rule applies. A dropdown list of sub-categories is available. If a Sub-Category name is defined (with no Item name), the rule applies to the whole sub-category, irrespective of the Category name (if the name is displayed; see the notes below).
Notes:
|
|
Item |
The catalog item to which the rule applies. If required, browse to get the appropriate item. If an Item name is defined, the rule applies to the specific item, irrespective of the Category and Sub-Category names (if the names are displayed; see the notes below).
Notes:
|
|
Update |
The Update button is, by default, disabled (grayed out). It becomes enabled in the following cases: When editing an existing rule; either by changing any of the field values or by changing the location of a rule in the Rule Table. When a new rule is defined. In this case, the Update button is only enabled when the Category, Sub-Category or Item is defined.
Note: If you have edited a rule or defined a new rule and then select another rule from the Rule Table without pressing the Update button, a message is displayed prompting you to "Update". |
Creating a new rule
-
InvokeInvoke the Rules Editor.
-
Browse to and select the relevant catalog for which the rule is to be defined.
-
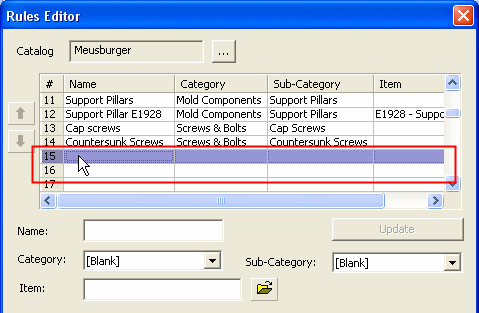
Select an empty row in the table of existing rules. All fields in the dialog, also in the Location and Size tabs, are displayed empty.
-
Enter all the data relevant to the rule. This includes general data (such as whether it is defined for a catalog Category, Sub-Category or a specific Item) and also relevant Location and Size rules.
-
If required, change the location of the new rule in the Rule Table by using the arrow buttons next to the table.
-
Click Update.
Editing a rule
-
InvokeInvoke the Rules Editor.
-
Browse to and select the relevant catalog.
-
Select the appropriate rule in the table of existing rules. When a table row is selected, all the relevant rule data is displayed in the dialog, including in the Location and Size tabs.
-
Edit the relevant data. This can include any data in the general area (such as whether it is defined for a catalog Category, Sub-Category or a specific Item) and also in the Location and Size rules.
-
If required, change the location of the rule in the Rule Table by using the arrow buttons next to the table.
-
Click Update.
Deleting a rule
-
InvokeInvoke the Rules Editor.
-
Browse to and select the relevant catalog.
-
Right-click on the appropriate rule in the table of existing rules and select Delete from the popup menu.
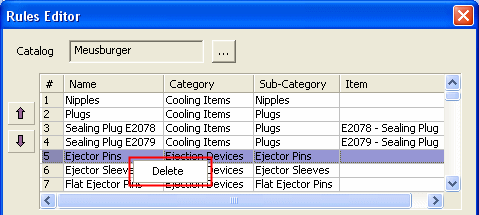
- A confirmation message is displayed. Approve the deletion request.
Related Topics
|

 Type your drop-down text here.


