|
|
Threads and Ejectors  : Options and Results


Access: Invoke this function from one of the following locations:
-
Select Tools > Main Tools > Threads & Ejectors from the menu bar.
-
Select the
Threads
and Ejectors icon from the Hole Attributes
toolbar.
Attach Thread or Ejector attributes to circular edges and faces, closed loop edges, or edges that have adjacent conic faces.
Required Step 1 
Pick the entity to which the Thread or Ejector attribute is to be attached and set the parameters as required.
The following entities can be picked: circular edges and faces, closed loop edges, or edges that have adjacent conic faces. Multiple entities can be picked by using box selection.
The following parameters are displayed:
|
Pick the required entity. |
|
|
|
|
|
Once picked, the appropriate symbol is displayed on the entity, either Thread or . . . |
Ejector Pin. |
|
|
|
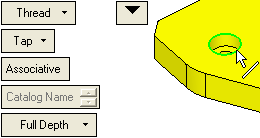
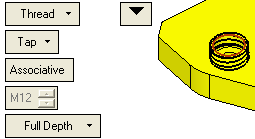
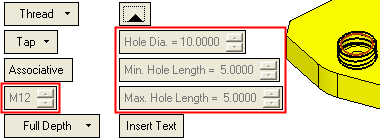
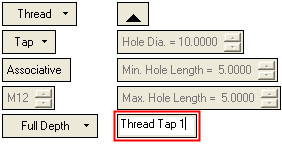
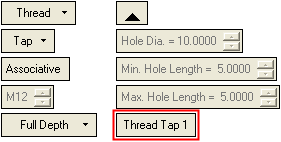
Set the parameters:
|
Thread |
This is a dropdown list that enables you to define the type of attribute to attach to the selected entity. The dropdown list options are as follows:
|
||||||||||||||
|
|
|||||||||||||||
|
Thread |
Attach Thread attributes to the selected entity. If this option is selected, additional parameters are available; toggle the parameters expand/collapse button
These dropdown parameters are initially set to their default values until the entity to be threaded is selected. The default value for the Hole Diameter parameter is the diameter of the last selected entity to be threaded. When the entity to be threaded is selected, the thread symbol is attached to the entity and the dropdown grayed out parameter values are automatically updated to reflect the dimensions of the entity. These parameters include the hole diameter and the minimum and maximum hole length. The thread symbol is attached to the entity and the dropdown grayed out parameter values are automatically updated to reflect the dimensions of the entity.
|
||||||||||||||
|
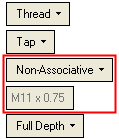
Tap |
This is a dropdown list that enables you to define the type of attribute to attach to the selected entity. The dropdown list options are as follows:
|
||||||||||||||
|
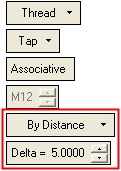
Associative |
This is a dropdown list that enables you to define Threads as either associated or non-associated catalog threads or to manually enter the thread diameter.
Notes:
|
||||||||||||||
|
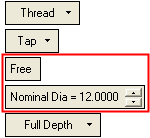
<Thread Type/Size> |
This field displays either the associative or non-associative catalog name or if the Free option is selected above, this field displays the nominal diameter of the hole/shaft. |
||||||||||||||
|
Full Depth |
This is a dropdown list that enables you to define the depth of the thread:
|
||||||||||||||
|
|
|||||||||||||||
|
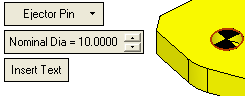
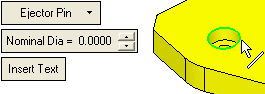
Ejector Pin |
Attach Ejector Pin attributes to the selected entity. When the appropriate entity is selected, the ejector pin symbol is attached to the entity and the Nominal Diameter parameter is automatically updated to reflect the dimensions of the entity.
|
||||||||||||||
|
Nominal Diameter |
Enter the diameter of the ejector pin. Once the required entity has been selected, this value is automatically updated to reflect the dimensions of the entity. However, this value can be edited and the preview of the ejector pin symbol changes in accordance to the value entered. |
||||||||||||||
|
Insert Text |
Enter any text that is to be attached to the ejector pin. See the Insert Text parameter explanation under the Thread parameters. |
||||||||||||||
|
|
|||||||||||||||
|
Delete |
Delete previously attached attributes, either by picking them individually or by deleting them all. |
||||||||||||||


Notes:
-
The thread attributes (type, color, etc.) can be defined in the Preferences.
-
Using the Cimatron Data Interface application, the thread symbol can be exported as wireframe entities to other CAD file formats.
-
The thread symbols can be hidden during ZPR (Zoom, Pan, and Rotate) operations.
-
Dimensions created on edges of faces with a thread/tap attribute will get the data automatically. See Radial Dimensions for additional information.
Optional Step 1 
Select the required Catalog and Thread Type. This step enables you to select the Catalog Name for the "Associative" and "Non-Associative" threads and also the Thread Type for "Non-Associative" threads only. This step is not available for "Free" threads.
The Thread Catalog dialog is displayed:
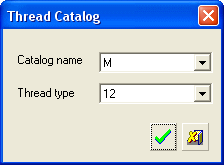
Notes:
-
For Associative catalog threads, the Thread Type field is not available as this field value is automatically updated in the screen parameter field (as part of the Catalog Name in required step 1 - above) if the hole/shaft size changes.
-
For Non-Associative catalog threads, all the fields in this dialog are available. This field value is NOT automatically updated in the screen parameter field (required step 1 - above) if the hole/shaft size changes.
-
This optional step is not available if the Free dropdown list option is selected above.
The thread catalog is a standard CSV file (threads.csv) located in folder \Cimatron\Data\ and can be fully edited.
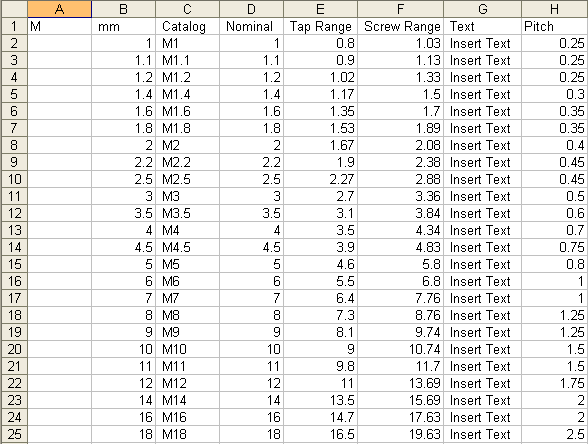
Catalog Name Definition
"Hole" Type Thread
The system looks for the first "mm" catalog, then the row (Max Tap diameter) with a nominal diameter which is the closest to the diameter and larger than the diameter of the cylinder attached to the edge. Then the string in the fourth column (Catalog String) is shown in the screen parameter field.
mm: If the diameter of the cylinder attached to the edge is 10 mm and the row matching this diameter (in the first, "mm" catalog "M") is 11 (9.8 is too small), the text in the screen parameter field will appear as "M12".
Inch: If the diameter of the cylinder attached to the edge is 1 inch and the row matching this diameter (in the first, "inch" catalog "UNC") is 1.0468, the text in the screen parameter field will appear as: "1 1/8 -7 UNC".
"Shaft" Type Thread (Screws, Bolts)
The system looks for the first "mm" catalog, then the row (Max Screw diameter) with a nominal diameter that is the closest to the diameter and larger than the diameter of the cylinder attached to edge. Then the string in the fourth column (Catalog String) is shown in the screen parameter field.
mm: If the diameter of the cylinder attached to the edge is 11 mm and the first "mm" catalog is "M" and in this catalog the first Max Screw diameter is 11.7, the text in the screen parameter field will appear as "M11".
Inch: If the diameter of the cylinder attached to the edge is 1 inch and the row matching this diameter (in the first "inch" catalog "UNC") is 1.0982, the text in the screen parameter field will appear as: "1 -8 UNC".
Notes:
-
For each catalog row, the second column is the Thread type (selected by the user from the list), the third column is the actual nominal diameter of the thread (in mm or inch according to the definition in the header row). The fourth column is the screen parameter field text and the last column is the attached text.
-
The "header" row must start in the first column.
-
The string after the comma must be mm or inch. If not, the entire catalog will be ignored.
-
If no unit definition (mm / inch) is defined in column 2 for the catalog name (column 1), it will be treated as mm.
-
The "quotation" marks in the Thread type column will be ignored.
-
A comma must be inserted between groups in the row.
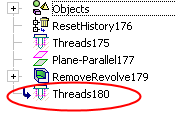
When completed, the Threads & Ejectors function will appear in the Feature Tree as follows:

|